B7100 Quick Attach

   / B7100 Quick Attach #1  

charlz

Elite Member
Joined
Jul 22, 2006
Messages
2,941
Location
Meridian Idaho
Tractor
Kubota B7100D
Yep, another quick attach thread! :D This time for an old, small tractor though.

I've wanted a quick attach for a while so I could make other loader attachments. I have clamp-on bucket forks that I use for a variety of uses but have seen their limitations. I would like a 'real' set as well as a light duty brush grapple. Moving tree trimmings/brush cuttings in particular is what I want the grapple for. Seems like I am always snagging what I am carrying on other trees, gates etc and have to climb off, restack etc etc. I could go with an add-on grapple to my bucket and continue to use the clamp on forks for limbs/brush but then I wouldn't get to build as much stuff! ;)

I chose the 'skidsteer' style as anything I build could potentially be used by a future 'new' tractor. Other quick attach solutions would be lighter but not offer me the same future flexibility.

Couple of challenges, my loader is rated at 500lbs... although I have picked up 800lbs of wood pellets with it. I have a round back-bucket, not as easy to work with as a flat-back bucket.

So I started out by first building the adapter plate that would go on the bucket. I figured this would help get my dimensions, alignment, etc. down when building the tractor side. It took some deciphering of the specifications, looking at lots of pictures and other builds here on TBN but this is what I ended up with:

001 (2).jpg

All the parts cut out of 1/4 plate using my plasma with a straight edge and drag tip. Corners cut using a piece of pipe as a guide. I bought a bunch of it cheap off Craigslist and the original bucket brackets are made from 1/4 so that is what I used.

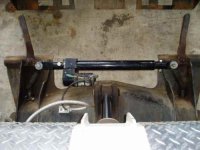
Here it is tacked up on my 'work bench', I had the bottom angle wrong but luckily I caught it before getting too far and was able to knock it off and weld on at the proper angle.

007 (2).jpg

I thought it turned out pretty good... but it weighed in at 40 lbs, too heavy! But it would work to help me set up the tractor adapter.
 
   / B7100 Quick Attach
  • Thread Starter
#3  
I started to layout the tractor side adapter using the quick attach plate as a guide. I quickly ran up against the problem of what locking mechanism to use. I spent a good month staring at it, looking at other builds, trying to figure out how I could make something without any machine tools.

Then just before Thanksgiving an old Atlas/Craftsman 101.04703 12x36 lathe showed up on Craigslist about 2 hours north. Machine tools don't often show up in this part of the country much less inexpensive ones unless they are from HF. The guy was asking way too much ($1500) but I figured while everyone else was laughing I could be negotiating so I sent him an email and we started a conversation. I did some research found out better pricing, explained it all to him and we agreed on a price of $425 for the lathe with almost no tooling. This is still a little high compared to other parts of the country for this lathe but I was willing to pay it, depending on condition, as it might be years before another inexpensive lathe showed up.

Naturally it snowed all the night before and all day on the day I was scheduled to pick it up. Made for a long drive up and back on nasty roads but at least there wasn't much traffic :)

My research had showed this was a 'hobby' level lathe but using a lathe is something I always wanted to learn and this was a cheap way to get some experience. It would also work perfect to make a few parts here and there for 'tractor builds'. Turning pins, making weld-on threaded studs etc etc. This guys Uncle had bought it when new and used it in his shop. The guy I got it from had if for about 20 years, the last 10 of which it just sat and collected dust.

Here is the lathe in its new home in my shop:
002.jpg

The ways were pretty much perfect even though the whole thing was very dirty. When this lathe was used a lot of that time was turning wood.

008.jpg


So with a new toy... er tool! in the shop I started to make the locking parts. I picked up some 5/8 cold rolled for the long locking shaft and sliding stud, used some old, rusted up 1/2 I had laying around for the weld-on stud. The handle came from an old disk I used to make a row hipper, they were used to actuate the disk scrapers. I had to relocate the existing hole and add a new one to get the action I wanted.

Here is the top end. the shaft at the bottom is my first attempt at threading on a lathe... and actually the second thing I turned! Ugly but it works, the other pieces turned out a little nicer. Turns out I really didn't need that much thread anyway, the more you compress the spring the 'looser' it makes the handle:

021.jpg
Bottom end, shaft ground down with a bench grinder. The locking pin is made from 1" square stock I had left over from the disk. I drilled through the 'top' and threaded the 'bottom' for the bolt. The shaft can 'wiggle' on the bolt:

023.jpg
'Before and After' of the locking handles:


020.jpg
 
   / B7100 Quick Attach
  • Thread Starter
#4  
This post gets me caught up to where I currently am, needing to figure out how to put the attachment points on the round back bucket.

Once I figured out the locking mechanism things moved pretty fast. I cut the brackets off the bucket and cut the 'round' part off to weld them on the tractor adapter. I took a cue from Ductape on his quick attach modification and spent _days_ in front of the drill press making things lighter... I could have went with lighter material but I already had a pile of 1/4 plate and a drill press so.... :rolleyes:

Here is what I ended up with:

002.jpg

005.jpg

008.jpg

Still weighs in a 35lbs even though it is mostly holes ;) That piece of angle iron is a little lightweight now but with the cross arm on the loader not too far away I think it will be OK. I still need to weld in the 'stop blocks' between the loader brackets. The original bucket had these so that both cylinders would 'stop' at the same point and keep the bucket level.

Now the next trick is mounting attachment plates on the bucket. Looks like my pretty adapter plate is going to have a date with the plasma :eek:
 
   / B7100 Quick Attach #5  
Charlz,
WOW! Very impressive. You should go into business.

I had two B7100's (old/new model), great little machines, work horses, never any real issues. I currently have a B7500 and would love to have a system like yours, but alas, it doesn't appear that anyone makes one, and if they do, it would cost prohibitive.

Good look with the rest of your project!
Teach
 
   / B7100 Quick Attach #6  
Charlz,
WOW! Very impressive. You should go into business.

I had two B7100's (old/new model), great little machines, work horses, never any real issues. I currently have a B7500 and would love to have a system like yours, but alas, it doesn't appear that anyone makes one, and if they do, it would cost prohibitive.

Good look with the rest of your project!
Teach

I actually had a quick attach made for my B7610 that is similar to the factory one for the larger B's. It cost me about $275 in material and labor. I still need to get it painted or powered-coated, so I haven't put in on yet. When I get my pin-on fork modified to fit, I'll install it (the pin-on fork is from my B7100 -- I had two of them too), different loader arm spacing. This type of QA uses the bucket unmodified. I'll post some pictures when I get around to taking them.

J.
 
   / B7100 Quick Attach #7  
Nice work ! All that swiss cheese looks farmiliar, as i did that to mine also.
 
   / B7100 Quick Attach #8  
Very nice! I built my own also (see http://www.tractorbynet.com/forums/build-yourself/141029-tractor-side-shuttle-shift-quick.html).

I like that your attachment does not displace the bucket any further from the pins - maintains lift and curl performance.

I have a couple of suggestions though;

Add a small gusset between the top angle (45 deg) and the loader pin bracket. This will prevent the flat stock from flexing especially with all the "speed holes" (Homer Simpson;)) in the material. It might be strong enough to not fail but movement may cause your lock pin to tighten and jam.

Also, the holey angle iron between the sides might not be strong enough. There has been debate about how important (structurally) this piece has to be but you will likely bend or twist that angle if you only get one side of the bucket hooked (this does happen). I understand that your loader does not have a huge lift capacity but you can subject it to a lot of stress with the tractor.

I like your design; I had to use a different configuration because my loader arms lined up on top of the QA pins. With my setup I was able to have both lock pins work off of one lock handle which is really nice and now I can make it remote control!:cool:
 
   / B7100 Quick Attach
  • Thread Starter
#9  

Your drawings are some of the ones in my pile! ;) Thanks for posting those. :)

I like that your attachment does not displace the bucket any further from the pins - maintains lift and curl performance.
It does but only about 1/4 to 3/8 of an inch.


I have a couple of suggestions though;

Add a small gusset between the top angle (45 deg) and the loader pin bracket. This will prevent the flat stock from flexing especially with all the "speed holes" (Homer Simpson;)) in the material. It might be strong enough to not fail but movement may cause your lock pin to tighten and jam.

Yeah I left that one 'path' through the holes to help stiffen things at the top. By gusset do you mean just welded to those pieces (air underneath) or also welded along the flat plate?

Also, the holey angle iron between the sides might not be strong enough. There has been debate about how important (structurally) this piece has to be but you will likely bend or twist that angle if you only get one side of the bucket hooked (this does happen). I understand that your loader does not have a huge lift capacity but you can subject it to a lot of stress with the tractor.

Hmmm hadn't thought about pressure more on one side of the bucket than the other. It _is_ twisty and I had really only thought about when the curl cylinders come full back. (need to put those 'stop blocks' back in)I used angle because I have a pile of it, another cragislist buy :D , but actually liked the idea of tube better.

The other thing I am a little concerned about is the 'softness' of the locking pins. Been wondering if it is better to have 'hard' pins?
 
   / B7100 Quick Attach
  • Thread Starter
#10  
I have one question for the group. As I am looking at how to attach the plate to the bucket it looks like I might need to raise the QA plate so the attachment points are slightly higher than stock, like an inch or so. Making the bucket 'lower' compared to the lift arms.

When using the bucket I like to fully curl it back, put the weight of the tractor on it and back drag. This leaves a nice, smooth, somewhat packed finish to the dirt. The curve of the bucket works perfect for this. Because of this I kept the plates the cylinders connect to as low as possible. However after studying it a bit and looking at the scratch marks on the bucket I think the locking pins and lower part of the adapter might get in the dirt a little.

So is 'lowering' the bucket in relationship to the arms about 1" a 'bad thing'? I am thinking of tacking the plate to the bucket enough to put it back on the tractor for a better look-see.
 
   / B7100 Quick Attach #11  
charlz


Found a picture of something that you might can use on your adapter. A linear actuator for open and closing the locking pins.
 

Attachments

  • 3_Open2.jpg
    3_Open2.jpg
    28.1 KB · Views: 349
   / B7100 Quick Attach
  • Thread Starter
#12  
Found a picture of something that you might can use on your adapter. A linear actuator for open and closing the locking pins.

That would be sweet! Doesn't help much with the weight issue though. Nice thing about a small tractor is I could just use one of these:

cornbroom.jpg


:D

if I could find a place to carry it! :rolleyes:
 
   / B7100 Quick Attach #13  
Your drawings are some of the ones in my pile! ;) Thanks for posting those. :)


It does but only about 1/4 to 3/8 of an inch.


Yeah I left that one 'path' through the holes to help stiffen things at the top. By gusset do you mean just welded to those pieces (air underneath) or also welded along the flat plate?


Hmmm hadn't thought about pressure more on one side of the bucket than the other. It _is_ twisty and I had really only thought about when the curl cylinders come full back. (need to put those 'stop blocks' back in)I used angle because I have a pile of it, another cragislist buy :D , but actually liked the idea of tube better.

The other thing I am a little concerned about is the 'softness' of the locking pins. Been wondering if it is better to have 'hard' pins?

I know that your bucket would be out a little. Aftermarket QA plates add two inches or more...

For the gusset, you don't need much. See my hack of your picture. I would do this for both the top and bottom. Doesn't add much weight and would do alot for rigidity.
qa mod.JPG
 
   / B7100 Quick Attach #14  
I have one question for the group. As I am looking at how to attach the plate to the bucket it looks like I might need to raise the QA plate so the attachment points are slightly higher than stock, like an inch or so. Making the bucket 'lower' compared to the lift arms.

When using the bucket I like to fully curl it back, put the weight of the tractor on it and back drag. This leaves a nice, smooth, somewhat packed finish to the dirt. The curve of the bucket works perfect for this. Because of this I kept the plates the cylinders connect to as low as possible. However after studying it a bit and looking at the scratch marks on the bucket I think the locking pins and lower part of the adapter might get in the dirt a little.

So is 'lowering' the bucket in relationship to the arms about 1" a 'bad thing'? I am thinking of tacking the plate to the bucket enough to put it back on the tractor for a better look-see.

When I grade backwards like this I always use the lip of the bucket. The bucket lip has a wear edge; better than wearing out the back of the bucket. Not sure which method does a nicer job though.:)

I prefer to maintain lift height so I would stick with the original location as close as possible. Depending on the geometery, the new QA pins might be exposed and that would require either locating the QA higher or adding a small protection (shield) to the bucket to protect the pins incase you back-drag them over a rock. Partially disengaging the QA while under reverse load (front wheels off ground for example) would be a good way to test that piece of angle!
 
   / B7100 Quick Attach #15  
That would be sweet! Doesn't help much with the weight issue though. Nice thing about a small tractor is I could just use one of these:

cornbroom.jpg


:D

if I could find a place to carry it! :rolleyes:

Which end of that would you hold?:D
 
   / B7100 Quick Attach #16  
Charlz,

Very nice build, I have a question: What keeps the locking pins handles in the locked position, I have been drawing up some ideas for a quick attach for my L4200 and have been stuck on the locking pins, I really like the simplicity of your design, I just dont know what to fab up to keep the locking levers from popping up

Thanks,

Mike
 
   / B7100 Quick Attach
  • Thread Starter
#17  
Charlz,

Very nice build, I have a question: What keeps the locking pins handles in the locked position, I have been drawing up some ideas for a quick attach for my L4200 and have been stuck on the locking pins, I really like the simplicity of your design, I just dont know what to fab up to keep the locking levers from popping up

Thanks for the comments. Since I haven't finished I have not been able to drive it around and test how well they stay 'locked'. What I did is under the angle iron there is a 'stop block' that prevents the handles from rotating too far, on down and around, and thus loosening the lock pins. I set this block so the handles come just slightly 'too far' and hopefully that is enough to hold the handles in place. Not sure if that makes sense or not. ;)

Another thing, which actually plays more towards keeping the handles up when 'unlocked' is the friction provided by the nuts holding the handles on. I plan on using nylock nuts so I can set that friction without having to worry about the nuts coming loose (hopefully).

Maybe someone who already has this type of QA can comment on the handles staying down.
 
   / B7100 Quick Attach
  • Thread Starter
#18  
Speaking of the locking handles and their stops. Tonight I tacked the QA plate onto the bucket and did a test fit to see what it looks like. Well, I found out the upper 'stop pin' that the handles come up against is perfectly aligned with the elbows coming out of the curl cylinders... and just long enough to hit them :eek: and if you curl the bucket all the way back somewhat quickly with weight of the bucket on there... well let's just say a new street elbow and some oil in the loader reservoir are in order along with moving those stop pins :D :rolleyes:
 
   / B7100 Quick Attach
  • Thread Starter
#19  
The other day I fixed the hydraulic 'problem' and solved the issue by moving the stop pins higher up, clears by a nice margin now. :D I also added the gusset between the loader bracket and top 45 degree plate as suggested by MWB.

While I had the QA plate tacked to the bucket I mounted it all on the tractor and checked the full dump and full roll back positions against baseline photos I had taken before cutting the brackets off the bucket. I had also made a line on the ends of the bucket that was parallel with the backs of the loader brackets. This would be the plane that the QA bracket would need to match. Everything in the photos looked good so I believe got it. The QA bracket is going to be lower than I would like but with a small tractor comes a small bucket :(

Next I started working on making the curved gussets to support the QA plate on the bucket. This took some messing around because I don't have a compass that can draw a circle as large as the curve of the bucket. I wound up taking some heavy paper and 'cutting' it to the curve of the bucket with a ball peen hammer.... like they used to make replacement gaskets back in the 'good ol' days'. Worked out pretty well. One of the things about working with a 30 year old bucket is there is pretty much nothing straight or the same on the each end :eek: I then figured out the height and length of the gusset and marked out a rectangle. By using the curve on the paper I could trace it from one corner to the other. Then I moved to the opposite corner and did the same thing. This gave me two gussets in one 'rectangle' with only a little 'football' of waste material in the middle. I can see where a plasma table system sure would be handy! :D

I made a wood template to help guide the plasma torch with the correct offset. Not everyone came out perfect but in the end it worked out because the back of the bucket was not perfect so I could mix and match gussets until I got one that fit that particular spot.

Once I tacked most of the gussets on the QA plate I took the plasma to it and cut the center sections out of it. This is an effort to lighten it a bit. Overall it will just compensate for all the gussets etc. I have to put in. I also welded on the gussets that I had tacked.

Here is where I left off, the two halves sitting on the bucket where they go. I made witness marks before pulling off the QA plate for cutting to help line these halves back up:

001.JPG
One half flipped over to show the gussets.
003.JPG

Now I just need to figure out how deal with the hole, there is one more set of gussets that will go along that edge of the plate. I made the QA plate from one I saw online and cut the center out. In hindsight I should have waited until where I am now to figure out how to lighten it up a bit. Oh well, live and learn ;)
 
   / B7100 Quick Attach
  • Thread Starter
#20  
Also, the holey angle iron between the sides might not be strong enough. There has been debate about how important (structurally) this piece has to be but you will likely bend or twist that angle if you only get one side of the bucket hooked (this does happen). I understand that your loader does not have a huge lift capacity but you can subject it to a lot of stress with the tractor.

Is this mostly a concern when digging or?? I finally finished the bucket, pics hopefully later today, and got a chance to play around with this. I held off painting the tractor side until I could test that angle. I hooked one corner and then the other under an immovable (for my tractor) object and worked the controls. It seemed like I _might_ have got a little twisting but it went right back into place as soon as I let the pressure off.
 

Tractor & Equipment Auctions

2024 DEVELON DL250-7 WHEEL LOADER (A59823)
2024 DEVELON...
UNKNOWN  500BBL WHEELED FRAC TANK (A58214)
UNKNOWN 500BBL...
Hidratrak 8' Rolling Cultivator (A53317)
Hidratrak 8'...
2017 GENIE S-45 TELESCOPIC BOOM LIFT (A60429)
2017 GENIE S-45...
2025 CATERPILLAR 255 SKID STEER (A60429)
2025 CATERPILLAR...
Jaw Crusher (A59228)
 
Top