You are using an out of date browser. It may not display this or other websites correctly.
You should upgrade or use an alternative browser.
You should upgrade or use an alternative browser.
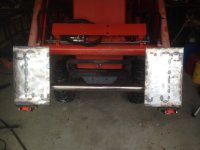
Advice on Welding/Warping of this Assembly
- Thread starter downsizingnow48
- Start date
- Views: 12415
/ Advice on Welding/Warping of this Assembly
#11
 . But otherwise it is very good! I loaned my book to an engineering student. And haven't got it back yet!
aarolar
Platinum Member
I'll look into that I'm sure I can order it in.
Mysfyt
Platinum Member
Shield Arc (as usual), covered it pretty well. The only thing I'll add is when heat shrinking, heat your spots about the size of a quarter. Guy who used to work in a fab shop that made front end loaders taught me that. It was his job to 'straighten' the loader in a jig until the pins would fit. Said you had better control this way.
Shield Arc
Super Member
If I remember correctly the guy worked at Mare Island Navy ship yard in Vallejo California. When they shut that ship yard down, I worked with a lot of those guys when they came into construction. Amazing welders!
Egon
Epic Contributor
Not a welder.
You may want to consider using a propane torch blowing thru the tube. Get it well heated before starting and do a very slow cool down when finished. A few hammer blows when finished may also help??
You may want to consider using a propane torch blowing thru the tube. Get it well heated before starting and do a very slow cool down when finished. A few hammer blows when finished may also help??
Gary Fowler
Super Star Member
- Joined
- Jun 23, 2008
- Messages
- 11,917
- Location
- Bismarck Arkansas
- Tractor
- 2009 Kubota RTV 900, 2009 Kubota B26 TLB & 2010 model LS P7010
That would be my suggestion also. Maybe in addition to heating, putting a "strongback" (a heavy piece of steel to prevent warping)opposite the welding area with it offset by some angle so you can get into the back side to heat the tubing. I usually heat it up to dull red (cherry red) before welding. The heat needs to be applied in an area the size of the welding HAZ (heat affected zone). This can be determined easily on the first weld by noting the color change on the steel after welding.Square tubing is very reactive to heat! I would take your torch and heat the opposite side of the tube where the brackets go, before welding. Or put a plate under the tube in the center, and clamp the ends of the tube down to your welding table before welding the brackets on.
You can also do an after weld diamond shaped heat to the back side of the weld after all welding is completed to correct any warping. Heat it up to cherry red and apply a wet rag to it to cool it down quickly. This gets the most movement out of it.
OP
downsizingnow48
Elite Member
I appreciate the help, many thanks!
It will be a week before I get back to the shop and put this into practice. On the question about the bracket holes. Each bracket carries a separate pin, so they don't have to be in perfect alignment. But for the use intended, the straighter the better. I will do a build post separately when I get started.
Now I think I will do one bracket at a time, rather than all in a row for fast production as I had originally thought. I will pre-heat the back of the weld with the torch, then clamp to a larger length of heavy tubing, then weld. I remembered I have a piece of 2x4x1/4 that will be perfect for this.
(As far as welding table goes, I spent my whole life welding in the dirt, or on a driveway if I was lucky. A couple years ago I upgraded myself to a Strong Hand light duty table. It is light years better than welding on the ground, and perfectly suited for 95% of what I do. It is no good for this job, but the heavy wall tubing will work.)
After welding each bracket, I will check straightness of the 2x2 tube, and use post-heat as needed.
Also I was originally planning to weld each bracket/gusset assembly to the tube at the same time. Now I think I will do the brackets first, and make sure everything is straight. And then weld the gussets.
I like the suggestion to minimize the heat going into the tube. Although with MIG I have got used to using as much heat as I can get away with.
So I will do the brackets one at a time, with much more prep than I had planned both before and after.
I am really glad I asked the question. That piece of 2x2 would probably have looked like a pretzel.
Shield Arc
Super Member
downsizingnow48 it won't help much in this case. But for future welding work. When you make a weld, if you can make a weld on the opposing side. When making long welds, back step them, and skip around a lot. This will break up the heat line, which helps with distortion.
Attachments
OP
downsizingnow48
Elite Member
Since we are on the topic, let me throw out another situation.
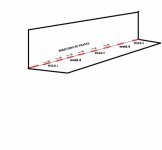
When I made my SSQA, I used the skip-around method for welding the inside ears to the "paddles". You can see that in the photo below where the vertical burn-through marks are. Even so, the weld pulled up the plate and I ended up with a 1/8" vee. And I also had already welded inverted 1/4" angle to the top and bottom of the paddle. Everything bent. To fix that I welded a heavy bead right down the line of burn-through marks. Similar to what Gary said. That pulled the vee straight. Then I had to grind off the bead. As a rescue operation it turned out OK although I thought for sure there had to be a better way.
When I made my SSQA, I used the skip-around method for welding the inside ears to the "paddles". You can see that in the photo below where the vertical burn-through marks are. Even so, the weld pulled up the plate and I ended up with a 1/8" vee. And I also had already welded inverted 1/4" angle to the top and bottom of the paddle. Everything bent. To fix that I welded a heavy bead right down the line of burn-through marks. Similar to what Gary said. That pulled the vee straight. Then I had to grind off the bead. As a rescue operation it turned out OK although I thought for sure there had to be a better way.