Yanmar ym1602 / ym1502 lift arm guides.

/ Yanmar ym1602 / ym1502 lift arm guides. #1  

grumbolt

Member
Joined
Nov 17, 2025
Messages
33
Tractor
yanmar ym1601
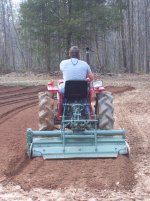
i recently acquired a YM1602 (my first yanmar) and in getting things squared away, i have replaced the clutch, and with the help of members here looks like i am getting my hydraulic stuff sorted out between the lift arms and loader etc.. but while working near the back, and using the lift arms to move a trailer, i noticed that there was nothing to keep the arms from going side to side possibly rubbing the tires, so i got to looking and didnt even see anywhere outboard of the arms to attach limiting chains. so i grabbed the measuring tools and went to scheming lol..

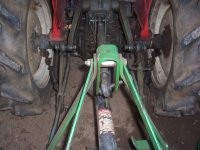
what i came up with is a bracket that uses the existing bolt locations at the end of the axle housing and puts the pivot point for the chains at the same axis as the arms themselves so it stays somewhat the same tension through the range of motion of the arms..

currently i only have chains hooked up on it, but soon i plan to find some turnbuckles so that it is adjustable. if any are interested in the pdf of the bracket i drew it at 1 to 1 scale so that you can just print it and glue it to a piece of steel to use as a template.

i tried to post it here, but dont see a way to attach a pdf.

if any of you have suggestions or comments feel free to comment..

Happy Thanksgiving!
Grum
 

Attachments

  • chain anchor installed.jpg
    chain anchor installed.jpg
    8 MB · Views: 54
  • chain anchor.jpg
    chain anchor.jpg
    3.4 MB · Views: 39
  • chains installed.jpg
    chains installed.jpg
    8.6 MB · Views: 55
Last edited:
/ Yanmar ym1602 / ym1502 lift arm guides.
  • Thread Starter
#2  
well reading around on the forum, i learned that the 3 point hitch wasnt offered originally on the 1602, and that if it has one, it was a retrofit / addon and is only as good, strong, or stable as the installers ability allowed at the time..

in the interest of preventing anything from breaking (reinforcing before breakage is always easier and less expensive than repairing breakage)

so i started inspecting my 3 point, and noticed that the nice thick heavy duty 1" bolts that anchor the tractor end of the arms are attached to a 1/8" plate that is bolted to the inner housing using 3 of the inner housing bolts.

it is also in single shear (as most tractors are, but the 1 inch pins on those tractors that have been designed to support them with nice heavy thick weldments/frame)

so it looks like i will be redesigning the frame mounting of the 3 point, and possibly making it double shear, but at the very least make the mount strong enough that single shear will be strong enough. this means that the mounts i just made and installed are gonna need to be redesigned and fabricated if i move the pins up, down, fore, or aft.

i made the above brackets out of 3/8 plate, so will probably do the same with the arm anchors.

currently the arm anchors are bolted with the rear lower 3 inner case bolts (m10x1.5) like i did the above brackets.

the location of the anchor is currently above the hitch, and forward of the rear case.

i am not sure what a part is that is bolted to the rear case with a 1/2" spacer, but that actually affords opportunity to redesign the spacer and incorporate the anchor base into it. basically makeing the current anchor plates out of 3/8 or 1/2 inch plate, and extending the plate of the spacer and the anchor to meet making a large "U" that would bolt on the back of the case as well as the sides of the case where the axle housings bolt to the case, this would leave the current location intact.

if any of you know what the part bolted to the back of the differential case at the pto output shaft is, or more specifically what it is used for (i know it is a pivot point, but im not sure what it is used for..) i would love to hear your ideas..


if i stay with the bolt and nut, it wont push the arms out any, and am leaning towards that..

please find attached pictures of the rear area being discussed..
 

Attachments

  • hitch and pin alignment.jpg
    hitch and pin alignment.jpg
    4.8 MB · Views: 37
  • hitch.jpg
    hitch.jpg
    5.6 MB · Views: 44
  • left arm anchor.jpg
    left arm anchor.jpg
    6 MB · Views: 44
  • pto attachment.jpg
    pto attachment.jpg
    6.8 MB · Views: 44
  • pto spacer.jpg
    pto spacer.jpg
    6.9 MB · Views: 36
  • rear view.jpg
    rear view.jpg
    6.9 MB · Views: 36
  • right anchor and hitch.jpg
    right anchor and hitch.jpg
    7.8 MB · Views: 48
Last edited:
/ Yanmar ym1602 / ym1502 lift arm guides. #3  
well reading around on the forum, i learned that the 3 point hitch wasnt offered originally on the 1602, and that if it has one, it was a retrofit / addon and is only as good, strong, or stable as the installers ability allowed at the time..

in the interest of preventing anything from breaking (reinforcing before breakage is always easier and less expensive than repairing breakage)

so i started inspecting my 3 point, and noticed that the nice thick heavy duty 1" bolts that anchor the tractor end of the arms are attached to a 1/8" plate that is bolted to the inner housing using 3 of the inner housing bolts.

it is also in single shear (as most tractors are, but the 1 inch pins on those tractors that have been designed to support them with nice heavy thick weldments/frame)

so it looks like i will be redesigning the frame mounting of the 3 point, and possibly making it double shear, but at the very least make the mount strong enough that single shear will be strong enough. this means that the mounts i just made and installed are gonna need to be redesigned and fabricated if i move the pins up, down, fore, or aft.

i made the above brackets out of 3/8 plate, so will probably do the same with the arm anchors.

currently the arm anchors are bolted with the rear lower 3 inner case bolts (m10x1.5) like i did the above brackets.

the location of the anchor is currently above the hitch, and forward of the rear case.

i am not sure what a part is that is bolted to the rear case with a 1/2" spacer, but that actually affords opportunity to redesign the spacer and incorporate the anchor base into it. basically makeing the current anchor plates out of 3/8 or 1/2 inch plate, and extending the plate of the spacer and the anchor to meet making a large "U" that would bolt on the back of the case as well as the sides of the case where the axle housings bolt to the case, this would leave the current location intact.

if any of you know what the part bolted to the back of the differential case at the pto output shaft is, or more specifically what it is used for (i know it is a pivot point, but im not sure what it is used for..) i would love to hear your ideas..


if i stay with the bolt and nut, it wont push the arms out any, and am leaning towards that..

please find attached pictures of the rear area being discussed..
Your chain mount on your tractor will have to be direct in line with your lift arm mounts or it will bind when you work your 3 pt lift.
 
/ Yanmar ym1602 / ym1502 lift arm guides.
  • Thread Starter
#4  
Your chain mount on your tractor will have to be direct in line with your lift arm mounts or it will bind when you work your 3 pt lift.
thats what i was thinking also, i will most likely keep the location the same.

that being said, i know i am gonna make the mounts stronger, i just havent decided if i am gonna make them double shear. i am leaning towards making them out of 1/2 inch plate, bolted on the sides as well as the back of the transmission, basically one large single piece bolted on 3 sides instead of the 2 individual pieces.


i am probably overthinking it and i definitely tend to overbuild things.

do you guys see any benefit to using the bolts instead of the pins like what is typically used on tractors?
 
/ Yanmar ym1602 / ym1502 lift arm guides. #5  
thats what i was thinking also, i will most likely keep the location the same.

that being said, i know i am gonna make the mounts stronger, i just havent decided if i am gonna make them double shear. i am leaning towards making them out of 1/2 inch plate, bolted on the sides as well as the back of the transmission, basically one large single piece bolted on 3 sides instead of the 2 individual pieces.


i am probably overthinking it and i definitely tend to overbuild things.

do you guys see any benefit to using the bolts instead of the pins like what is typically used on tractors?
Your model isn't too far off the frame size of a YM1510.

1764378095164.png


1764378120939.png


See attached and start at booklet page 83.

SpareX part numbers are sold thru many Farm retailers. So these part numbers can be found all over.
 

Attachments

  • Sparex Catalog 3rd Edition.pdf
    3.4 MB · Views: 31
/ Yanmar ym1602 / ym1502 lift arm guides.
  • Thread Starter
#6  
Your model isn't too far off the frame size of a YM1510.

View attachment 4454005

View attachment 4454006

See attached and start at booklet page 83.

SpareX part numbers are sold thru many Farm retailers. So these part numbers can be found all over.
you are awesome, thanks for the info! btw you wouldnt happen to know if there is a service manual available for the 1602 would you? i have the parts manual for the 1610 that i am currently translating to english, i hope that is the right one for my tractor lol..

also, do you know what the adapter bolted on to the back of the transmission is for?

Attachments

  • pto attachment.jpg
    pto attachment.jpg
    6.8 MB · Views: 44
 
Last edited:
/ Yanmar ym1602 / ym1502 lift arm guides. #7  
Reply #2 the L. arm anchor JPG.. My org. metric threads have finally worn out also. Looks as though that may have happened on yours also from what I can see. Sure looks that way from the steel plate.
Last time it came loose I was able remove the washer and catch the last remaining Metric threads. Been having trouble for decades keeping them tight. Esp the L. one..
This last time I had to use a Standard threaded pin.. Larger Dia. that I put a Tach weld on the Loc. nut to make sure it didn't come loose. I haven't had it come loose yet but it takes quite a few Hrs. for it to loosen up. Worst case I'll try to Heli coil insert it.
 
Last edited:
/ Yanmar ym1602 / ym1502 lift arm guides. #8  
you are awesome, thanks for the info! btw you wouldnt happen to know if there is a service manual available for the 1602 would you? i have the parts manual for the 1610 that i am currently translating to english, i hope that is the right one for my tractor lol..

also, do you know what the adapter bolted on to the back of the transmission is for?

Attachments

  • pto attachment.jpg
    pto attachment.jpg
    6.8 MB · Views: 44
The YM1610 parts manual is for the Ground & Recreational parks care. The reason why it ends in GR.
Engine wise it will be close. The YM1720DGR is the same way.
1764429653318.png


For the Gray Market machines, Japan has a different culture, people bring their machines in to be repaired for overhaul. Thus, no service manuals.

For a Service Manual, you would need to find the Yanmar domestic sold machine manuals.
The YTOG has several, and the YM-1.
 
/ Yanmar ym1602 / ym1502 lift arm guides. #9  
also, do you know what the adapter bolted on to the back of the transmission is for?

Attachments

  • pto attachment.jpg
    pto attachment.jpg
    6.8 MB · Views: 44
The adapter bolted to the back is for a Yanmar rotary tiller. In this case, it would be a 2-point model, not a 3-point.

Chances are, it was a RC class tiller from that era.
 
/ Yanmar ym1602 / ym1502 lift arm guides.
  • Thread Starter
#10  
The adapter bolted to the back is for a Yanmar rotary tiller. In this case, it would be a 2-point model, not a 3-point.

Chances are, it was a RC class tiller from that era.
so probably not gonna be needed in the future for my uses.. if i get a rotary tiller, it would be a 3 point model..

in your opinion would it be something worth trying to sell / trade?
 
/ Yanmar ym1602 / ym1502 lift arm guides. #11  
The YM2000 was A import rice patty tractor. Tiller! No doubt about it. The water damage showed up in several places. Lack of Maint Ect.. Had a tiller for it. I purchased a Yanmar 1400 from Fredricks. It worked much better than I expected. the small garden worked really well. My 3pt ghetto rig! worked will it last?

Attachments

  • Picture 054.jpg
    Picture 054.jpg
    588.6 KB · Views: 465
  • 3Pt. Pin replacement.JPG
    3Pt. Pin replacement.JPG
    2 MB · Views: 303
 
/ Yanmar ym1602 / ym1502 lift arm guides. #12  
so probably not gonna be needed in the future for my uses.. if i get a rotary tiller, it would be a 3 point model..

in your opinion would it be something worth trying to sell / trade?
It may fit other models SCUT Yanmar tractors from that era. I wouldn't scrap it. Parts like this are an extreme rarity. Someone in the next 5 to 10 years will post a message here asking how to hook up one of these old RC tillers and need the part!
 
/ Yanmar ym1602 / ym1502 lift arm guides.
  • Thread Starter
#13  
Reply #2 the L. arm anchor JPG.. My org. metric threads have finally worn out also. Looks as though that may have happened on yours also from what I can see. Sure looks that way from the steel plate.
Last time it came loose I was able remove the washer and catch the last remaining Metric threads. Been having trouble for decades keeping them tight. Esp the L. one..
This last time I had to use a Standard threaded pin.. Larger Dia. that I put a Tach weld on the Loc. nut to make sure it didn't come loose. I haven't had it come loose yet but it takes quite a few Hrs. for it to loosen up. Worst case I'll try to Heli coil insert it.

if you are going to step up the size to a helicoil, why not just put the next size metric bolt in? instead of a m10 go to a m12?

on mine, the bolts all tightened up nicely, but i dont like how thin the bracket looks. i will be taking measurements and developing a better system. most likely will make the side brackets and a back bracket all one piece such that i will have bolts going in from each side, and bolts going in from the back, which should allow a very strong bracket.

after that part is fitted, i will decide if i want to use the large bolt and nut, or if i want to use a pin for the arms to slide onto.

providing this works out the way i envision it will, pictures of the progress will be added to this thread, and if any want it, measured drawings can be shared.

i typically draw the parts i want to make in autocad, and then cut it out of heavy cardboard with my laser cutter so that i can mock up everything and ensure alignment/fitment before i spend time and energy making it out of metal.. kinda a mix of the 2 "cad"s (cardboard aided design, and computer aided design) lol
 
/ Yanmar ym1602 / ym1502 lift arm guides. #14  
if you are going to step up the size to a helicoil, why not just put the next size metric bolt in? instead of a m10 go to a m12?

on mine, the bolts all tightened up nicely, but i dont like how thin the bracket looks. i will be taking measurements and developing a better system. most likely will make the side brackets and a back bracket all one piece such that i will have bolts going in from each side, and bolts going in from the back, which should allow a very strong bracket.

after that part is fitted, i will decide if i want to use the large bolt and nut, or if i want to use a pin for the arms to slide onto.

providing this works out the way i envision it will, pictures of the progress will be added to this thread, and if any want it, measured drawings can be shared.

i typically draw the parts i want to make in autocad, and then cut it out of heavy cardboard with my laser cutter so that i can mock up everything and ensure alignment/fitment before i spend time and energy making it out of metal.. kinda a mix of the 2 "cad"s (cardboard aided design, and computer aided design) lol
AWESOME, yes, please post images of your progress and dimensions.

AutoCAD works great. The files can be imported into FreeCAD. We can then take the flat 2D patterns into 3D, even 3D Print if needed.

On the YTOG, we have a section now for Yanmar 3D printable parts in STL and STEP files. (y)

 
/ Yanmar ym1602 / ym1502 lift arm guides.
  • Thread Starter
#15  
It may fit other models SCUT Yanmar tractors from that era. I wouldn't scrap it. Parts like this are an extreme rarity. Someone in the next 5 to 10 years will post a message here asking how to hook up one of these old RC tillers and need the part!
i am gonna be mapping out the tractor side so i can make a spacer/brace adapter anyway, maybe i should draw/model the whole part and post incase someone wanted to have one fabricated if needed..

oh and who am i kidding.... i can never bring myself to get rid of anything that might be useful in the future. i dont have problems with letting something go to someone who will use it but i have never been a fan of scrapping stuff lol
 
/ Yanmar ym1602 / ym1502 lift arm guides.
  • Thread Starter
#16  
AWESOME, yes, please post images of your progress and dimensions.

AutoCAD works great. The files can be imported into FreeCAD. We can then take the flat 2D patterns into 3D, even 3D Print if needed.

On the YTOG, we have a section now for Yanmar 3D printable parts in STL and STEP files. (y)


i am a member of YTOG as well, that section is in the wiki right?

i typically print the drawings to pdf with the same filename as the drawing so that it is easy to scroll through and find what you are looking for.

how would i go about submitting the files for upload?

could a folder for cad files / pdf files be made over there?

do you think the chain anchor at the beginning of this thread would be an item of interest for the list?
i actually cut that out with a drill press, a 2.5 inch hole saw, a 1.5 inch hole saw, a 3/8 drill bit and a sander..
using the drawing as a template, i marked all the holes center, drilled the 2.5 hole all the way through, and then used the 1.5 to mark radius of the 3 ends so be able to sand it and make it pretty lol..
 
Last edited:
/ Yanmar ym1602 / ym1502 lift arm guides. #17  
i am a member of YTOG as well, that section is in the wiki right?

i typically print the drawings to pdf with the same filename as the drawing so that it is easy to scroll through and find what you are looking for.

how would i go about submitting the files for upload?

could a folder for cad files / pdf files be made over there?

do you think the chain anchor at the beginning of this thread would be an item of interest for the list?
i actually cut that out with a drill press, a 2.5 inch hole saw, a 1.5 inch hole saw, a 3/8 drill bit and a sander..
using the drawing as a template, i marked all the holes center, drilled the 2.5 hole all the way through, and then used the 1.5 to mark radius of the 3 ends so be able to sand it and make it pretty lol..
There is a members upload folder.
1764436883330.png


You can create a sub-folder in there for the project.

Once completed, The one moderator will make a released folder out on the shared system for the project.

1764436991797.png


Now if your parts are more about cutting, forming and welding, he may make a new area on the shared system for those projects.

Today we are messing around with other 3D CAD creation. 3-inches of snow going to 7 today. Nobody wants outside. :)
 
/ Yanmar ym1602 / ym1502 lift arm guides. #18  
if you are going to step up the size to a helicoil, why not just put the next size metric bolt in? instead of a m10 go to a m12?

on mine, the bolts all tightened up nicely, but i dont like how thin the bracket looks. i will be taking measurements and developing a better system. most likely will make the side brackets and a back bracket all one piece such that i will have bolts going in from each side, and bolts going in from the back, which should allow a very strong bracket.

after that part is fitted, i will decide if i want to use the large bolt and nut, or if i want to use a pin for the arms to slide onto.

providing this works out the way i envision it will, pictures of the progress will be added to this thread, and if any want it, measured drawings can be shared.

i typically draw the parts i want to make in autocad, and then cut it out of heavy cardboard with my laser cutter so that i can mock up everything and ensure alignment/fitment before i spend time and energy making it out of metal.. kinda a mix of the 2 "cad"s (cardboard aided design, and computer aided design) lol
No Metric pins. available local. I would have to order them. Fredricks most likely. I do have another US. 2000 and just so happen to have them. I didn't even have to remove tire. If it would happen on the R. which has never came loose. I'll do it the same way. Heli either way metric or standard is a still a option available. Which I'll go Standard not metric.
 
/ Yanmar ym1602 / ym1502 lift arm guides.
  • Thread Starter
#19  
with the holidays and the work trips i havent had as much time to develop this as much as i want, but im making progress none the less.. i have the side plates drilled and mostly mapped out, i will be test fitting them to the tractor in the near future and providing i measured well, i will be fitting the lift arm pins (7/8 pin) onto the plates and welding them out..

once that part is finished, it will be much stronger than it us currently. i am still toying with the idea of making a plate that would bolt onto the back of the rear end that would tie both sides together.

hopefully i will at least get the sides done before Christmas, if so i will post pics.
 
/ Yanmar ym1602 / ym1502 lift arm guides.
  • Thread Starter
#20  
luckily i was able to devote some time to it and finish up installing the lower arm anchors.. i have decided to keep the lift arms as bolts with shims to ensure everything stays aligned and tight.

i pulled both of the old side mounts off and noticed someone had drilled and tapped the left side out to a 1/2 inch bolt instead of it using M10x1.5 so it went from a easy swap to a lets dig in a little deeper kind of day.

i noticed when i pulled the left side off, that the bolts seemed pretty short, so i inspected them a little closer and discovered that the original installer of the old side plates used short bolts and only tapped the outer housing (the bolts being used for the side plates are actually the bolts that hold the outer axle housing on to the differential case.

they did drill deeper, but didnt tap it. so i drilled it to full depth and tapped it to 1/2-13 as that is what was already tapped into the outside covers. long story short i installed both sides and think it looks pretty good, and it feels exceedingly solid, being that the bracket is resting against the cutout in the frame, as well as the pin extends into the frame.


i designed the plates so that the back edge would be flush with the back of the tractor. i am toying with the idea of cutting a plate that would bolt on to the back of the differential where the tiller attachment used to be, and would also bolt to each of the side plates.

i made the side plates out of 3/4 inch steel. this way if i see any deflection i can make up that back plate and bolt it on without too much issue.
 

Attachments

  • back closeup.jpg
    back closeup.jpg
    9.1 MB · Views: 41
  • back view.jpg
    back view.jpg
    9.1 MB · Views: 33
  • bracket back.jpg
    bracket back.jpg
    3.3 MB · Views: 28
  • bracket front.jpg
    bracket front.jpg
    5.4 MB · Views: 27
  • left bracket.jpg
    left bracket.jpg
    7.8 MB · Views: 39
  • left drilled.jpg
    left drilled.jpg
    6.5 MB · Views: 27
  • left installed.jpg
    left installed.jpg
    6.2 MB · Views: 33
  • left thread engagement.jpg
    left thread engagement.jpg
    5 MB · Views: 32

Marketplace Items

2017 ADDCO ROAD SIGN DH1000-ALS (A60736)
2017 ADDCO ROAD...
1983 INTERNATIONAL S SERIES WATER TRUCK (A57192)
1983 INTERNATIONAL...
2011 TRAIL KING INDUSTRIES PNEUMATIC TRAILER (A60736)
2011 TRAIL KING...
SKLP SK-HJ6 40' 6 Section Storage Shelves (A60463)
SKLP SK-HJ6 40' 6...
(3) 24"x20' PVC Pipe (A60463)
(3) 24"x20' PVC...
1999 CATERPILLAR 312B EXCAVATOR (A52709)
1999 CATERPILLAR...
 
Top