Protecting your well head from fire, impact, sun, and freezing

/ Protecting your well head from fire, impact, sun, and freezing #1  

dfkrug

Super Member
Joined
Feb 3, 2004
Messages
7,708
Location
Santa Cruz Mtns, CA
Tractor
05 Kioti CK30HST w/ Prairie Dog backhoe, XN08 mini-X
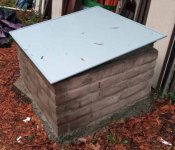
I have been meaning to do this for years: protect my water well head from wildfire, impacts from trees, the sun, and even freezing.

Wildfire damage in the Santa Cruz Mountains a few years ago was a real wake-up call to those of us who have unprotected well heads. I know of several cases where fire destroyed the well head, causing the pump to fall, and the well to get contaminated.

Since freezing is not a Big Problem around here, enclosing the well head is often not done at all. I have tarped mine for the 27 years since it was installed, but my biggest concern is falling trees and branches. Last year, I suffered damage to buildings from the storm of FEB23.

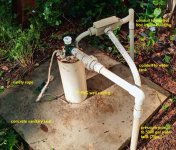
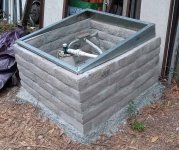
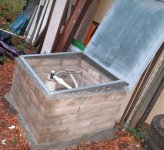
Here is my well head. The white PVC pressure pipe is 1-inch sched 40, and easily degraded by the sun. It feeds a 5000 gallon water tank 500 feet away, and at about 160 feet higher elevation. The conduits are supposed to be UV-resistant, but the box cover looks sad, despite the tarp.
 

Attachments

  • well_head_2.jpg
    well_head_2.jpg
    364.1 KB · Views: 244
/ Protecting your well head from fire, impact, sun, and freezing
  • Thread Starter
#2  
So, I decided to go with a small brick wellhouse, with steel cover.

The sanitary seal is a 2x2' concrete slab that seals the 5" PVC well casing to the rough hole. This concrete goes down 25' from ground level and keeps surface contaminants from getting into the well.

It is not square to the adjacent workshop building, so I planned a wellhouse that fixes that.
 

Attachments

  • well_house_3.jpg
    well_house_3.jpg
    514.3 KB · Views: 113
  • well_house_4.jpg
    well_house_4.jpg
    513.4 KB · Views: 121
  • well_house_1.jpg
    well_house_1.jpg
    390.6 KB · Views: 102
  • well_house_2.jpg
    well_house_2.jpg
    363.3 KB · Views: 107
/ Protecting your well head from fire, impact, sun, and freezing
  • Thread Starter
#3  
Next, the top.

I cut up some steel joists I had here, on a taper, then I welded them up to form a 3x3' frame. It sits in a bed of mortar.

Finally, I used some 16-gauge galvanized sheet steel, and some 1/2" EMT conduit to make the lid and the rounded edges.
 

Attachments

  • well_house_7.jpg
    well_house_7.jpg
    478.3 KB · Views: 118
  • well_house_6.jpg
    well_house_6.jpg
    183.8 KB · Views: 104
  • well_house_5.jpg
    well_house_5.jpg
    249.5 KB · Views: 104
  • well_house_8.jpg
    well_house_8.jpg
    276.7 KB · Views: 111
  • well_house_9.jpg
    well_house_9.jpg
    353.2 KB · Views: 108
/ Protecting your well head from fire, impact, sun, and freezing #4  
That’s much different than what we have in PA.

Casings are steel. Water connection is below frost line via a “pitless” adapter that goes through the side of the casing. Electric comes from the same depth as the water line to the house, up along the side of the casing through a 1” black poly pipe (same as what feeds into the house). Connection is made under the metal well cap (mine has a lock on it), with heat shrink covered butt connectors).

Pump is accessed by threading a 6’ piece of 1” galvanized or black iron pipe (with a T fitting at the top and 2 short pipes as handles), into the pit less adapter. Then pull it up.
 
/ Protecting your well head from fire, impact, sun, and freezing #5  
Freezing temps all winter means a pitless adapter, under ground plumbing, and a cast iron well case head.

My neighbor has a decorative "Wishing Well" cover that just lifts off.
My own well head is a foot down in a brick lined pit due to landscaping needs.
 
/ Protecting your well head from fire, impact, sun, and freezing #6  
Next, the top.

I cut up some steel joists I had here, on a taper, then I welded them up to form a 3x3' frame. It sits in a bed of mortar.

Finally, I used some 16-gauge galvanized sheet steel, and some 1/2" EMT conduit to make the lid and the rounded edges.

Looks good!
 
/ Protecting your well head from fire, impact, sun, and freezing #7  
My first thought would be to put a concrete pipe ring around it with a concrete top.
That is how shallow wells are done here. My neighbour made his look like a wishing well by wrapping it with wood and a little roof with fairy people all around the area.
I do like your solution. Here the branches that fall can be quite large so I would have made the lid a little heavier.
 
/ Protecting your well head from fire, impact, sun, and freezing #8  
That's a well thought out design and a very well executed build Mr. DFKrug! (See what I did there? )

It looks great and solid enough to keep the well protected from falling trees, mountains and meteors!

These kind of projects are what keep us thinking and moving forward!
 
/ Protecting your well head from fire, impact, sun, and freezing #9  
1731759446153.jpeg

Not as pretty as yours but they make precast concrete lids for round and square culverts for wells.

Pitless wells are recommended here since critters like to move in to those beautiful structures creating contamination risks and potential health hazards.
 
/ Protecting your well head from fire, impact, sun, and freezing #11  
I've inspected hundreds and hundreds of private and public wells. Gotta admit - that is the first well head that I've ever seen with everything above ground.

You have the right idea - protect it. Perhaps a little bigger would have made work on it a little easier. However - I guess you can lean over the wall and get most everything done.
 
/ Protecting your well head from fire, impact, sun, and freezing
  • Thread Starter
#12  
That’s much different than what we have in PA.

Casings are steel. Water connection is below frost line via a “pitless” adapter that goes through the side of the casing. Electric comes from the same depth as the water line to the house, up along the side of the casing through a 1” black poly pipe (same as what feeds into the house). Connection is made under the metal well cap (mine has a lock on it), with heat shrink covered butt connectors).

Pump is accessed by threading a 6’ piece of 1” galvanized or black iron pipe (with a T fitting at the top and 2 short pipes as handles), into the pit less adapter. Then pull it up.
A few months ago, I was checking to see if any Utube videos were posted on how domestic wells were usually done here in coastal California in the 90s. That was first time I saw how "pitless adapters" worked, and how to service them.

I found nothing on how mine is constructed, until recently. This is how mine is done: 1.25" threaded schedule 80 PVC in 20' sections, spliced with threaded PVC couplings. This vid shows metal couplings.

The video is of a city well, but I don't know where. I installed mine myself, twice. No crane or help needed, tho I would prefer one helper. My well is drilled 125' deep, but the pump hangs at 100'. My well driller showed me how, back before Utube and digital photos.

I don't know how common the HDPE (black poly) is here.
 
Last edited:
/ Protecting your well head from fire, impact, sun, and freezing
  • Thread Starter
#13  
I've inspected hundreds and hundreds of private and public wells. Gotta admit - that is the first well head that I've ever seen with everything above ground.

You have the right idea - protect it. Perhaps a little bigger would have made work on it a little easier. However - I guess you can lean over the wall and get most everything done.
Often, even the starter box is outside, right on the wellhead. My control box and control panel for aeration and tank ventilation is inside the adjacent workshop building.

It is also common around here to build a small wooden pump house, which also contains the pressure pump and bladder tank. Not protected from fire.

As for impact protection, I have metal frame installed over my 4" wharf hydrant. It took a huge hit last winter, from a tree.
 

Attachments

  • hydrant.jpg
    hydrant.jpg
    687.4 KB · Views: 86
/ Protecting your well head from fire, impact, sun, and freezing
  • Thread Starter
#14  
Well built and looks good.

Is there enough room inside to allow work on the well/well head components?p

I can sit on the edge of the opening with my feet inside.

But it also provides two solid surfaces to support my clamping board for the next time I take out the pump. No fancy clamp is used. The threaded pipe couplings provide a convenient place for a board with a U-shaped slot cut into it.
 
/ Protecting your well head from fire, impact, sun, and freezing #15  
I help my uncle build a concrete block well house years ago that was maybe 8x10 with a metal roof on a track that could be slid back to fully expose…

A mason by trade.

The door was louvered steel.
 
/ Protecting your well head from fire, impact, sun, and freezing #16  
That’s much different than what we have in PA.

Casings are steel. Water connection is below frost line via a “pitless” adapter that goes through the side of the casing. Electric comes from the same depth as the water line to the house, up along the side of the casing through a 1” black poly pipe (same as what feeds into the house). Connection is made under the metal well cap (mine has a lock on it), with heat shrink covered butt connectors).

Pump is accessed by threading a 6’ piece of 1” galvanized or black iron pipe (with a T fitting at the top and 2 short pipes as handles), into the pit less adapter. Then pull it up.
This describes what is used here too.
 
/ Protecting your well head from fire, impact, sun, and freezing
  • Thread Starter
#17  
View attachment 1838972
Not as pretty as yours but they make precast concrete lids for round and square culverts for wells.
I considered pre-made concrete septic tank risers, but the inside dimensions were not big enough and lifting and placing them would be difficult. I have 4 of those, 1 for each manhole of my 2 septic tanks. The manhole covers are also not big enough for access.

There is a cheap alternative that folks should also consider: one of those galvanized steel livestock watering tubs, with or without a hinged lid.

I am an extreme DIY person, so I was gonna use one of those DeepRock-type drilling rigs to drill my own well, back in '95 when I purchased my acreage. Turns out, the state requires a C-57 contractor license, one of only 2 building activities you can not DIY in California. I do have a year-round creek, which is accessed by some neighbors for their drinking water. They are grandfathered with easements that go back to the 1800s. I can't use that source.

To drill a domestic well legally in CA, back in the 90s, you had to get permits from County and State. Then get a C-57 to drill, following all the rules for tailing ponds, etc. Then you had to pump 3600 gallons within a 24-hour period, using a flow meter and subject to surprise inspection by the State during pumping. A C-57 or licensed civil engineer can do this. My driller let me do the test under his license on a cold rainy winter day. Inspector was a no-show.

Then, the sanitary seal is poured by the driller while a State inspector watches. Finally, you take water samples and submit to a licensed lab for testing.
 
/ Protecting your well head from fire, impact, sun, and freezing #18  
The farm spent tens of thousands for 2 dry holes…

It’s still a sore subject between Mr. and Mrs.

Sites had soundings and geological research plus knowledge of local producing wells… no joy.
 
/ Protecting your well head from fire, impact, sun, and freezing #19  
The farm spent tens of thousands for 2 dry holes…

It’s still a sore subject between Mr. and Mrs.

Sites had soundings and geological research plus knowledge of local producing wells… no joy.
Sorry to hear that.

I think that in many parts of the state, California geology is particularly challenging when it comes to well drilling. There are so many folded and fractured layers that you can have one well that yields well and one a few hundred feet away that is dry. A rancher friend had a 90gpm well and three hundred feet away they did not manage to hit water. Our well is three times one neighbor's, twice the neighbors across the street and a fifth of his neighbors. A little "variable", wouldn't you say? All the wells were drilled by the same drillers. Go figure. A neighbor down the road had to go down 700' for water.

The variability in wells, at least around here, is one reason why we did not try to buy a California ranch without known good water.

All the best,

Peter
 
/ Protecting your well head from fire, impact, sun, and freezing #20  
I considered pre-made concrete septic tank risers, but the inside dimensions were not big enough and lifting and placing them would be difficult. I have 4 of those, 1 for each manhole of my 2 septic tanks. The manhole covers are also not big enough for access.

There is a cheap alternative that folks should also consider: one of those galvanized steel livestock watering tubs, with or without a hinged lid.

I am an extreme DIY person, so I was gonna use one of those DeepRock-type drilling rigs to drill my own well, back in '95 when I purchased my acreage. Turns out, the state requires a C-57 contractor license, one of only 2 building activities you can not DIY in California. I do have a year-round creek, which is accessed by some neighbors for their drinking water. They are grandfathered with easements that go back to the 1800s. I can't use that source.

To drill a domestic well legally in CA, back in the 90s, you had to get permits from County and State. Then get a C-57 to drill, following all the rules for tailing ponds, etc. Then you had to pump 3600 gallons within a 24-hour period, using a flow meter and subject to surprise inspection by the State during pumping. A C-57 or licensed civil engineer can do this. My driller let me do the test under his license on a cold rainy winter day. Inspector was a no-show.

Then, the sanitary seal is poured by the driller while a State inspector watches. Finally, you take water samples and submit to a licensed lab for testing.
I find it interesting that concrete is used on your well for the sanitary seal. Where I live in western Washington bentonite is used. I wonder if this is because we have plenty of rain so the bentonite can never dry out.
I tried using one of those DeepRock type well drilling machines. It worked great for 11 feet. Then I hit hardpan and the thing just couldn't penetrate the stuff. I tried all day and only got a few inches. So I hired a guy with a cable tool to put in the well. It took him about a week to go through 40 feet of that hardpan. Then he hit water and I ended up with 15 gallons a minute of really good water.
Eric
 

Marketplace Items

500 BBL FRAC TANK (A58214)
500 BBL FRAC TANK...
2020 FORD F-150 XL CREW CAB TRUCK (A59823)
2020 FORD F-150 XL...
2022 Harley-Davidson FLHTP Police Electra Glide Motorcycle (A60352)
2022...
2012 GMC Acadia AWD SUV (A59231)
2012 GMC Acadia...
2014 Dodge Journey Van (A59231)
2014 Dodge Journey...
2022 CAT 289D3 (A60462)
2022 CAT 289D3...
 
Top