My Horse Barn in Progress

   / My Horse Barn in Progress
  • Thread Starter
#171  
This is somewhat of a duplicate post, since I had posted a thread here about securing the bottoms of my sliding doors. However, I thought it might be a good idea to post a summary in this thread since it has to do with the same barn.

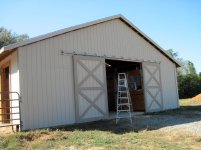
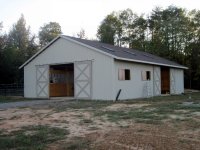
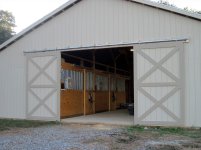
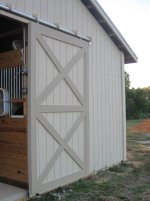
The main doors for the barn (all three sets of them) hang from their roller hardware. Unless the bottoms of the doors are somehow secured, they are free to swing outward when the wind blows through the barn. The most common way to keep them from doing that is to put a stay roller like the one below at the bottom of each door.

6759286.jpg


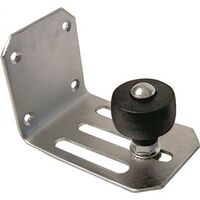
However, since the stay rollers are located at the outside edge of the door opening (it would be pretty inconvenient to have a couple stay rollers protruding out from the middle of the door opening where they could be driven over with a tractor or trampled by horses), they really only work to secure the outside corners. Without something additional to secure the inside corners of the doors, a strong gust of wind blowing through the barn could twist the doors pretty severely.

I got some good ideas about how to fix this problem in the aforementioned thread, and the solution I came up with was to bolt a PT board to the end of the slab with a rabbet cut along the top inside edge. Then I put a "Z" shaped metal bracket on the inside bottom corner of each door which protrudes downward into the rabbet. The bracket simply slides in the slot. I made the brackets from standard Simpson deck joist ties. I cut one side short and bent the edges slightly outward. Also, since the corners only need to be secured when the doors are in the closed (or mostly closed) position, the rabbetted portion of the board only extends for a couple of feet in the center of the door opening. Beyond that, the rabbet flairs outward until there's no wood remaining to hold the door in place any more. That keeps the groove from filling with water and provides a place for dirt and debris to exit the track.

Here are some pictures.

attachment.php


attachment.php


attachment.php


attachment.php


attachment.php
 
   / My Horse Barn in Progress #172  
I know what you mean about thinking that someone else is going to do the job,

I believe I would have rented one of those high pressure sprayers, that sprays paint out at 1/2 gal. paint per minute. All the cracks, seams, corners, flat, etc. Different nozzles for width. Just stand back with an extension and have at it. I painted a 1200 by 6 ft fence with one of those, and there was not much waste. It sprays out nothing but paint at about 100 to 2500 psi.
 

Attachments

  • X5.jpg
    X5.jpg
    8.3 KB · Views: 192
   / My Horse Barn in Progress #173  
I know what you mean about thinking that someone else is going to do the job,

I believe I would have rented one of those high pressure sprayers, that sprays paint out at 1/2 gal. paint per minute. All the cracks, seams, corners, flat, etc. Different nozzles for width. Just stand back with an extension and have at it. I painted a 1200 by 6 ft fence with one of those, and there was not much waste. It sprays out nothing but paint at about 100 to 2500 psi.


I had to paint my deck and my airless sprayer would not build up any pressure repair kit was over $200.00.
Ebay to the rescue refurbished (looked new to me) Wagner paint crew plus delivered to my door 147.00

1105999341474040_1.jpg


I did 7 gallons of paint in 4 hrs.
My neighbor asked if I would do his house I told him he coulden't afford me But for 150.00 he could have his own.
A week later he was spraying his his place. The only complaint he had was clean up.

I told him release all the pressure and to bag the gun in a plastic bag with 1/2 cup water and seal it up tight around the hose and hang up so tip is in the water.
Fill paint resivore close to the top with paint and pour 1 cup of water on top of paint very slowly so it doesn't brake paint film and just floats on top of it he he painted in the evenings for a week with out cleaning it.

When you are ready to paint stir the water in to the paint take the gun out of the bag spin tip to clean position crank it back up clean tip and get back to painting.

Disclaimer: This obviously this only works for water based paint.

tom
 
   / My Horse Barn in Progress
  • Thread Starter
#174  
I had to paint my deck and my airless sprayer would not build up any pressure repair kit was over $200.00.
Ebay to the rescue refurbished (looked new to me) Wagner paint crew plus delivered to my door 147.00

1105999341474040_1.jpg


I did 7 gallons of paint in 4 hrs.
My neighbor asked if I would do his house I told him he coulden't afford me But for 150.00 he could have his own.
A week later he was spraying his his place. The only complaint he had was clean up.

I told him release all the pressure and to bag the gun in a plastic bag with 1/2 cup water and seal it up tight around the hose and hang up so tip is in the water.
Fill paint resivore close to the top with paint and pour 1 cup of water on top of paint very slowly so it doesn't brake paint film and just floats on top of it he he painted in the evenings for a week with out cleaning it.

When you are ready to paint stir the water in to the paint take the gun out of the bag spin tip to clean position crank it back up clean tip and get back to painting.

Disclaimer: This obviously this only works for water based paint.

tom

That's a pretty cool tip! Thanks.
 
   / My Horse Barn in Progress
  • Thread Starter
#175  
Here are a couple of more pictures of the outside since the last update. Now you can see the trim color my wife chose.

I still have to make the pent roofs to go over the tops of the sliding doors on the gable ends (to keep rain from running down the walls, behind the doors, and inside the barn). Then I have to install gutters, add trim boards at the tops of the walls along the roof line, make and install the permanent doors for the windows in the horse stalls on the north side, and do a little bit of back-filling and final grading. After that I should pretty much be finished with the exterior!

attachment.php


attachment.php


attachment.php


attachment.php
 

Attachments

  • IMG_1804.jpg
    IMG_1804.jpg
    905.1 KB · Views: 1,449
  • IMG_1813.jpg
    IMG_1813.jpg
    1,009.6 KB · Views: 1,397
  • IMG_1814.jpg
    IMG_1814.jpg
    714.6 KB · Views: 1,372
  • IMG_1815.jpg
    IMG_1815.jpg
    735.1 KB · Views: 1,239
   / My Horse Barn in Progress #176  
Looks nice, from what i can see. You need to resize your pics to a manageable size to see.
regards,
Steve
 
   / My Horse Barn in Progress
  • Thread Starter
#177  
Looks nice, from what i can see. You need to resize your pics to a manageable size to see.
regards,
Steve

Steve, I can definitely do that. On all of my browsers (Internet Explorer, Firefox, and Google Chrome) they automatically resize once they load. You can then click above each picture to see it at full resolution or see it at full-screen size by opening it from one of the thumbnails at the end (at which point it will load at full resolution, but should be automatically resized to fit your screen by any of the browsers I mentioned above). I included the pictures at high-resolution so a person could zoom in closely if they chose to do so. I, for one, like to have the option to see fine details.

That being said, if they're not automatically resizing for you, I'll do it differently in the future (it's too late to edit my previous posts). Looking at them at 12 Mpixels is certainly less than ideal. Sorry about that.

Josh
 
Last edited:
   / My Horse Barn in Progress #178  
Wow, great pictures (I had no trouble viewing them, by the way). Who made your horse stalls? They are really nice, I like that "arch" at the top of the doors.

Very neat idea on the stay roller issue for the exterior barn doors, looks like it works well. Always looking for new and innovative ideas, thanks.
 
   / My Horse Barn in Progress #179  
T-11 siding ......... the sight gives me shivers. Had the two story storage garage .... our vehicle garage and home covered with the stuff. Put up with the painting for about a decade and then vinyl sided everything.
 
   / My Horse Barn in Progress #180  
Steve, I can definitely do that. On all of my browsers (Internet Explorer, Firefox, and Google Chrome) they automatically resize once they load. You can then click above each picture to see it at full resolution or see it at full-screen size by opening it from one of the thumbnails at the end (at which point it will load at full resolution, but should be automatically resized to fit your screen by any of the browsers I mentioned above). I included the pictures at high-resolution so a person could zoom in closely if they chose to do so. I, for one, like to have the option to see fine details.

That being said, if they're not automatically resizing for you, I'll do it differently in the future (it's too late to edit my previous posts). Looking at them at 12 Mpixels is certainly less than ideal. Sorry about that.
Josh

I use Mozilla3.6.11 and the pics don't resize. I have to move the bars L+R, U+D to see.
Btw, you can re-size without changing the pixels.
Nice work anyway!
regards,
Steve
 

Tractor & Equipment Auctions

2013 Ford Explorer SUV (A48082)
2013 Ford Explorer...
2004 CATERPILLAR 232 WHEELED SKID STEER (A50458)
2004 CATERPILLAR...
2002 Mack DM690S Roll Off Truck, VIN # 1M2B209C32M028771 (A48836)
2002 Mack DM690S...
Blue Concrete Test Shed (A49461)
Blue Concrete Test...
New/Unused 20ft Farm Metal Driveway Gate (A48837)
New/Unused 20ft...
(1) HD 24ft Free Standing Corral Panel (A48836)
(1) HD 24ft Free...
 
Top