qed-cat225
Gold Member
What is the ideal setting on the Bobcat tractor for maximum scraping potential on a box blade, top link in which of the three positions and link extended or retracted or in between?
and what position low middle or high does the toplink go on the back of the tractor?
and what position low middle or high does the toplink go on the back of the tractor?
") ) and read through this link - there's several pages but I've marked it as a favourite and refer back to it from time to time - lots of good info. http://www.tractorbynet.com/forums/attachments/122762-beginners-guide-using-box-blade.html
) and read through this link - there's several pages but I've marked it as a favourite and refer back to it from time to time - lots of good info. http://www.tractorbynet.com/forums/attachments/122762-beginners-guide-using-box-blade.htmlHaven't done it yet, but my experience with the top link part of TnT (top and tilt) has made me a believer and proven the benefit of going all the way....hyd side link is on order.
Don't take my word for it, but do read up on the plethora of posts (search "top 'n tilt") - you'll have a hard time finding anyone who regrets having made the investment.
If you don't mind me asking, what is your side link costing you?
Don't mind a bit - but never saw your post until now....sorry!
Anyway, events of the past couple months have overtaken my best intentions and I'm still sidelink "challenged" (as in sidelinkless).
Total it all up and I'd guestimate you're looking at a range of $200 - $300 - assuming one already has the RR's.
Once life returns to a close approximation of "normal" around here I'll renew the quest and start over from the beginning.
The one thing I know for sure is I kick myself every time I use the BB for still not having completed the project yet but, as they say, .....in due course.
As an aside, I purchased the top link from CCM and was pleased with both the quality and service they provided.
I elected not to go with them for the sidelink (if I recall theirs is ~$250-300) NOT because of $ but because I didn't want the check valve. (That's an argument with staunch proponents on both sides<g> but at this stage I might just bite the bullet and go that way and get it over with! <s>
and what position low middle or high does the toplink go on the back of the tractor?
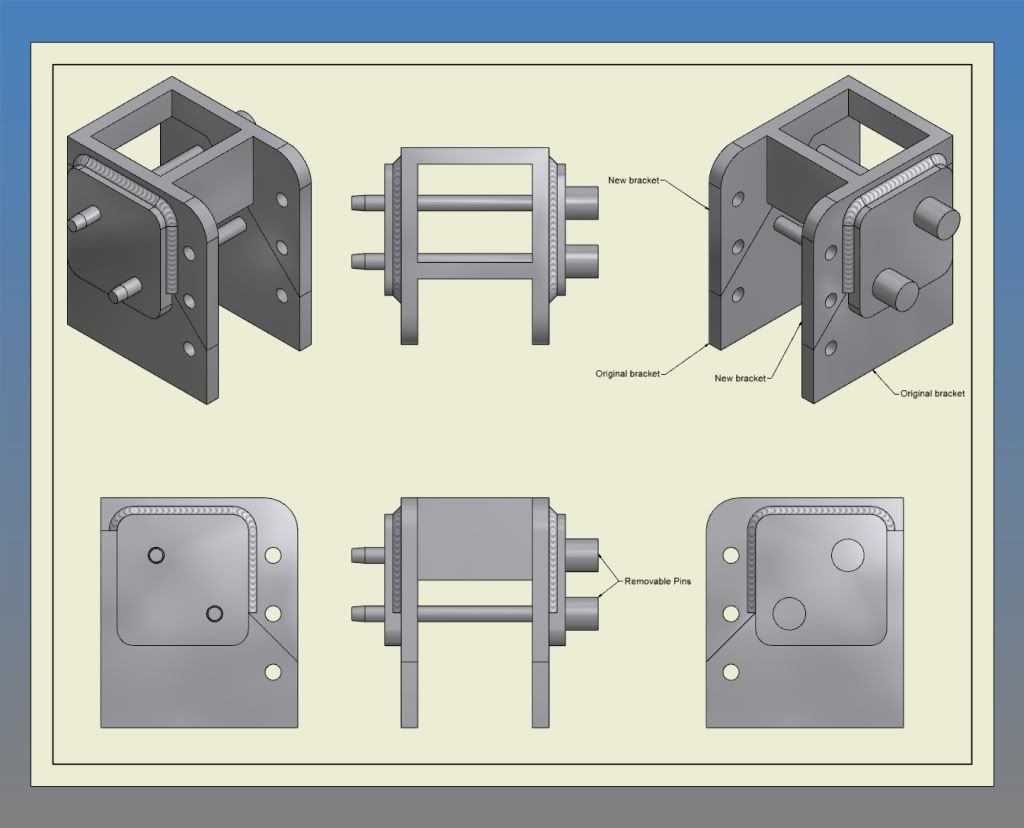
I bought a hydraulic top link (CCM brand) for my CT335 and am forced to put it in the bottom setting cause the housing is too wide to go into the center or top cause it would hit the tractor top link bracket when the 3 pt. position would be from half way to all the way down.
I bought a hydraulic top link (CCM brand) for my CT335 and am forced to put it in the bottom setting cause the housing is too wide to go into the center or top cause it would hit the tractor top link bracket when the 3 pt. position would be from half way to all the way down.
And O yeah the 4th pic, my new kitten Henry