OP
You are using an out of date browser. It may not display this or other websites correctly.
You should upgrade or use an alternative browser.
You should upgrade or use an alternative browser.
Yanmar SA Mods
- Thread starter sa324owner
- Start date
- Views: 35129
More options
Who Replied?
/ Yanmar SA Mods
#21

OP
sa324owner
Member


OP
sa324owner
Member
I have stared at the plow and tractor for a total of three evenings and I finally came up with a plan using stuff I had laying around.
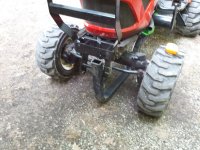
Strongly considering the size and weight of the plow, I've decided to build a subframe on the front of the tractor. The previous owners of my property must have had an Allis-Chalmers 5220 or 5230 because they left the brand new ROPS in the barn. Lucky me! The beefy ROPS has become the basis for the subframe. I don't think I could have asked for a more perfect thing to start with.
The subframe will (tentatively) attach at the rear mid-mount mower lift point, the front mid-mount mower lift point (rear of the front-end loader mounts), and the front "bumper". The primary issue that the hacked-up ROPS is going to solve is clearing the front axle with the axle at full articulation and steering at full lock. The mock-ups I've done make it seem VERY promising.
Attachments

OP
sa324owner
Member
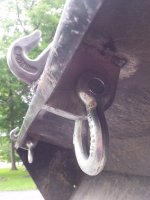
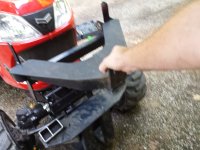
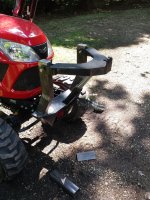
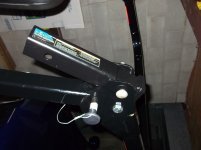
I've also mulled over how to handle the plow lift mechanism on the tractor side. Some more staring lead me to the leftover mount of the repurposed ROPS. It is going to become the new permanent front bumper on the tractor. I drilled some holes and did a quick test fit. I lifted the front of the tractor with the loader and check for clearance between the tires and bumper. Plenty of room and it looks like some monster off-road bumper you'd find on a Jeep!
The "bumper" will be fitted with two upright arms to support the plow's lift arm. It will ultimately look sort of like a brush guard and function as one since the original will have to be removed. The plow lift arm and plow lift cylinder will pin-on so they can be removed when the plow is not attached.
The "bumper" will be fitted with two upright arms to support the plow's lift arm. It will ultimately look sort of like a brush guard and function as one since the original will have to be removed. The plow lift arm and plow lift cylinder will pin-on so they can be removed when the plow is not attached.
Attachments


OP
sa324owner
Member


OP
sa324owner
Member
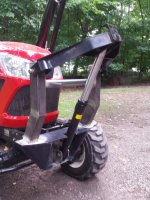
The lift cylinder that was on the plow had some pitting/peeling on the cylinder itself, so I ordered a replacement. I decided to go with a 1.5" x 10" (instead of the stock 8" stroke) so that the lower mount worked out a little better. I don't think I'll actually need the extra lift height unless I'm making some big snow mounds.
I also got the brush guard cross bar installed.
The entire lift mechanism pins on and can be installed/removed in a matter of minutes.
Due to the extended lift height, I had to notch out the back of the lift arm to make room for the cylinder.
I also got the brush guard cross bar installed.
The entire lift mechanism pins on and can be installed/removed in a matter of minutes.
Due to the extended lift height, I had to notch out the back of the lift arm to make room for the cylinder.
Attachments


MACflyer
Bronze Member
The lift cylinder that was on the plow had some pitting/peeling on the cylinder itself, so I ordered a replacement. I decided to go with a 1.5" x 10" (instead of the stock 8" stroke) so that the lower mount worked out a little better. I don't think I'll actually need the extra lift height unless I'm making some big snow mounds.
I also got the brush guard cross bar installed.
The entire lift mechanism pins on and can be installed/removed in a matter of minutes.
Due to the extended lift height, I had to notch out the back of the lift arm to make room for the cylinder
Is the plan to remove the bucket and use those hydraulic lines for the plow?
OP
sa324owner
Member
Yes! The overall idea is to make the plow and components as quick-attach as I possibly can. Using the tractors existing hydraulic system helps make that possible. I'm shooting for < 5 minutes on/off.Is the plan to remove the bucket and use those hydraulic lines for the plow?
All the hydraulic hoses on the plow need replaced anyway, so I'll replace them with lines long enough to run to the existing connections on the tractor.
OP
sa324owner
Member
I've been making slow plow progress because I had to divert to reconfigure my leaf collection equipement to prepare for Leaf-ageddon 2021.
I took a few days off work to (hopefully) make some progress.
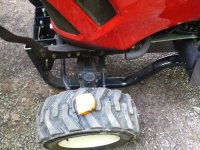
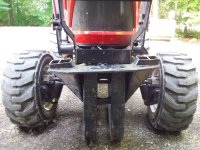
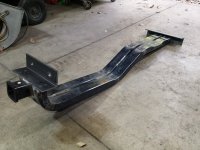
I welded up the main rails of the subframe yesterday. I was able to tack it in place to test clearances. My primary concern was the subframe-to-driveshaft clearance. Nothing hits so far!
I took a few days off work to (hopefully) make some progress.
I welded up the main rails of the subframe yesterday. I was able to tack it in place to test clearances. My primary concern was the subframe-to-driveshaft clearance. Nothing hits so far!
Attachments


Willieintn
New member
- Joined
- Dec 28, 2021
- Messages
- 2
- Tractor
- Yanmar SA324
I just bought a SA324. I have a similar cross drawbar that you show above. The problem is that it is 3" too long to fit between 2 bottom links. I want this to lug around my splitter. The drawbar that came with it is very low, for my old back to deal with.I bought my SA324 back in April and I've been scouring the Internet ever since looking for modifications to make. I wanted to share what I've done so far and I'd like to see what other people have done as well.
View attachment 573119View attachment 573120View attachment 573128
Fabricated 2 Inch receiver in place of original drawbar. Most accessories I already have for my truck fit a 2" receiver so this was far more useful to me. Used a cargo carrier I fabricated for my wife's old car to carry a large cooler. We would fill the cooler full of water for watering plants around the yard.
View attachment 573121View attachment 573122View attachment 573123
T-slot aluminum for ROPS-mounted lights. T-slot aluminum for versatile mounting for shovels/rakes/gas trimmer, etc. Wiring for lights is fully integrated into the main wiring harness at uses fused accessory circuit. Switch fits perfectly in pre-existing hole.
View attachment 573124
Obligatory steering knob.
View attachment 573125
Cross drawbar from TSC. I drilled out the two outer holes to fit some shackles. Seems to work well for general purpose stuff, including pulling small trees with the 3-point.
View attachment 573126View attachment 573127
Last, and certainly not least, a lever in place of the brake pedal-actuated differential lock. In my opinion, this (or something like it) is how the tractor should have come equipped originally. The lever gives a MUCH improved positive feedback on whether or not the differential lock is engaged. As an added bonus, the lever will engage the lock if moved forward OR backward. The 3-point sliding lock can also be used to lock the new lever in the locked position if need be. I rebent the 3-point height control lever so the handle grip angles inboard so the two levers do not interfere with one another. The lever is currently unfinished. I will likely 3D print a handle grip similar to what's already on the machine. Since the brake pedal no longer does double-duty, I took all the slack out of the braking mechanism. The brake now operates as you'd hope/expect.
Now... show me what you've come up with!
Similar problem on the old box blade I have. The bottom links on the 3pt need to open to 29inchs, which won't happen. So, I'm gonna have to remove 2 big pins to get the box on. Lining up the hole could be a pain, and I don't have a 1 5/16" socket. Is it worth it to look for a quick connect?
So far during the breaking 50 hr period I've not challenged this little tractor at all, but carrying around and using the 450# box might just be that challenge. I'm wondering if I'm going to need weight other than the FEL in the front.
OP
sa324owner
Member
Congratulations on the new tractor! I think you made a solid choice and I sincerely hope it treats you well.I just bought a SA324. I have a similar cross drawbar that you show above. The problem is that it is 3" too long to fit between 2 bottom links. I want this to lug around my splitter. The drawbar that came with it is very low, for my old back to deal with.
Similar problem on the old box blade I have. The bottom links on the 3pt need to open to 29inchs, which won't happen. So, I'm gonna have to remove 2 big pins to get the box on. Lining up the hole could be a pain, and I don't have a 1 5/16" socket. Is it worth it to look for a quick connect?
So far during the breaking 50 hr period I've not challenged this little tractor at all, but carrying around and using the 450# box might just be that challenge. I'm wondering if I'm going to need weight other than the FEL in the front.
I'm sorry to hear about your drawbar and box blade attachment issues. I'm unsure if a quick connect would help or not considering that your attachments seem like they might be wider than normal. Maybe you could make a dedicated post for that question?
Starting from square 1, are you sure the lower links on the tractor are as wide as they'll go when attaching? There are turnbuckles (likely silver in color) on the inside of each lower link that need to be unpinned and adjusted outward to clear the attachment's pins. After the pins are set and the lynch pins are inserted through the attachment pins, tighten the turnbuckles and insert their hairpin cotters again. It can definitely be a pain to wrestle everything into place on a box blade.
If that isn't the problem, could the pins on the box blade be flipped, for example, inward instead of outward? I believe my box blade's design would allow for the pins to be flipped, but I'm unsure if that is ever something that needs to be done in practice (maybe whne connecting a category 1 implement to a category 0 tractor?).
I've had zero issue lugging around and using my 60" box blade, even with the 5 scarifiers most of the way down. A 60" blade is probably about as big as I'd go with this size/weight tractor, though.
When using the box blade, make sure you have the top link is adjusted such that the box blade isn't pitched digging in too much. You'll also need to be aware how to use the 4x4 and, possibly, the differential lock.
I would highly recommend some sort of liquid ballast in the tires if you don't have that already.
Good luck!
Willieintn
New member
- Joined
- Dec 28, 2021
- Messages
- 2
- Tractor
- Yanmar SA324
Thanks W. Your suggestions helped. I was in the process of flipping the pins on the box, but they were frozen solid, to the point that I was thinking about cutting them off. But it turned out the problem was not the box blade pins. The problem was operator malfunction. The lower 3 point links were extremely stiff almost frozen in place. Applied some penetrating oil and a couple of good kicks and they opened up just fine. Duh! Do I feel stupid. (you don't have to agree).
So, the box blade is installed and leveled and as soon as things dry up a little I'll be out on the driveway with it. Also, it's is a nice 400# ballast. So, for the time being the quick connect is on back burner.
I think I should get a ballast box first. I'm in hill country in east TN and this is a small tractor so I probably should have that soon. The question is what to fill it with. Any suggestions would be appreciated. I don't want to use concrete. So, I hoping I can find some cheap scrap metal. Does anyone use old lead acid batteries (with the acid dumped out). Seems like all that lead should be good for something. Maybe batteries with sand to fill in the open spaces?
Thinking about a 3 point carryall with wooden sides to carry fire wood etc.
OP
sa324owner
Member
I'm glad you got it resolved and that it turned out to be simple! Once a season I tend to go through the tractor and add some good quality marine grease to the moving bits that don't get as much use as the loader. That may keep it from happening again. Also, I tend to grease the loader on a more frequent schedule.Thanks W. Your suggestions helped. I was in the process of flipping the pins on the box, but they were frozen solid, to the point that I was thinking about cutting them off. But it turned out the problem was not the box blade pins. The problem was operator malfunction. The lower 3 point links were extremely stiff almost frozen in place. Applied some penetrating oil and a couple of good kicks and they opened up just fine. Duh! Do I feel stupid. (you don't have to agree).
So, the box blade is installed and leveled and as soon as things dry up a little I'll be out on the driveway with it. Also, it's is a nice 400# ballast. So, for the time being the quick connect is on back burner.
I think I should get a ballast box first. I'm in hill country in east TN and this is a small tractor so I probably should have that soon. The question is what to fill it with. Any suggestions would be appreciated. I don't want to use concrete. So, I hoping I can find some cheap scrap metal. Does anyone use old lead acid batteries (with the acid dumped out). Seems like all that lead should be good for something. Maybe batteries with sand to fill in the open spaces?
Thinking about a 3 point carryall with wooden sides to carry fire wood etc.
I would highly recommend liquid ballast for the rear wheels for two reasons:
1) The added weight will be very low to the ground. This will help with overall stability. Unfortunately, these tractors only have one rear wheel track setting and cannot be set wider. The terrain is mostly flat in my neck of the woods, but I've still considered adding some quality steel wheel spacers to the rear to increase the track an inch or two on either side.
2) The liquid ballast will permanent and not be in the way of attachments.
I had my rear tires filled by the dealer prior to delivery. It was less than $100 and seemed quite cost effective.
The caveat of the liquid ballast is that it does not add the 551 pounds of ballast the owner's manual states is needed. Wheel weights could be added to offset the difference, but there is no Yanmar wheel weight kit for the SA324 (only the SA424). I've considered casting removable concrete wheel weights using the wheels themselves as a form.
I really like your idea of some sort of modular ballast (old, sand-filled lead-acid batteries). Maybe those hardware store "traction sand" tubes/bags would be a good option? They're 50-70 pounds each and not terribly expensive.
I've tended to shy away from ballast boxes, though, since they aren't as "general purpose" as I'd like. They also seem somewhat pricey for what they are. After purchasing a 3-point carry all over the summer, however, what I've considered instead of a ballast box is to cast some interlocking concrete plates that I can stack and pick up fork-lift style using the carry all. This would let me use the carry all as a carry all, but quickly and easily swap out whatever I'm carrying with the stack of ballast weights. I've conceived using a large, hacked-up plastic tote as the basis for a form.
Good luck and please keep me in the loop on the direction you take!
bmaverick
Super Member
- Joined
- Sep 17, 2013
- Messages
- 7,386
- Location
- Beloit-WI
- Tractor
- Yanmar YM2610 ■YANMAR GURU■ EXTRAORDINAIRE
I really like your idea of some sort of modular ballast (old, sand-filled lead-acid batteries).
Use battery boxes instead of hacking into the batteries and having a mess. Plus, the covers snap on really well. You could also fill them with concrete too.
I've picked up 5 in the past year on close outs for a mere $5 each. These are Group-27 size too.
Wheelz
New member
- Joined
- Jun 18, 2022
- Messages
- 1
- Tractor
- yanmar 324
Well this thread seems to have died out but Ill give it a try... Just got a 324 and looking for Ideas for a grab handle to get off the tractor Im either pushing myself up with the arm rest or pulling myself up with the steering wheel... anyone make something up yet?
rfoxinc
New member
Co
Here is what l did, [post #8}
$11 at Hatbor Freight
congratulationsWell this thread seems to have died out but Ill give it a try... Just got a 324 and looking for Ideas for a grab handle to get off the tractor Im either pushing myself up with the arm rest or pulling myself up with the steering wheel... anyone make something up yet?
Here is what l did, [post #8}
$11 at Hatbor Freight
Attachments
bmaverick
Super Member
- Joined
- Sep 17, 2013
- Messages
- 7,386
- Location
- Beloit-WI
- Tractor
- Yanmar YM2610 ■YANMAR GURU■ EXTRAORDINAIRE
A ROPS grab handle is typical on SCUT and zeroturn mowers.Well this thread seems to have died out but Ill give it a try... Just got a 324 and looking for Ideas for a grab handle to get off the tractor Im either pushing myself up with the arm rest or pulling myself up with the steering wheel... anyone make something up yet?
The Polaris has this one.
Polaris 5439299-070 - GRAB HANDLE | Partzilla.com
Buy Polaris 5439299-070 - GRAB HANDLE. This OEM part is guaranteed by Polaris's limited part warranty ✓ FREE Shipping on qualified orders - Partzilla.com
 www.partzilla.com
Now, I don't at all drill holes in ROPS because if the tractor is ever sold, there is liability risk as it's a federal law.
BUT, you can use ROPS brackets to mount the handle.
")
On the older YM, F, FX, KE, RS Yanmars, we have fender handles to grab and hop into the seat.
Oh my, the SA221 has a very low grab handle if you want to call it one.
What about mounting something to the side below the dash? Is there structure for a grab handle there?
Last edited:
OP
sa324owner
Member
I feel that entry/exit on the SA324/424 isn't particularly great. I tend to use the fender-mounted grab handle and the loader upright together for entry/exit. I also sometimes use the steering wheel (which I feel uncomfortable doing).
@bmaverick: I pulled the "dash" on my SA324 years ago to map out the ignition/accessory wiring. If I'm remembering correctly, there isn't really any support structure to speak of under there.
@Wheelz: If your SA324 has a loader, I might recommend something similar to what @bmaverick proposed, but attached to the loader support arm(s) instead. I don't recall there being any pre-drilled hole in the uprights, though.
What I think might work well is a handle that attaches to the back side of the loader upright that curves in toward the hood/dash area so as not to obstruct entry/exit, but would provide a better alternative to grabbing the steering wheel. I shamelessly snagged some images from the Internet and modified them to illustrate what I'm thinking.
I've got some tree cleanup to do this week. I'll be sure to try to come up with a solution while using the tractor.
Attachments

rfoxinc
New member
Co
congratulations
Here is what l did, [post #8}
$11 at Hatbor Freight
LS Tractor Owner
Super Member
- Joined
- May 1, 2017
- Messages
- 7,668
- Location
- Edgewood, NM
- Tractor
- LS XG3025 TLB, Previously MT125 TLB, Craftsman GTS6500
You could slide a mount w/ a ball in there and have even a better "grab ball". Might actually work well !