what are the four holes for in the bottom of the TO-30 differential case?

   / what are the four holes for in the bottom of the TO-30 differential case? #51  
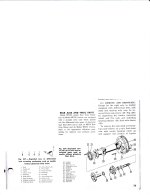
Keep it flowing from outside to inside like the pic/diagram. Outer seal, find a socket or something big enough to press on the outer edge of the seal when you go to replace it in the casting.
To remove anything use a seal puller tool from any auto store. Take the old bearings to a auto store and see if they're stock size. Replace or reuse, your choice depending on condition of existing ones. Pack them full of wheel bearing grease. Exchange brake shoes and keep spares for when you tear down other side drum. Cut drum if needed, or not. Pattern in drum will wear itself into new shoes if you don't cut it on a lathe.
 
   / what are the four holes for in the bottom of the TO-30 differential case?
  • Thread Starter
#52  
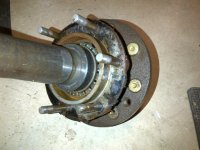
I'm probably most concerned about that shrink collar. I've replaced bearings and seals on stuff before, but never messed with any shrink-fit stuff. It's actually the removal that seems more difficult. The collar measures about 2" ID x 2.75" OD x 0.7" long. Wouldn't be so bad to set the shaft up horizontally on a mill and machine away one side of the collar till it gets really thin, but that shoulder sticking off the back of the bearing retainer shadows about half the length of the collar. Anyone removed one of those collars before?

TO-30_left_rear_axle_looking_at_collar_and_bearing.jpg
 
   / what are the four holes for in the bottom of the TO-30 differential case? #53  
My breakdown of a 135 rear end is a little different than the TO 30 but my manual states the same thing; drill the collar and chisel for removal. For installation it states heat to 800 degrees F and seat against bearing cone before it cools.

135 rear diff.jpg
 
   / what are the four holes for in the bottom of the TO-30 differential case? #54  
....... and nice work on the adapter, looked very stable :thumbsup:
 
   / what are the four holes for in the bottom of the TO-30 differential case?
  • Thread Starter
#55  
....... and nice work on the adapter, looked very stable :thumbsup:

Thanks. Gave me an excuse to use the machine tools and practice my welding. :)

When removing the collar, how careful do you have to be not to drill or gouge the shaft? Ideally, you'd just get the collar, but if we're talking hand-held drill and chisel, I don't see having real precise control over drilling depth or where the chisel stops when you whack it. I've always been taught to be real careful with shafts that have any kind of seal or bearing that goes on them (i.e. don't scratch or ding the nice ground surfaces). I guess if damage happened in just the section where the collar sits, the new one would cover it up. There'd still be a drill dimple under there and/or a chisel gouge (hopefully one that doesn't raise material to either side of it). I'd assume the damage would be small enough relative to the 2" diameter of the shaft not to compromise its integrity. Maybe I'm overthinking it, but it'd be nice to keep the shaft in perfect condition - unless someone has already boogered it up and I just can't see it. :hammer:
 
   / what are the four holes for in the bottom of the TO-30 differential case? #56  
Thanks. Gave me an excuse to use the machine tools and practice my welding. :)

When removing the collar, how careful do you have to be not to drill or gouge the shaft? Ideally, you'd just get the collar, but if we're talking hand-held drill and chisel, I don't see having real precise control over drilling depth or where the chisel stops when you whack it. I've always been taught to be real careful with shafts that have any kind of seal or bearing that goes on them (i.e. don't scratch or ding the nice ground surfaces). I guess if damage happened in just the section where the collar sits, the new one would cover it up. There'd still be a drill dimple under there and/or a chisel gouge (hopefully one that doesn't raise material to either side of it). I'd assume the damage would be small enough relative to the 2" diameter of the shaft not to compromise its integrity. Maybe I'm overthinking it, but it'd be nice to keep the shaft in perfect condition - unless someone has already boogered it up and I just can't see it. :hammer:

I think the axle shaft is way harder than you think it is, so I wouldn't overly worry about damaging it by removing the collar. How about using a cutting torch to blast through it? You're going to replace the bearing anyway right? Or, what about milling through the collar by running the bit parallel to the shaft and 'drilling' down toward the bearing to split it into pieces by drilling in a couple of places around the collar? Is it possible to get in that close to avoid the retainer shoulder?
I seem to remember Volvo using a similar setup with a collar that had to be removed on their 122 model rear axles. I seem to remember having to use a cutting torch to cut them off, I can't really see any better or quicker/safer way to do what you need to other than a heat wrench. You might be able to hand form a metal shield over the bearing cavity area to keep any schlag from sticking to the critical area while cutting? Two cuts and done?!:thumbsup:
 
   / what are the four holes for in the bottom of the TO-30 differential case? #57  
I know it's just a tractor, as an aircraft engineer I get a little twitchy when risking damage to bearing surfaces. If I were comfortable I had the space needed to remove it with minimal risk I would attempt it. While minimal there are acceptable limits for damage to bearing surfaces on aircraft too.

I'm sure you have checked for availability of parts before drilling anything, sometimes they can be difficult to find for these old girls.
 
   / what are the four holes for in the bottom of the TO-30 differential case?
  • Thread Starter
#58  
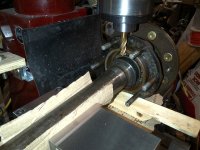
Thanks, guys. I stuck the axle up on the mill last night just to see what I'd be able to do with it on there. Looks like I should be able to take a decent chunk out of the collar with a 1/2" end mill. I think I'm going to take Coyote machine's suggestion and make a shield to cover the bearings so I don't get chips in there (maybe just made of cardboard). If I had a decent-size T-slot cutter, I could reach in under the shoulder of the bearing retainer casting to get more of the collar.

left_rear_axle_on_mill_to_remove_shrink_collar.jpg

After the end mill, maybe try to eat away some of what's left by drilling and then careful application of a carbide ball burr in a die grinder. I wonder if doing it on one side would relieve enough stress in the collar that I'd be able to slide it off. Guess we'll find out.

I ordered new seals, collar, brake shoes, and outboard gasket yesterday. Will have to get the bearings out and see what they look like before deciding on those.
 
   / what are the four holes for in the bottom of the TO-30 differential case? #59  
That looks like you'll be able to take a good portion of it, how much of the collar is encased by the retainer?

If it works well I wonder if two or three relief cuts might decrease enough of the surface tension to help remove it without having to necessarily split it.
 
   / what are the four holes for in the bottom of the TO-30 differential case?
  • Thread Starter
#60  
About 0.4" of the collar's length is clear. The other 0.3" is shadowed by the shoulder.

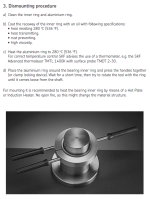
When I heard shrink-fit collar, I wondered if you could remove it with heat as well. My first thought was the intimate contact between the ID of the collar and the OD of the shaft would just conduct heat to the shaft and expand it along with the collar. But apparently, they do it with bearings:

SKF Aluminium dismounting rings

I guess as long as the mass of the collar is small relative to the shaft and you can heat it quickly, it could work. Working off a nominal ID of 2" at 70 deg F and a 6.7x10^-6 in./(in. deg F) CTE, taking the collar up to 572 deg F would grow the ID 0.007". Even just taking it up to 350 deg F would grow it 0.004". Maybe I need to try making one of these aluminum clamp rings:

SKF_TMBR_dismounting.png

With the machining option, it'd be nice if you whittled enough away that the last little bit just failed in tension from the stress.
 

Tractor & Equipment Auctions

2020 KUBOTA RTV X1100C UTV (A51406)
2020 KUBOTA RTV...
1999 Toyota Camry Sedan (A50324)
1999 Toyota Camry...
2011 Liebherr L586 (A52128)
2011 Liebherr L586...
2018 FORD EXPEDITION (A51406)
2018 FORD...
John Deere LX5 3 pt Rotary Mower (A50515)
John Deere LX5 3...
2014 Yale 3 stage 8500lbs lift solid tire forklift (A52128)
2014 Yale 3 stage...
 
Top