The building of 101 Pepperbush lane

   / The building of 101 Pepperbush lane
  • Thread Starter
#41  
I am amazed how fast this has gone already. Maybe you should have titled it Building a house in the woods in 89 days :laughing:

Well we had planned on starting it that June and getting in by Christmas. We had sold our house in May and the people wanted to close by the end of Nov. and move in Dec. This was 2009 and if they closed before Dec. they would get the $6000.00 to $8000.00 tax credit.

Then Janes health issue came about and the race was on to get her into the new home by the end of Oct. two months early. This project really showed us how much our friends and even people that did not know us can care and help out in a bind.I have always and still do go above and beyond for my customers.

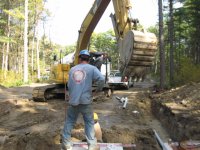
Steve the customer/friend that did our excavation for the house for the cost of diesel built a vacation home in New Hampshire ten years ago with his partner. Yes I did supply all the lumber but then spent the next eight four day weekends up there with them framing for the exercise :).
 
   / The building of 101 Pepperbush lane
  • Thread Starter
#42  
It's is now the first week of Sept. and we have a crew doing the siding, putting up the deck, the plumber and the heating contractors have now started also.
 

Attachments

  • image-1730740182.jpg
    image-1730740182.jpg
    235.6 KB · Views: 159
  • image-86435146.jpg
    image-86435146.jpg
    232.2 KB · Views: 147
  • image-1981758999.jpg
    image-1981758999.jpg
    235.8 KB · Views: 149
  • image-2173498671.jpg
    image-2173498671.jpg
    360.4 KB · Views: 168
  • image-2839673016.jpg
    image-2839673016.jpg
    361.7 KB · Views: 136
  • image-2574669110.jpg
    image-2574669110.jpg
    283.2 KB · Views: 134
  • image-3151094816.jpg
    image-3151094816.jpg
    277.3 KB · Views: 142
  • image-1251492866.jpg
    image-1251492866.jpg
    345.4 KB · Views: 140
   / The building of 101 Pepperbush lane
  • Thread Starter
#43  
Lots of siding pictures
 

Attachments

  • image-3469565923.jpg
    image-3469565923.jpg
    315.7 KB · Views: 145
  • image-2088303574.jpg
    image-2088303574.jpg
    283.4 KB · Views: 156
  • image-1366562494.jpg
    image-1366562494.jpg
    273.2 KB · Views: 147
  • image-2458384403.jpg
    image-2458384403.jpg
    265.5 KB · Views: 139
  • image-2662655128.jpg
    image-2662655128.jpg
    242.8 KB · Views: 142
  • image-1554166399.jpg
    image-1554166399.jpg
    242 KB · Views: 152
  • image-3882577284.jpg
    image-3882577284.jpg
    262.2 KB · Views: 209
  • image-2907558982.jpg
    image-2907558982.jpg
    293.4 KB · Views: 140
   / The building of 101 Pepperbush lane
  • Thread Starter
#44  
And still more siding. The concrete floor gets pored, Jane checks out my wiring job. And the neighbors goat stops by to check us out.
 

Attachments

  • image-1304776345.jpg
    image-1304776345.jpg
    262.6 KB · Views: 171
  • image-1062573967.jpg
    image-1062573967.jpg
    241.5 KB · Views: 140
  • image-3507573057.jpg
    image-3507573057.jpg
    267.9 KB · Views: 194
  • image-3704244017.jpg
    image-3704244017.jpg
    259.2 KB · Views: 186
  • image-2138155216.jpg
    image-2138155216.jpg
    316.3 KB · Views: 149
  • image-1698093124.jpg
    image-1698093124.jpg
    262 KB · Views: 148
  • image-534903334.jpg
    image-534903334.jpg
    248.6 KB · Views: 167
  • image-1730349752.jpg
    image-1730349752.jpg
    322.9 KB · Views: 211
   / The building of 101 Pepperbush lane
  • Thread Starter
#45  
It's now the last week of Sept. the rough plumbing is done and inspected as is the electric. I did the electric work my self with the help of one of my customers that is a master electrician. He put all the boxes and outlets in and I pulled the main runs and jumpers. He put the panel in and together we did all the underground from the street to the trans. then to the house 700'+. Also the heat and air are all roughed and inspected.
 

Attachments

  • image-2008440741.jpg
    image-2008440741.jpg
    322.2 KB · Views: 123
  • image-638138844.jpg
    image-638138844.jpg
    408.9 KB · Views: 124
  • image-4079182878.jpg
    image-4079182878.jpg
    389.5 KB · Views: 127
  • image-2355435055.jpg
    image-2355435055.jpg
    401.4 KB · Views: 119
  • image-3653982110.jpg
    image-3653982110.jpg
    377.4 KB · Views: 146
  • image-1059771123.jpg
    image-1059771123.jpg
    264.5 KB · Views: 143
  • image-1539863573.jpg
    image-1539863573.jpg
    368.2 KB · Views: 132
   / The building of 101 Pepperbush lane
  • Thread Starter
#46  
Now for the insulation and blue board. Sorry could not find any photos of the insulation install. I had them leave out the insulation in the cellar ceiling as we wanted to try and heat with a wood stove in the walk out cellar. The building inspector did not want to past the insl. Inpection do to this point . But with a few well chosen words h was ok with it.:)
 

Attachments

  • image-3128929563.jpg
    image-3128929563.jpg
    257.2 KB · Views: 111
  • image-625484567.jpg
    image-625484567.jpg
    308.1 KB · Views: 123
  • image-2838001305.jpg
    image-2838001305.jpg
    300.5 KB · Views: 127
  • image-1455486855.jpg
    image-1455486855.jpg
    253.6 KB · Views: 116
  • image-174922360.jpg
    image-174922360.jpg
    271.6 KB · Views: 118
   / The building of 101 Pepperbush lane
  • Thread Starter
#47  
Now it's Oct. first the insulation took one day from 7:00am to about 4:00pm. These guys worked hard and left the place cleaner then it was when they started. The crew has started to hang the board and said the plasterers will start the next day as he would have at least two if not three rooms ready for them
 

Attachments

  • image-2255574506.jpg
    image-2255574506.jpg
    222.8 KB · Views: 112
  • image-604602267.jpg
    image-604602267.jpg
    195.2 KB · Views: 111
  • image-506899353.jpg
    image-506899353.jpg
    177.4 KB · Views: 109
  • image-3098137135.jpg
    image-3098137135.jpg
    280.8 KB · Views: 132
  • image-1936158508.jpg
    image-1936158508.jpg
    237.8 KB · Views: 120
  • image-2937393666.jpg
    image-2937393666.jpg
    280 KB · Views: 131
  • image-3619415146.jpg
    image-3619415146.jpg
    207.7 KB · Views: 113
  • image-4052940133.jpg
    image-4052940133.jpg
    224 KB · Views: 124
   / The building of 101 Pepperbush lane #48  
It's now the last week of Sept. the rough plumbing is done and inspected as is the electric. I did the electric work my self with the help of one of my customers that is a master electrician. He put all the boxes and outlets in and I pulled the main runs and jumpers. He put the panel in and together we did all the underground from the street to the trans. then to the house 700'+. Also the heat and air are all roughed and inspected.

What's with the two concrete boxes? I think I understand the reason for the one with the manhole ( you've got a 700' foot run - you'd never pull wire that distance - got to have something part way thru the run) - but what's the second one next to it - that has two conduits going over to it?

Why 3 conduits? I can see two - one for electrical power and one for data lines (cable, internet, phone, etc) - what's the third one for?

What size conduit did you run for the electric? I ran conduit underground a few years back when I built my barn - and I'm hoping to get the power run out there sometime soon (finally) - but I've read some stuff in the intervening years that makes me think I may have run too small of a size conduit for the amps of electrical service I want to put out there.

Great thread - keep posting the pics!
 
   / The building of 101 Pepperbush lane
  • Thread Starter
#49  
What's with the two concrete boxes? I think I understand the reason for the one with the manhole ( you've got a 700' foot run - you'd never pull wire that distance - got to have something part way thru the run) - but what's the second one next to it - that has two conduits going over to it?

Why 3 conduits? I can see two - one for electrical power and one for data lines (cable, internet, phone, etc) - what's the third one for?

What size conduit did you run for the electric? I ran conduit underground a few years back when I built my barn - and I'm hoping to get the power run out there sometime soon (finally) - but I've read some stuff in the intervening years that makes me think I may have run too small of a size conduit for the amps of electrical service I want to put out there.

Great thread - keep posting the pics!

Jim the box on the right in this picture is just a junction with manhole the box on the left is for the transformer. I split off two lots out front to sell off to pay for the 18 acres for my lot so the line coming in is 14000 volts to the transformer. The 4" pipes going to the junction box are for the power one as a spare for future use as required by N-Star elec. The two pipes going to the transformer from the manhole carry the power to the trans. then back out to the manhole to my house and the other lots.

The 3" pipe that goes to the left of the manhole is for cable. We did not bring in a phone line we do not have a land line phone but if need be we could get it with the cable. I will take a picture of it as it looks now with all the pull boxes and trans. In place. They are all in the middle of a turn around at the end of the driveway before our house.
 

Attachments

  • image-660077463.jpg
    image-660077463.jpg
    264.5 KB · Views: 149
   / The building of 101 Pepperbush lane #50  
Jim the box on the right in this picture is just a junction with manhole the box on the left is for the transformer. I split off two lots out front to sell off to pay for the 18 acres for my lot so the line coming in is 14000 volts to the transformer. The 4" pipes going to the junction box are for the power one as a spare for future use as required by N-Star elec. The two pipes going to the transformer from the manhole carry the power to the trans. then back out to the manhole to my house and the other lots.

The 3" pipe that goes to the left of the manhole is for cable. We did not bring in a phone line we do not have a land line phone but if need be we could get it with the cable. I will take a picture of it as it looks now with all the pull boxes and trans. In place. They are all in the middle of a turn around at the end of the driveway before our house.

Aaaah - ok. Now I see.

The transformer sits in a sealed box? Is there access on the side or something like that? Just curious.
 
   / The building of 101 Pepperbush lane #51  
Aaaah - ok. Now I see.
The transformer sits in a sealed box? Is there access on the side or something like that? Just curious.
I would assume that the wires enter and exit through the underside of the transformer using the rectangular hole seen in the top of the left box in the last picture.

Aaron Z
 
   / The building of 101 Pepperbush lane
  • Thread Starter
#52  
I would assume that the wires enter and exit through the underside of the transformer using the rectangular hole seen in the top of the left box in the last picture.

Aaron Z

Aaron you are right the trans. is on top and the wires come up from bellow. Here are a few pictures to show you what it looks like now 3 1/2 years later. The first pic. is looking towards the house from the driveway. The next from the house towards the road. The third shows the trans. the white rock is sitting on the manhole and to the right is the pull box for the cable. The last is to show the grass we planted to hide it all.
 

Attachments

  • image-2271742732.jpg
    image-2271742732.jpg
    447.6 KB · Views: 172
  • image-736658460.jpg
    image-736658460.jpg
    459.2 KB · Views: 160
  • image-2977148455.jpg
    image-2977148455.jpg
    541 KB · Views: 177
  • image-401112554.jpg
    image-401112554.jpg
    529.4 KB · Views: 173
   / The building of 101 Pepperbush lane #53  
I would assume that the wires enter and exit through the underside of the transformer using the rectangular hole seen in the top of the left box in the last picture.

Aaron Z


Doh!... I'm not sure why I was even thinking this - but I was looking at the box and wondering why a transformer would be put inside a box like that and buried with no access. I guess looking at the construction pic it just wasn't clear that a transformer would be placed on top of the box. Makes sense now with the additional pictures GBOUTDOORS posted.
 
   / The building of 101 Pepperbush lane #54  
Enjoying your build, and your pix.

I guess we'll have to wait til the end to hear about the happy ending. :reading:
 
   / The building of 101 Pepperbush lane
  • Thread Starter
#55  
Oct. second and the plasterers have started. Also the well truck is on site and starting the well. We have town water that goes buy the property but they wanted us to spend $12,000.00 on special pipes to bring it up to the circle and out to the three lots. The well cost me $5000.00 he had 15 gal. per min. at 150' but when I got home the truck was still there.

The next morning he was back drilling away so a asked him why seeing as we had 15 gal. already . To this he said he was going to charge me a flat rate of $5000.00 and wanted to be sure the well was going to produce far more than we needed. I have used him on many jobs before and he said this was his way of saying thanks. He stopped at 350' put the pump at 150' and showed me how the water was only 2' down from the top of the casing and that at times the water may over flow do to the pressure in the well :)
 

Attachments

  • image-3710311622.jpg
    image-3710311622.jpg
    383 KB · Views: 134
  • image-3328844862.jpg
    image-3328844862.jpg
    418.7 KB · Views: 138
  • image-3219986977.jpg
    image-3219986977.jpg
    344.2 KB · Views: 147
  • image-3428073974.jpg
    image-3428073974.jpg
    246.1 KB · Views: 139
  • image-754648583.jpg
    image-754648583.jpg
    231.7 KB · Views: 134
  • image-3287155352.jpg
    image-3287155352.jpg
    164.2 KB · Views: 133
  • image-2728270160.jpg
    image-2728270160.jpg
    227.2 KB · Views: 128
  • image-1733611769.jpg
    image-1733611769.jpg
    211.4 KB · Views: 138
   / The building of 101 Pepperbush lane
  • Thread Starter
#56  
We did not have water on the site for the plaster so a neighbor let me fill this container from his well. It took three fills to do the job. Jane picked out the front door color so I painted it up for her.
 

Attachments

  • image-2596963021.jpg
    image-2596963021.jpg
    417.8 KB · Views: 137
  • image-46255582.jpg
    image-46255582.jpg
    398.1 KB · Views: 140
  • image-2550627870.jpg
    image-2550627870.jpg
    190.5 KB · Views: 148
  • image-2508811596.jpg
    image-2508811596.jpg
    228.7 KB · Views: 156
  • image-2549800427.jpg
    image-2549800427.jpg
    222.6 KB · Views: 117
  • image-271503984.jpg
    image-271503984.jpg
    218.2 KB · Views: 127
  • image-3669167402.jpg
    image-3669167402.jpg
    171.6 KB · Views: 137
   / The building of 101 Pepperbush lane
  • Thread Starter
#57  
We move on to Oct.9th and the plastering is done and dried. The interior doors, window trim and baseboard have been delivered. The finish carpenters take over the job and install all the doors. The doors are all hollow core masonite 4 9/16 split jambs with 3 1/2" stafford casing apl.
 

Attachments

  • image-747105091.jpg
    image-747105091.jpg
    218.8 KB · Views: 118
  • image-1596268796.jpg
    image-1596268796.jpg
    240.5 KB · Views: 107
  • image-3331359471.jpg
    image-3331359471.jpg
    195 KB · Views: 107
  • image-541037947.jpg
    image-541037947.jpg
    173.8 KB · Views: 122
  • image-2300183554.jpg
    image-2300183554.jpg
    235.3 KB · Views: 114
  • image-1937018655.jpg
    image-1937018655.jpg
    208.8 KB · Views: 107
  • image-4072184682.jpg
    image-4072184682.jpg
    240.6 KB · Views: 123
   / The building of 101 Pepperbush lane
  • Thread Starter
#58  
Oct.10th they finish putting the doors in first thing in the morning and then the painters take over to prime walls and trim.
 

Attachments

  • image-4154034982.jpg
    image-4154034982.jpg
    223.1 KB · Views: 117
  • image-1543466055.jpg
    image-1543466055.jpg
    214.6 KB · Views: 115
  • image-2700520261.jpg
    image-2700520261.jpg
    225.8 KB · Views: 116
  • image-4253960946.jpg
    image-4253960946.jpg
    166.7 KB · Views: 107
  • image-454740107.jpg
    image-454740107.jpg
    158.1 KB · Views: 110
  • image-3416035560.jpg
    image-3416035560.jpg
    147.5 KB · Views: 114
  • image-2115785183.jpg
    image-2115785183.jpg
    192.4 KB · Views: 119
  • image-527299935.jpg
    image-527299935.jpg
    215.4 KB · Views: 126
  • image-36776877.jpg
    image-36776877.jpg
    175.2 KB · Views: 120

Marketplace Items

2025 GPS Trailer (A56857)
2025 GPS Trailer...
2016 Ford Explorer AWD SUV (A59231)
2016 Ford Explorer...
2008 Ford F-250 Reading Service Truck (A59230)
2008 Ford F-250...
UNUSED FUTURE 12" HYD AUGER (A52706)
UNUSED FUTURE 12"...
2019 MACK GRANITE (A58214)
2019 MACK GRANITE...
TOPCAT HCRC 72" HYD BRUSH CUTTER (A52706)
TOPCAT HCRC 72"...
 
Top