t joint weld prep

/ t joint weld prep #1  

swick1

Platinum Member
Joined
Jul 11, 2007
Messages
872
Location
WV
Tractor
John Deere 1026R
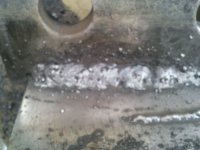
I'm getting ready to weld up my backhoe ripper with an old AC buzzbox. The shank is 1" and the top plate that attaches it to the ears is 1/2".

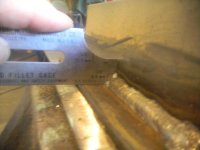
I am trying to figure out how big to make my bevels in the 1" shank for the t joint. I looked online and saw 1/4" as a recommended bead size. You can see pictures of it here:

http://www.tractorbynet.com/forums/build-yourself/220577-john-deere-260-backhoe-ripper.html

Do you have any suggestions for the amps setting on the welder? It's 220VAC.
 
/ t joint weld prep #2  
You are going to want WAY more than a 1/4" bead when done:confused2:

I would bevel the 1" peice about 3/8's on EACH side. This will leave you with only about 1/4" in the middle.

Then (as others will reccomend here) burn in a root pass with 6011 and then all subsequent passes with 7018 untill you have a nice looking fillet.

But it sounds like you are a newbie welder and those two rods can be a pain to run, especially if you dont have a good DC welder.

I personally wouldnt have any problems beveling like I mentioned and doing the whole thing with some 7014 on about 180A. I would be confident that It wouldnt break if I were doing it that way.
 
/ t joint weld prep
  • Thread Starter
#3  
I will go ahead with your suggestion. Ill post pics of the root pass for your review.
 
/ t joint weld prep #4  
I am suprised others havent jumped in here. I have welded a LOT of things over the years. And I consider myself to be a good welder. But I am by no means a professional.

And honestly, I dont think I have ever did the method I mentioned. (6011 root/7018cap). I only stated that because it seems that is what everyone says most of the time:confused2:

You can do what you want. But if you arent a newbie to welding, just do what you are most comfortable with. Because it doesnt matter what rod or method you use, a good weld trumps a poor one. So if you havent ever welded with 6011/7018, your first go at it probabally isnt going to be the best. In which case, I would say a rod you are familiar with would be stronger, or just practice with the 6011/7018 until you feel comfortable enough to tackle your project.
 
/ t joint weld prep #5  
I am guessing that the 1/4" is the bevel and not the bead size.. I would always suggest beveling 50% of the thickness and at 1" I would say to use a 5/32 at minumum rod for the root. Burn what you want but 1" material demands a hot rod.
 
/ t joint weld prep #6  
If you really want it to hold the first time, bevel the 1-inch plate at least 37-degrees, if not 45-degrees. And put enough weld to have 1/2-inch reenforcement outside of the plate on each side.
When not working off blueprints I go with my gut and make a decision on what the item is going to be used for. If the item is not really going to be stressed then I cut the bevels, and weld the amount accordingly. You can over weld things at times.
 

Attachments

  • T-joint.jpg
    T-joint.jpg
    18 KB · Views: 567
  • 250 +.jpg
    250 +.jpg
    130.1 KB · Views: 750
/ t joint weld prep #7  
What size back hoe? a single 1 inch ripper is really gonna be put to the test.

Non critical application though so don't worry to much, 7024 is an easy to use rod and works well with ac, work has to be horizontal which is doable, just not sure how it would work inside that bevel and 90???

JB.
 
/ t joint weld prep
  • Thread Starter
#8  
I got a new tombstone welder and it still wants to stick bad with bigger rod. Its on a 30 amp breaker. Is this the problem?
 
/ t joint weld prep #9  
I got a new tombstone welder and it still wants to stick bad with bigger rod. Its on a 30 amp breaker. Is this the problem?

Possibly, if the wire is only 10 ga. might not be getting enough juice to the welder. The breaker itself wouldn't matter to much as long as it was not tripping.

There has been some discussion on what input amps these cracker boxes really need, so if your breaker is not tripping and your sticking rod to the work, try cranking up the amps more for now. If the rod stops sticking as much, but then you start tripping the breaker, you'll know you need more input amps.

What rod and how many amps are you using now?

JB.
 
/ t joint weld prep #10  
I got a new tombstone welder and it still wants to stick bad with bigger rod. Its on a 30 amp breaker. Is this the problem?

I suggest you pick up some Hobart 335-A 6011. It must have some arc stabilizer in the flux, this rod is child's play compared to other rods I've run. Amp for Amp it's the best penetrating 60 series rod I've run too. Next would be ESAB's Sureweld 10P-Plus 6010, but you can't run 6010 on your machine.
 
/ t joint weld prep #11  
I would think that if you follow the sketch on the attachment thread with all the gussets on it, a 1/4" fillet would be sufficient. If you bevel the plates so you get at least half the thickness ( 1/3 on each side and 1/3 unbevelled) then top with 3/8 fillet weld, it will never break if the weld is solid. If you can weld it flat or slightly inclined, E 7018 in either 3/32 or 1/8" size will work in the tombstone Lincoln. About 125-150 amps should weld good in flat or slightly inclined uphill for the 7018 works best for beginner welders.. I would use the 6011 as a first pass then fill it and cap with the 7018. They are stronger and more ductile than the 60xx series rods. Just keep as short an arc as possible without them sticking. Get the AC version of the 7018 for your crackerbox welder. The tombstone welders like to run a longer arc to avoid the rod sticking which makes it aggravating somewhat with the 7018 as they need a short arc length to weld properly but the 7018AC helps with that. I have used hundreds of pounds of DC 7018 with Lincoln Tombstone welders back in 60's and 70's when all I had was the AC machine and 7018 AC was not made yet and other than hard to start and occassionally arcing out, the weld was strong. I even welded cast steel and stainless steel with them with good results although the welds would rust on the stainless.
 
/ t joint weld prep
  • Thread Starter
#12  
Success!!! The wiring at the breaker was 110v. I changed it aroumd and now it really cooks! I still could use a 50 amp breaker though because it is tripping every half rod at 150 amps.
 
/ t joint weld prep #13  
Success!!! The wiring at the breaker was 110v. I changed it aroumd and now it really cooks! I still could use a 50 amp breaker though because it is tripping every half rod at 150 amps.

That machine is supposed to be on a 50amp circuit... with the appropriate sized wire from breaker to outlet of course.

I agree with the 6011 root and 7018 filler. BUT if you don't have 6011 or 6010 for a root pass 7018 will give a good result on it's own.

I'd use 5/32 rods... but you could get away with 1/8 if you work them right.
 
/ t joint weld prep #14  
It's all about the stress placed on the end product. 1" attached to 1/2" material, the joint will be no stronger than the 1/2" plate the 1" Ts into. Piling a lot of filler on top of a well filled fillet adds nothing to the strength. In fact a fillet weld should be somewhat concave when completed with no undercut on either side. Nothing weakens a joint more than undercutting. Makes a natural path for a crack. I have used AC buzz boxes a lot. Now have an AC/DC that I only use on DC. The 6011 root pass is good info. The little drawing in one of the posts is the way I would do the bevel. If the molten puddle does not penetrate and fuse well on both sides you have a weak joint so you need to assure the heat gets down in there. If apperanace is not the goal you can take it 6011 all the way. Your metal is probably tensile rated no higher than 60,000 PSI anyway. The first to numbers are the tensile strength. The 7018 is a low hydrogen rod and makes a nice bead with little splatter and easy removed slag, pops right off, builds up fast, and is good all posistion including downhand. I disagree on it being flat work only. I use 7015 with my DC reverse. 18 is made for both AC and DCR. Amp settings? They are all only an approximation. Every machine is different with different fudge factoes. Practice and run at the highest amps you are confortable with. Only too low amps gives a bad weld all other factors equal. Higher amps it is easier to strike and maintain the arc. If your weld deposit is thicker than a dime higher than the adjacent material you are too cold. Diameter of the rod at the right heat will determine the width of the puddle unless you weave a lot. It takes a lot of practice to get a weave down pat. I use a figure 8 weave a lot for vertical work opr if I have a wide joint to fill as you can control the puddle better. There are some inexpensive manuals out there for the novices which can get you up and running fast.

Hopes this helps, from and "old" pipefitter/welder. Tractors are a lot more fun.
 
/ t joint weld prep
  • Thread Starter
#15  
Thanks for the help guys. Im going to weld this weekend. I will post pics.
 
/ t joint weld prep
  • Thread Starter
#16  
This is from my first weld bead. I was holding the rod too far away from the work.
 

Attachments

  • 2011-10-11 16.31.24.jpg
    2011-10-11 16.31.24.jpg
    105.7 KB · Views: 706
/ t joint weld prep #17  
Even with a slightly long arc, you shouldnt have that much porosity. Check your rods for moisture or block the wind from the welding area. Looks like you were running too cold also. You may need to go to a smaller rod if you are maxing out your breaker capacity. You have to get the amps up to the correct number for the rod you are using if you expect to get a good weld. 150 amps if correctly measured would burn a 5/32 rod but with inexperienced welders, I never recommend larger than 1/8" as the larger rods are the harder they are to use correctly.
 
/ t joint weld prep #18  
This is from my first weld bead. I was holding the rod too far away from the work.

Swick,

If that was done with 5/32 it is way too cold. Your 150 Amp problem is going to be a problem trying to do a 1/2" fillet (your tee word). Use 1/8 as hot as you can sustain your weld w/o tripping the breaker. I always run a little hotter than most but then I have done a lot of this. Hot, short arc, stay ahead of the puddle and don't let it pile up. Better to have a small hot puddle than a large cold one. Point your rod toward the cold metal not toward the puddle. Later you can get to where you can work it both ways depending on what you want to do. Remember you are fusing the metals, both pieces and the rod, lay it on top and you do not have a weld. I gave away all my books on welding long ago or I would send you one. You may have to go with 3/32 rod with your amp limit. It will work ok, just take a lot longer. To start, use what we call stringer beads; small beads tht overlap each other. Get that down before you try a weaving pattern. Practice on scrap till you get it down. When I first started I burned 50# of rod before the instructor gave me an A. And that did not include vertical or overhead work much less welding down hand. It is difficult to do this on the net, better if you can see the student's technique and provide guidance and corrections. Find a friend who welds well and let him (her) coach you. Too bad you are not just down the road.

Ron
 
/ t joint weld prep
  • Thread Starter
#19  
I switched out my circuit wiring to 6ga and put in a 50 amp breaker. I played around some more and got a much nicer looking weld with undercut, so i'm sure that i am penetrating well. I just need to modify technique to lose the undercut. Thanks for the advice so far! I always thought you needed to point toward the puddle as you drag the rod? What does turning it the other way do?
 
/ t joint weld prep #20  
I switched out my circuit wiring to 6ga and put in a 50 amp breaker. I played around some more and got a much nicer looking weld with undercut, so i'm sure that i am penetrating well. I just need to modify technique to lose the undercut. Thanks for the advice so far! I always thought you needed to point toward the puddle as you drag the rod? What does turning it the other way do?

It makes sure you get the heat to the bottom of the joint, you have to hold a close arc though and move fast enough to ensure you do not blow a hole through. Look on the reverse side of the weld, if you see a nice even bead on that side you are good, if you see the gap in the joint you are not penetrating to the bottom. You need about an 1/8" gap between the two pieces. Make sure you melt in all the tacks also, you should not see where they were on the reverse side. If you leave any unfilled areas you have a weak joint. It's hard to explain but you can see the result.

The root passes ARE THE MOST IMPORTANT, they do not have to be a lot of metal or look nice, just solid and sound. The next passes as you can experience is when you point toward the puddle as you get more build up. At that stage you are not worried about burning through and leaving a void or slag pocket. Practice Practice.

Ron
 
Last edited:

Marketplace Items

2011 John Deere 995 (A60462)
2011 John Deere...
2025 Pabreak Hydraulic Brush Cutter Skid Steer Attachment (A61567)
2025 Pabreak...
(4) Goodyear Logger Lug III 67x34.00-26 NHS Tires (A60462)
(4) Goodyear...
2020 John Deere 6105E (A60462)
2020 John Deere...
2015 BOBCAT T770 SKID STEER (A62129)
2015 BOBCAT T770...
2019 Takeuchi TL8 Track Loader with 72in Tooth Bucket (A61307)
2019 Takeuchi TL8...
 
Top