'Real Farming' with a CUT

/ 'Real Farming' with a CUT #1  

Greyfields

Silver Member
Joined
Mar 24, 2007
Messages
148
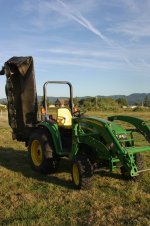
I bought my first tractor this last winter so am a relative new-comer to the whole "agricultural" world. Let me say that I wanted a tractor that would fit in our garden (surrounded by 8' high deer fencing) and would be a good tractor in the fields as well. I settled on the JD 4120. I had reserached tractors quite a bit, being of an engineering mind set, and found that a 35 HP PTO was about as small as you could go and still eventually get fun "farming toys" to play with. I also liked the weight and stability of the 4X20 series, which is 3700 lbs sihpped + driver + fuel + front loader + filled rear tires.

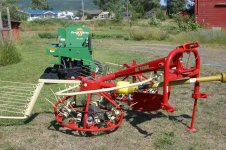
I got a couple PM's asking me to photo document some of my projects. I think a lot of people are in the same boat, being new to farming, having tractors, then trying to figure out how to use them. So, I will start sharing today. Old-timers, please tell me what I'm doing wrong. New-comers, remember no question is too stupid. I ask stupid questions all the time. Unless your craddle was painted John Deere green, people learn through experience, rather than having done it their whole lives.

First, our farm is Greyfields. It's located on Puget Island, WA, which is 5-mile long, 2-mile wide island in the middle of the Columbia River. We are 39 miles upsteam from Astoria, which makes us the first fresh water port on the River. Our river and sloughs are tidal and Wahkiakum County receives a stupidly high amount of rainfall ( ). We are raising pastured (grass fed) beef, pork and lamb; along with pastured/free range Christmas goose, duck, meat chickens and eggs. We sell at the Two Island Farm Market, which is at the farm adjacent to ours which is supremely convenient. You can find all these on Local Harvest if you search. One final note about our name, "Greyfields". It's an allusion to my cousins' dairy in Herefordeshire, England, called "Woofields" (Anglo-Saxon in origin for "the field with wolves"). My grandmother, mother and wife are all English, so we spend at least a month every year across the pond.... thus Christmas Goose being natural to us, rather than turkey.
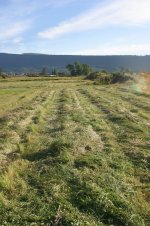
First, a panorama:
 

Attachments

  • panorama-smaller-yet.jpg
    panorama-smaller-yet.jpg
    710 KB · Views: 1,560
/ 'Real Farming' with a CUT
  • Thread Starter
#2  
First we'll cover hay making. I used to "buck bales" as a teenager, and there is nothing I hate more. Hay makes my skin itch, turn red and my nose run. After reading about modern hay making requiring a lot less labor, mostly due to round bales, I thought I'd give it a try. I don't have to touch the stuff much afterall, then. Plus, I don't need to hire labor.

Our pastures are pretty rotten currently; but mowing them monthly for 6 months has helped quite a lot. The "problem" plants are tussock grass, horsetail, canadian thistle and creeping buttercupt. The 'good' grasses are tall fescues, white clover and reed canary grass. The reed grasses grow very well here (water table is between 2' and 4' down depending on the tide and time of year), almost too well. They easily grow to over 10' in height and very densely. If you keep it well cut, though, it is actually nutritious.

You need three attachments to make hay.

a) a cutter
b) a rake
c) a baler

Here are some photos of the baler. First in the "travel" position. If you've only ever used brush hogs (rotary cutters), it takes some getting used to these since they are offset from the tractor. When you raise and lower them, the weight shifts and it can feel a little squirly at first. The big difference is that a disc mower cuts the grass off cleaning, but does not chop it. It's like a knife cutting it off at the ground, laying the grass down in a row. The first time I used a disc mower, I didn't think it was actually cutting and that the grass just laid down. Sometimes, it even remains standing in clumps, but if you pull on them you'll realize they've been sawed off.

The other photos are the discs, the mower and the cut grass laid in the swath.
 

Attachments

  • disc-mower-1.jpg
    disc-mower-1.jpg
    360.5 KB · Views: 1,288
  • disc-mower-2.jpg
    disc-mower-2.jpg
    542.6 KB · Views: 1,031
  • disc-mower-3.jpg
    disc-mower-3.jpg
    552.7 KB · Views: 1,180
  • disc-mower-4.jpg
    disc-mower-4.jpg
    493.1 KB · Views: 1,119
  • disc-mower-5.jpg
    disc-mower-5.jpg
    485.5 KB · Views: 948
/ 'Real Farming' with a CUT #3  
Very interesting.:D Keep the pictures going.:D

And thanks for the ones seen so far.:D :D

I always did like the smell of fresh mown evening hayfield's!:D
 
/ 'Real Farming' with a CUT
  • Thread Starter
#4  
Friday is market day, so I didn't get to finish posting the material I had. But here is a preview! I tedded my first fields today, and will be doing two more on Sunday. So, I'll have photos of before/after. Here is my rake/tedder:
 
/ 'Real Farming' with a CUT
  • Thread Starter
#5  
Picture didn't stick...
 

Attachments

  • rake-tedder.jpg
    rake-tedder.jpg
    535.8 KB · Views: 2,060
/ 'Real Farming' with a CUT
  • Thread Starter
#6  
And a preview of things yet to come....
 

Attachments

  • discs.jpg
    discs.jpg
    617.6 KB · Views: 971
  • drill.jpg
    drill.jpg
    454.7 KB · Views: 1,075
  • oats.jpg
    oats.jpg
    395.9 KB · Views: 950
  • plow.jpg
    plow.jpg
    559.4 KB · Views: 877
  • wheat.jpg
    wheat.jpg
    256.7 KB · Views: 724
/ 'Real Farming' with a CUT #8  
Greyfields -- great pictures! The panoramic was awesome! Thanks.

Nice, shiny... er, implements. And that's just what every small farmer... NEEDS!

(I'm showing all this stuff to my wife! As a way of educating and informing... OK, lobbying!)

Maybe a bit of info regarding (I guess I could search the web) the specs on your new tools would be a great addition.

Like the minimum HP for the disc mower, width of cut and what brand is the rake/tedder? (I didn't know there was a combo rake and tedder in one unit..)

Anyways, can hardly wait to hear (see) how the new baler does for ya'.

Keep 'em comin'!

AKfish
 
/ 'Real Farming' with a CUT #9  
Nice to see you discovered the tedder. Almost a necessity here in the PNW for first cutting.

I used a mower conditioner to speed up drying. I had a 2 row tedder and a side delivery/tedder by Madds-Amby of Holand if I recall. Loved the Madds rake and was a very unique design that worked quite well with tall grass or first cutting clover or alfalfa.

Would have never guessed Puget Island would be locate on the Columbia. So far from the Puget Sound.
 
/ 'Real Farming' with a CUT
  • Thread Starter
#10  
AKfish said:
Maybe a bit of info regarding (I guess I could search the web) the specs on your new tools would be a great addition.
Like the minimum HP for the disc mower, width of cut and what brand is the rake/tedder? (I didn't know there was a combo rake and tedder in one unit..)

The baler is in the driveway. I picked it up in Salem yesterday, then towed it home with my truck. Let me give you some links to the implements. I do have more photos, but am a bit busy with work and making hay, so it may take me a few days yet.

The baler (not yet photo'd) is a small round baler. It's a Massey Furgeson 1745.

http://www.masseyferguson.com/agco/MF/NA/HayForage/RoundBaler.pdf

My tractor is 42 HP / 35 PTO, so I really wanted the 1734, the smaller baler even. But, I was given the choice if waiting a year for it to come from the factory, or going the next size up. Since the 1745 has a 40 HP PTO requirement, we did a bunch of checking with the 'factory boys'. If I stay away from doing the maximize size bales (5') of heavy material (silage), the HP won't be an issue. I will no more probably Tuesday as I begin bailing.

The disc mower is a Hesston 1005. It requires 35 HP PTO and has a 6'6" cutting width.

http://www.hesston.agcocorp.com/@resource/agcoproductspecs/HS_Disc Mowers_Product Specs.pdf

The rake/tedder is a Braber TR300. The manual seems poorly translated from German. It's all I know, except that yes it indeed rakes and teds (I also looked at the Universal 300's which are rake/tedders, but the Braber was a far less complicated looking design). I haven't found a linky yet.

Anyway, my advice regarding tedding is to be sure and get your top link set correctly, so you're not tedding up the mulch from the previous cutting. I cut in a little too deep initially, so had to go back and pick up by hand a few clumps. I got my first job already baling on shares. It's a field of white clover / prennial rye, to be baled into the smallest diameter round bale I can make. It's far better than any forage on my farm, so I'm really excited!!
 
/ 'Real Farming' with a CUT #12  
Thanks for the pics, really like your pan shot. When I started looking at the photos of the shiny new equipment, I had my doubts, "is this guy gonna make a farmer?", then I saw the pic of the disc and saw the balin' ware (that's the way to spell it) and then I knew you are one.:D :D I know hayin' is a busy time, but keep the pics coming.
 
/ 'Real Farming' with a CUT
  • Thread Starter
#13  
Tedding....

Basically, this fluffs-up the hay, inverts some of it and un-bunches it so that it can dry more uniformly. All the research I've read says it actually does not make the hay dry faster, but it does help it dry uniformly. Regardless, after you have mowed, the grass is in long parallel lines in the direction you cut. Once you have tedded, it's horizontal to the way you've mowed.

It's really hard to see in the photo, but I'll give it a try.

One other note, always ted in the morning while dew is still on the hay, or after dusk. Doing it during the heat of the day will break leaves off clovers, reducing the forgage's nutrition.
 

Attachments

  • tedded.jpg
    tedded.jpg
    151.4 KB · Views: 529
/ 'Real Farming' with a CUT
  • Thread Starter
#14  
Basic instructions on raker / tedders...

Many rakes today both windrow and tedd. This is how mine adjusts.

The picture shows the diagram on the rake along with the top adjustment, which raises & lowers the wheels in relation to the rake. As it raises and lowers, it also tilts the rotating rakes more or less horizontal. You also need to adjust your top link so that the tines run about 1" above the ground (or just above the stubble). The top adjustment is in the tedding position in the photo.

The tines along the rake adjust as well, depending on your mode. The first shows the tedding mode, the second the raking (windrowing) mode. The tines just pull out and snap back into the different hole.
 

Attachments

  • adjustment.jpg
    adjustment.jpg
    99 KB · Views: 472
  • tedder mode.jpg
    tedder mode.jpg
    198.7 KB · Views: 441
  • rake mode.jpg
    rake mode.jpg
    160.2 KB · Views: 442
/ 'Real Farming' with a CUT
  • Thread Starter
#15  
Finally, the baler has arrived. I drug it home from Salem on the back of my Toyota Tacoma (V6 power, baby). It took a long long time to get home....

Oh and regarding discs... a neighbor has let me 'borrow' his 10' wide offset discs, because there was no way in **** he thought my tractor would pull them. It turns out, I can pull them with no problem. I may get a free set of discs out of this if I keep shaming him over it.
 

Attachments

  • baler.jpg
    baler.jpg
    134.1 KB · Views: 560
  • baler back view.jpg
    baler back view.jpg
    113.1 KB · Views: 488
/ 'Real Farming' with a CUT #16  
Sharp lookin baler, how'd it go?
 
/ 'Real Farming' with a CUT #17  
I'm glad to see your land is flat, that is a lot of baler for a little tractor. The rake tedder you have is based on the decades old PZ-Haybob design. Very solid and reliable but uses a lot of teeth compared to other designs. I didn't notice on yours but some of the new teeth for haybobs have a tie to hold them in place after they break so they don't get left in the field.

Those disc mowers are reliable things and do a great job in tough mowing conditions. With more hp you could probably mow at 10 mph.

Have fun and make sure your hay is dry before baling if you are storing inside!
 
/ 'Real Farming' with a CUT
  • Thread Starter
#18  
Thanks for the tips!

Now, we had a bit of rain last night after I had winrowed and was waiting for just the right dry conditions. So, this morning I "rolled" the windrows, which means I shifted them over one position, inverting the piles. Heading out now to check since it looked good earlier today, which has turned out windy and warm. I'll be doing my first bale shortly, then having a neighbor down with his moisture probe to make sure everything's OK. It's really hard to type that sentence with out smirking....
 
/ 'Real Farming' with a CUT #19  
Greyfields said:
I'll be doing my first bale shortly, then having a neighbor down with his moisture probe to make sure everything's OK. It's really hard to type that sentence with out smirking....

Yeah, I'm surprised it didn't get censored!

BTW there is a technique for checking hay moisture content with just a scale and a microwave oven. It's outlined in a seed catalog I have from Forage First. Chances are it's also on three dozen websites. Not as convenient as an electronic probe, but just FYI if you want to do it yourself without buying more stuff.
 
/ 'Real Farming' with a CUT
  • Thread Starter
#20  
I have turned grass into cylinders!!!

:D

:D

I will get the photos up in the morning. Here are my initial comments:

1) Making round bales takes some finesse! My first one was a cone, much larger diameter on one side than the other. I had a few awkward ones, which won't be in the photographs, but mostly I got the hang for it. You move your baler from side to side on the windrow so that the core forms evenly, then you can pretty much follow the windrow centered.

2) My concerns of pulling a 3700 lb baler + bale with a 3700 lb tractor was a non-issue. It pulls it without a struggle. When the bale gets larger diameter and you hit a mound to go over, I was having to give it some throttle. But, I kept the RPM's around the 1800 range most the time. It didn't feel like I was pushing the envelope on the tractor one bit.

3) A made 30", 3', 4' and 5' diameter bales. After some discussion and head scratching, we decided that the 4' would be best for half our hay and the 30" for the other half. Two people can lift the 30" diameter (the lenght is 46") without too terrible a struggle and they will fit in my front loader. I was thinking of using these for goats, sheep, and other animals who won't eat the big bales quickly like cows would. 48" was really manageable on the tractor, it didn't bog the PTO down; whereas going from 48" out to 60" I had to throttle up a bit to keep things running smoothly.

4) There was one problem with my plans. The 30" bales were not quite heavy enough to always activate the ramp and roll out. So, I either looked at the shadow to verify it rolled out, or I backed the tractor up 5' then reversed it forward and I could feel it roll out. As a last resort, the gate obviously won't close if the bale hasn't ejected, so always check your control box for the green light.

5) Mine does not have the auto-tie option installed. It wasn't hard on me or my neck to look back and manually set the tie points. However, I could see how you would want auto-tie if you were doing over 10 acres per day.

That's about all I can think to say right now, except I'm utterly thrilled that this 'project' has come to fruition. Yes, you CAN bale with CUT's; but remember to be safe and don't run machines out of specs or guidelines. Consider also that the John Deere 4x20 series really blurs the line between a CUT and a standard utility tractor. It's just a monster and I love all I can do with it.

[edit] one more thing, I still somewhat wish I had got the 1740 because the 39" bale length by a 30" diameter would have been really manageable with bale hooks to move around. that gives me options to use small amounts of hay without having to hook-up the spear. But, I think I should regret things less, and be less of an engineer and just keep trucking and make better bales each day!
 
 
Top