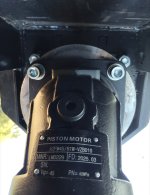
Well, I guess so, it took me about 2 hrs. to do a 30 min. job. I went slow cause I was guessing how the china man who built this would have put it together. I really wish I had of made a video of doing the job. I haven't ruled that out yet, but I can tell you how I done it. But first I would really like to know what kind of rpm's the little bota is turning your drum when your at operating rpm's. I am running my Cat @ 2500 rpm's.
What I did :
1. Remove cover and I took a leaf blower and cleaned out all of the dirt and debris.
2. Record the tension bolt for correct belt tension on reassembly. I used a set of what I call spreaders. It is like a compass you use to make circles. I also took a perma marker and drew a line down the middle of the threads on the tensioner bolt and backed it off 3 turns, or loose enough to take the belt off. Note how many turns you make you'll need it for reassembly.
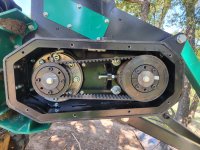
3. Before you loosen the 4 bolts that are holding the drive check the gap between the frame and the edge of the motor. Mine was .037. I used a set of feller gauges to do this, and used them to support the motor during reassembly. I was able to do this because I layed the mulcher down horizontally to do the job. ( I guess that should have been step 1 but I am going off memory )
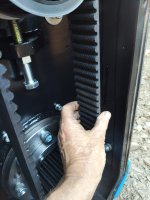
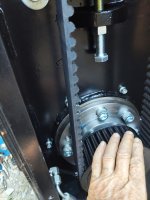
4. The 4 nuts you will be looking at will take a 15/16 socket. If you don't have an impact wrench you may ought to get one or have a helper close by to hold backup for you on the large allen head bolts on the inside of the mulcher. Once you have those loose take the belt off. I made sure that I put my belt back on the same way I removed it so it would be turning in the same direction. Cogged belts are picky about how they are tensioned and lined up so I tried to put things back the same way I found them. With the exception of the pulleys.
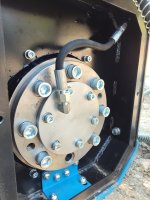
5. Raytree uses a 2 part coupling design. It is captured to the shaft with a tapper, and a keyway. You will see 4 allen head bolts. I think they were 8mm but I cant recall. Anyway, you will also see 2 threaded holes. These are to push the tappers apart from each other. I removed 2 bolts completely to use to push with, and I loosened the other 2 and left about 2 threads holding the 2 halves of the coupling together. You will also see a bolt in the center of the shafts with a big round thick washer. You can remove these. The bolts and washers will allow you to get back to the proper placement of the hub assembly later. There is a split in the hub that opens up the outer hub so it will slide off the shaft once the hubs are separated. You want to be careful here though, just use enough spread with a wedge or flat head screwdriver to get the hub to move, also, insert the screwdriver as far out as possible so on reassembly it doesn't get in the way of the flat washer to line up the couplings. These things will break in half, and then you will be trying to find a new one ! When separating the coupling hubs go slow, 1/4 turn or less on each one of the 2 pushing bolts you are using to separate the coupling hubs. You'll feel it when they separate, they are pretty tight. The hub should slide off easily.
6. Now that you have both pulley's off, change there locations ( drive on driven, driven on drive ). What I done here is slid the pulley's on till they liked about a 1/4 of an inch going completely onto the shaft. Then I let the bolt and washer ease them on the rest of the way onto the shaft. The washer acts as a stop to align the inner part of the hub to the exact placement on the shafts. I didn't tighten the bolt in the center to tight, but I didn't want it to move either. I left the locking washer off during this process.
7. Remove the 2 separating bolts used to push with and insert them back in the holes they came out of, see why we left the other 2 bolts in now, no lining up issues. Remove the wedges if you haven't already done so. Start tightening the bolts as so they will be letting the tapper attach to the shaft. You will want to do this in an even manner, criss cross method. Do this to both pulleys.
8. Replace the belt.
9. Raise hyd. motor enough as to let the proper spacing to ride along the slotted hole in the frame and adjust your bolt tension back to where it was when you started, and tighten the hold down bolts. You will have to have an extension to do this cause the pulley you just put on this shaft is nearly in the way.
10. Go get a cold beer... Good Luck