New Post Hole Digger

   / New Post Hole Digger #1  

George2615

Super Member
Joined
Feb 28, 2005
Messages
8,814
Location
Central Square, NY
Tractor
LS XR3037HC
Well, new to me.
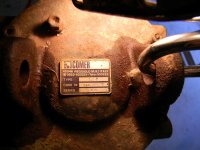
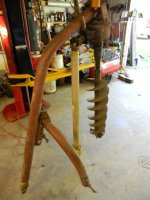
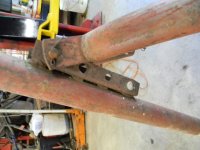
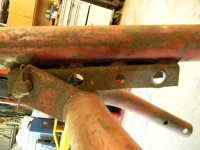
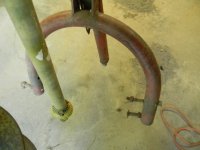
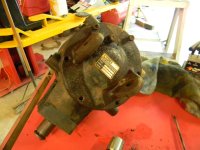
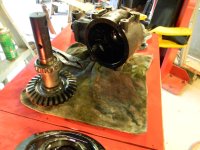
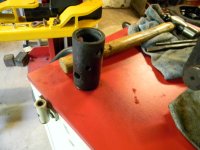
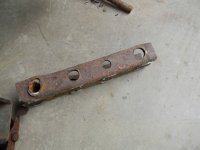
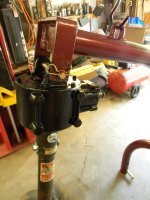
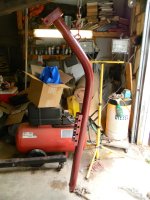
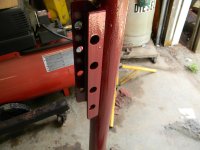
Found a good deal on CL for a PHD. Went to look at it. Gearbox felt nice and tight, no slop. But frame has seen some abuse. Auger is the heavy duty 9" double flight but shear bolts are wrong size and bent. Boom adjust holes are all oblong. Lift pins are loose. PTO shaft yokes are good but U-joints are bad. Generally sound just some U Joints, new pins, make a new boom adjust out of C channel. Unit weighs 198#. I found the center of gravity and will weld on a lift hook.
 

Attachments

  • DSCN1299 (Large).JPG
    DSCN1299 (Large).JPG
    349.9 KB · Views: 137
  • DSCN1282 (Large).JPG
    DSCN1282 (Large).JPG
    283.5 KB · Views: 177
  • DSCN1283 (Large).JPG
    DSCN1283 (Large).JPG
    268.7 KB · Views: 123
  • DSCN1284 (Large).JPG
    DSCN1284 (Large).JPG
    276.3 KB · Views: 120
  • DSCN1285 (Large).JPG
    DSCN1285 (Large).JPG
    256.9 KB · Views: 95
  • DSCN1287 (Large).JPG
    DSCN1287 (Large).JPG
    257.9 KB · Views: 91
  • DSCN1288 (Large).JPG
    DSCN1288 (Large).JPG
    259 KB · Views: 100
  • DSCN1289 (Large).JPG
    DSCN1289 (Large).JPG
    264 KB · Views: 88
   / New Post Hole Digger
  • Thread Starter
#2  
Some pics are out of order but you get the idea. Cut off the old boom adjustment C channel and made a new one and welded it on. Gearbox is a Comer (made in Italy). 3:1 ratio, 1 1/4" input shaft, 2" (w / sleeve) output. Took gearbox apart for inspection. Everything looked good except the gear lube. It was old and black but was still doing its job.
 

Attachments

  • DSCN1299 (Large).JPG
    DSCN1299 (Large).JPG
    349.9 KB · Views: 73
  • DSCN1300 (Large).JPG
    DSCN1300 (Large).JPG
    282.5 KB · Views: 98
  • DSCN1301 (Large).JPG
    DSCN1301 (Large).JPG
    310.3 KB · Views: 119
  • DSCN1302 (Large).JPG
    DSCN1302 (Large).JPG
    326.2 KB · Views: 120
  • DSCN1303 (Large).JPG
    DSCN1303 (Large).JPG
    264.2 KB · Views: 95
  • DSCN1304 (Large).JPG
    DSCN1304 (Large).JPG
    314.8 KB · Views: 93
Last edited:
   / New Post Hole Digger
  • Thread Starter
#3  
Reassembled gearbox and painted. Welded on lift hook. Painted boom and lift yoke and assembled with new pins. Refilled the gearbox with fresh 90-140 lube. Local TSC store only had one U-joint in stock so will have to make another trip to get the second one. Once I install that it will be ready to go. Still need to get a couple more different size augers but other than that I don't think I did too bad for only investing a little time, effort, some materials and less than $400 in total.
 

Attachments

  • DSCN1309 (Large).JPG
    DSCN1309 (Large).JPG
    304.1 KB · Views: 93
  • DSCN1308 (Large).JPG
    DSCN1308 (Large).JPG
    325.1 KB · Views: 110
  • DSCN1307 (Large).JPG
    DSCN1307 (Large).JPG
    497.9 KB · Views: 98
  • DSCN1306 (Large).JPG
    DSCN1306 (Large).JPG
    312.3 KB · Views: 93
  • DSCN1305 (Large).JPG
    DSCN1305 (Large).JPG
    292 KB · Views: 82
   / New Post Hole Digger #4  
Run out of Sail Blue paint? :rolleyes: Just giving you a bad time, everything looks good. :thumbsup:
 
   / New Post Hole Digger
  • Thread Starter
#5  
Actually, I was going to paint it sail blue did not have enough left for this job and didn't want to make a trip to W/mart. I didn't have enough equipment yellow either. I did have a leftover quart of Martin Senour automotive metallic red and rustoleum black so that's what I used.
 
Last edited:
   / New Post Hole Digger #6  
Contrast is good, :thumbsup: I just figured after your last find and clean up, that everything would be blue. :cool:
 
   / New Post Hole Digger #7  
What's old is new!
Nice resto' job.
 
   / New Post Hole Digger #8  
9" is a good general purpose size. Only need 12 for large wooden corner posts. 6" (have 2) is useless to me as the hole is so small in diameter you can't get anything to speak of around a line wooden post and if you get the hole crooked, which is usually the case, you don't have much if any room to level it up.

In retrospect, the 6" aren't totally useless. I drilled one into the ground till I had about 18" sticking up. To store my digger, I remove the existing auger and set the drive shaft into the auger buried in the ground. This holds the digger erect for me to easily dismount and mount the sucker alone. A real bear having it lying on a pallet or something on it's side and trying to wrestle it onto the 3 pt alone without pinching my fingers at least once or hurting my back.

A little tidbit of info here. I came out here 35 years ago poor as dirt. I did my own work and wooden posts were all that would fit into my operation. As time passed and things got better I went with steel pipe posts. I prefer them hands down. The wood rots and you have to have the cross stays to keep the corners erect under load. In my soil it is a fairly often chore to re square the corners. The steel you weld it in place, no paint (let it skin over rust.....I call it natures brown), no cross wires, no rotting, and looks great.

The other thing about fencing I learned was wire type. The general barbed wire for sale around here is 2 strand 12 gauge in 2 or 4 point. There is another wire brand name Gaucho, made in Arkansas which is high tensile and only 15 1/2 gauge making the roll of wire, same length, much lighter. It doesn't stretch so once you install it and get it tight it stays there. The galvanize/zinc coating on it seems to be much better than the regular wire as mine has been up over 20 years and still hasn't started rusting. The points on the barbs are sharp and you had better have long sleeves and gloves on when around it.....but it keeps the cows on their side....oh and the barbs are closer together than the standard wire. Don't need the 4 pt. 2 does just fine.

Some guys hate it as being high tensile it is stiffer than the other and doesn't roll out limp like the other and as stated the barbs are razor sharp. Like anything else, just takes getting used to.

And now the kicker. Since less steel is in the roll it is cheaper.

HTH,
Mark
 
   / New Post Hole Digger
  • Thread Starter
#9  
9" is a good general purpose size. Only need 12 for large wooden corner posts. 6" (have 2) is useless to me as the hole is so small in diameter you can't get anything to speak of around a line wooden post and if you get the hole crooked, which is usually the case, you don't have much if any room to level it up.

In retrospect, the 6" aren't totally useless. I drilled one into the ground till I had about 18" sticking up. To store my digger, I remove the existing auger and set the drive shaft into the auger buried in the ground. This holds the digger erect for me to easily dismount and mount the sucker alone. A real bear having it lying on a pallet or something on it's side and trying to wrestle it onto the 3 pt alone without pinching my fingers at least once or hurting my back.

HTH,
Mark

That's why I welded on a lifting loop. I can now hang it from the rafters with a rope and pulley or from a tree outside. The 9" should be good for setting 4x4 and 6x6 posts. For 6x6 it will be close and holes would have to be near perfect vertical. A 6" for fence posts and maybe a 12" for larger shrubs or small tree balls. Depending on how much use I get for it I may convert it to hydraulic driven instead of PTO driven. Then I'd have reverse to unscrew it. This same PHD was available as a hydraulic driven unit.
 
   / New Post Hole Digger #10  
Then I'd have reverse to unscrew it. This same PHD was available as a hydraulic driven unit.

Excellent point. BTDT several times and power reverse would certainly have helped.

To circumvent the problem with PTO drive I work the auger up and down keeping the hole cleaned out which, in addition to watching for it loading up, have pretty much prevented getting stuck.

Other thing I do is to stop the auger at the bottom of the hole, remembering that most of the loose dirt has been removed. I then lift the auger out of the hole bringing most of what's left in the way of cuttings out and then hit the PTO to throw it off. Makes for a clean hole with little manual labor.

Good Luck,
Mark


Top