You are using an out of date browser. It may not display this or other websites correctly.
You should upgrade or use an alternative browser.
You should upgrade or use an alternative browser.
My Senior design project - a "Swamp Thing" tracked vehicle clone
- Thread starter Garauld
- Start date
- Views: 245906
More options
Who Replied?
/ My Senior design project - a "Swamp Thing" tracked vehicle clone
#371
ArlyA
Super Star Member
- Joined
- Mar 18, 2016
- Messages
- 13,480
- Tractor
- Outlander1000 6x6, Ego lawn mower and shopping for tractor
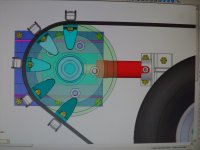
I have a hydraulic Porta-power cylinder that I pressurize with grease to tighten the tracks up. There is no heavy spring used to tension them. Here's a cad image of the rear take-up spool mounted to a slide and the cylinder (red).
This "grease cylinder" tension system was used by many manufacturers over the years. Subsequently they have been replaced by hydraulic operated ones.
ProjectKing
Platinum Member
- Joined
- Sep 16, 2015
- Messages
- 823
- Location
- USA
- Tractor
- Kubota L3830 FEL, Kubota L3301 FEL/BH, Ford Golden Jubilee, Honda Foreman 450ES, Polaris Ranger 400, Kubota ZD326, etc, etc
My Senior design project - a "Swamp Thing" tracked vehicle clone
I think your drive sprockets maybe a little wide and not a sharp enough profile. Meaning the resultant force is lifting the cleat off the sprocket instead of pushing the cleat. This force should be fairly straight forward to calculate since you have full drawings. Couple that with potentially under tensioned tracks and that could be why you are getting track slip.
Also increasing diameter of drive sprocket may be very helpful. Just some ideas.
Garauld
Gold Member
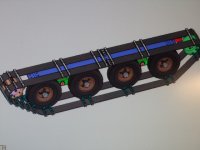
I have developed new higher and sharper tooth profiles and I have the plastic stock in a box. I just have not had the time to make a cutter and mill the new teeth. I am revising the upper track support method. Currently, I have a pair of HDPE blocks that the track bars slide on and I found that the weight of the unsupported track allows it to drop enough where it contacts the ramp on the block rather harshly and thus, causes a lot of chatter. You can hear it in the video when I am traveling straight. I plan to use a long 72" steel plate onto which a 3/8" thick strip of HDPE is attached to support the top track. There will be a minimal gap between the drive and take-up spools and the new support. A 5 degree slope on each end will gently allow the track bars to approach the plastic strip. Here's an image of the design with the UHMW strip shown in blue. I have my fingers crossed that this will be substantially quieter.


Last edited:
Garauld
Gold Member
airbiscuit
Super Member
- Joined
- Aug 28, 2004
- Messages
- 7,535
- Location
- NW Wisconsin
- Tractor
- New Holland T2310 (40hp), Kubota L3010 GST, New Holland TC21DA *** Previously - Farmall H, 1941 John Deere B, Shibaura SD1500, John Deere 850, Bobcat 642, New Holland 1925
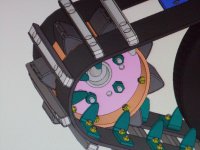
Here's a look at the new sprocket teeth. I plan to make them up over the weekend.
View attachment 664259
Do both ends have sprocket teeth? We had a barn cleaner conveyor one time that had sprocket teeth at both ends and would sometimes cause problems. Obviously you need sprocket teeth in the driven side, but the passive side was replaced with a smooth roller. Things functioned much better after that. 50% reduction of things that had to mesh.
Garauld
Gold Member
Airbiscuit - take a close look at the image in post 374 and you will see that the take-up spool is smooth.
airbiscuit
Super Member
- Joined
- Aug 28, 2004
- Messages
- 7,535
- Location
- NW Wisconsin
- Tractor
- New Holland T2310 (40hp), Kubota L3010 GST, New Holland TC21DA *** Previously - Farmall H, 1941 John Deere B, Shibaura SD1500, John Deere 850, Bobcat 642, New Holland 1925
I guess I didn't squint enough
pmsmechanic
Elite Member
- Joined
- Dec 6, 2013
- Messages
- 4,380
- Location
- Southern Alberta, Canada
- Tractor
- 4410 and F-935 John Deere, MF 245
I think your sprockets are slipping because the belt has too much stretch in it. I also think you should make an extra pair of sprockets for each side that helps keep the belt round instead of it going flat between the cross bars as it goes around the sprocket. The pitch between the bars of the belt is changing because the force on the belt is pulling the belt flat between the teeth as it goes around the sprocket. This results in the bar on the belt hitting the tooth half ways up the profile of the sprocket instead of at the root of the tooth where it should be. The noise you hear is the bar on the belt slapping against the sprocket as it slips down the tooth into place. Your drawings show the belt as following the curve of the sprocket but I'm thinking if you watch a video of the rear sprocket you'll see what I mean.
Garauld
Gold Member
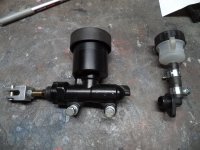
While I am waiting for the the long track support materials to arrive, I removed the service brake master cylinder assembly and disassembled it. As I mentioned earlier, the service brake hardly worked as the master cylinder piston bore was too big at 1-1/8" diameter. I plan to install a smaller master cylinder made for a Kawasaki m/c. It has a 1/2" bore. As you can see, the original m/c brake fluid reservoir was really small so I made one from 2" Delrin round bar and will use the snap-on cap from the OEM Toyota reservoir. I hope I have enough volume to clinch both rotors. If not we'll try something different.


