My Rake Build

   / My Rake Build #1  

RobJ

Elite Member
Joined
Jul 10, 2005
Messages
3,554
Location
Spring, TX (Houston)
Tractor
Kubota L2500
OK you guys first have to STOP making me spend money. I see, I want, I make. OK so I see this and I have some use for a rake and I figure WTH!! First off this has to be one of my bottom line cheap projects. New moneys spent were for the tines and nuts and bolts. Everything else was leftover (I know I DID pay for it once). It was also VERY easy.

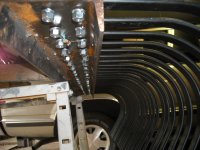
Not having a plasma cutter on a CNC machine, I'm keeping it simple. After building a few, the 3pt connection part of the project is the most PITA. So a while back as some might recall I made sort of a utility tool bar thing out of some 4"x4"x1/4" square tubing I found. I have turning plows that fit in it, middle busters, cultivators, etc, and a class 1 hitch. In hind sight(as always) I should have thought it out a little better. You can see some extra mods to strenghten the 3pt which I pulled off the first time I tried to use it. Yes the attachements are a little loose, but they still work fine. Plus it's hard as heck to cut a straight through hole in 4" square tubing.

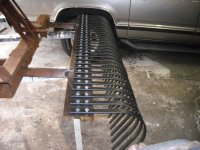
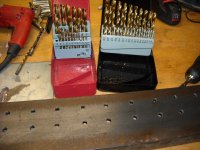
So the project, I bought 30 of the Agri Supply tines, the 2 hole better ones at about $2.98 each. Thought I was going to have a spare or 2 but didn't. I had a 5'3" piece of 5" channel (light stuff, about 5.3# per foot) left over and use it, no cutting!! Basically that's the project, drill 60 holes in the channel, weld on some solid bar to attach to the utility bar, bolt on the tines and away we go.

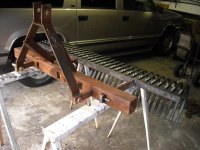
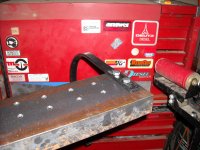
So the pics, Start off with the utility bar. I think I'm going to "clean" it up a bit while it's in the main garage. Might paint it, but mainly clean up some of the welds and add'ons.

Forgot, here is the pile of tines I got from Agri Supply..
 

Attachments

  • tractor-rake.JPG
    tractor-rake.JPG
    232 KB · Views: 828
  • tractor-rake (1).JPG
    tractor-rake (1).JPG
    225.8 KB · Views: 702
Last edited:
   / My Rake Build
  • Thread Starter
#2  
Phase one, the drilling, read a couple threads by Eddie (can't believe he didn't have a drill press), and the latest thread by Larry using a spaced out flat bar and the single hole tines and metal spacers(cool idea BTW). I've had good luck with drilling lately, so I'm drilling holes.

Using my new cheapo HF DP, I clamp on a guide, prop it up on some rollers I made, and slide it from hole to hole. I use WD-40 to keep the bit cool. And I have found these $15 HF drill bit sets to be very good. Just don't burn them up and they will last a long time. First hole was just as easy as the last on an already used 3/8" bit. After the first row I realigned the stop block for the second row of holes. Just used a speed square and soap to mark the location.
 

Attachments

  • tractor-rake (5).JPG
    tractor-rake (5).JPG
    232.4 KB · Views: 434
  • tractor-rake (4).JPG
    tractor-rake (4).JPG
    233.1 KB · Views: 479
  • tractor-rake (3).JPG
    tractor-rake (3).JPG
    229.7 KB · Views: 460
  • tractor-rake (2).JPG
    tractor-rake (2).JPG
    229.3 KB · Views: 585
Last edited:
   / My Rake Build
  • Thread Starter
#3  
Next the simple process of putting on the arms that attach to the bar. I think these are 3/4"x2", not sure actually. I had this piece about 30" long and cut it in half, perfect fit! ;) I had some heavier stuff but good thing I didn't use it, little to thick for easy install into the tool bar. I drill a simple hole in the end to keep it from sliding out of the tool bar. This is how I keep all the stuff in the bar. I figure with the 3pt down, even with some jiggle it'll still float and stay flat on the ground.
 

Attachments

  • tractor-rake (6).JPG
    tractor-rake (6).JPG
    232.6 KB · Views: 465
  • tractor-rake (7).JPG
    tractor-rake (7).JPG
    235.7 KB · Views: 433
Last edited:
   / My Rake Build
  • Thread Starter
#4  
Yesterday I spent a whole hour to finish it...maybe less.

I used my new HH140 to heavy tack the arms on the channel, surprised I got some good penitration with the little 110 unit. Gas is sweet!

But use the Lincoln Ac stick for the main weld. 7014 rod, 125 amps. 2 passes on 3 sides, one side was just 2 darn pretty to go over. :D

Then is was to put on the new tines. I read how yall went with grade 8 bolts. I thought it out differently. I figure a grade 8 bolt is way stronger than the tine. So what would I rather break, a bolt that I can replace for $.14, or a $3 tine. Yeah I know what you are saying, I scare myself sometimes!! :D

And some more pics..
 

Attachments

  • tractor-rake2 (3).JPG
    tractor-rake2 (3).JPG
    234.2 KB · Views: 440
  • tractor-rake2 (2).JPG
    tractor-rake2 (2).JPG
    233.6 KB · Views: 496
  • tractor-rake2 (1).JPG
    tractor-rake2 (1).JPG
    233.5 KB · Views: 542
  • tractor-rake2.JPG
    tractor-rake2.JPG
    233.1 KB · Views: 508
   / My Rake Build
  • Thread Starter
#5  
And the last of the pics. Again really simple project. I'm in for about $130 or so. No it doesn't angle, won't windrow, but it'll drag on the ground I bet. I did take a look this morning about being able to make it push while going in reverse. All I need to do is put some arms on the back side and reverse it that way. Not a simple swivel, but might work.

Oh just remembered, I spaced the tines 1.25" apart. I decided to open them up a little more than an inch. In hindsight, I probably should have gone 1.5"

Enjoy the pics, thanks for looking and listening!

Rob
 

Attachments

  • tractor-rake2 (4).JPG
    tractor-rake2 (4).JPG
    233.9 KB · Views: 432
  • tractor-rake2 (6).JPG
    tractor-rake2 (6).JPG
    232.7 KB · Views: 577
   / My Rake Build #6  
Hey Rob,
You are an inspiration to all of us man.
You also didn't waste any time knocking that rake out. How long did it take you over all? I saw some of those photos when you posted them on Eddie's drill press thread too.
It looks real good too.
Very nice job Rob!
 
   / My Rake Build #7  
RobJ -

Nice and simple rake. It sure didn't take you long to slap that together, I bet it works good too. Have you tried it out yet? Is that why you say 1.5" tine spacing would be more desirable than 1" or 1.25"? Thanks fro sharing your project. Are you going to paint it?

Larry
 
   / My Rake Build #8  
Rob,

Very cool!!! Nothing better then making a new implement for as little money as possible.

Now I want a drill press even more then before. Was that really possible?

Eddie
 
   / My Rake Build #9  
A nice simple build and well done.

I really like your multi use tool bar idea. That's the way I think too, one main bracket to hold an assortment of attachments. We were talking about something like that last spring but a QA tool bar for the FEL.
 
   / My Rake Build #10  
RobJ,

Nice job! and fast too, I saw your reply in Larry's Rake thread, then, POW!
Yours is completed already!

Eddie, you must get a drill press. They really are worth their weight in steel.
 
   / My Rake Build
  • Thread Starter
#11  
3RRL said:
Hey Rob,
You are an inspiration to all of us man.
You also didn't waste any time knocking that rake out. How long did it take you over all? I saw some of those photos when you posted them on Eddie's drill press thread too.
It looks real good too.
Very nice job Rob!

Thanks, no way I have over 2 hours total. probably more like 90minutes. Nice to have the channel I didn't need to cut. Then when drilling the holes, I would drill 10 or so, then while the bit cooled some I was building a table cart for the neighborhood clubhouse. About 15 minutes to cut and weld the arms on, then 20 minutes to put on the tines. I still have to tighten the nuts. It doesn't get any easier than this...really. I'm hoping the payoff is worth more than the little time I have in it. No pics of it working for a couple weeks.
 
   / My Rake Build
  • Thread Starter
#12  
GuglioLS said:
RobJ -

Nice and simple rake. It sure didn't take you long to slap that together, I bet it works good too. Have you tried it out yet? Is that why you say 1.5" tine spacing would be more desirable than 1" or 1.25"? Thanks fro sharing your project. Are you going to paint it?

Larry


Just a theory at this point and sort of thinking what my use is. If I was grading a horse arena, I'd want it smaller. But I'll be using mine mostly to cleanup the sticks that a bush hog leaves behind that I don't want my FM to chew up. So my thinking is I can get the sticks, but leave most of the dirt behind. Of course we could also remove every other tine if needed and see how that works on bigger stuff.

I'm also going to try it out on seed bed prep this hunting season. One last mod to make, I'm going to put a stand on the front...on the rake alone. I'm also going to expirement with guage bars. Not wheels, just a curved piece of metal that will ski across the ground. Again, cheap, easy and probably will work the same.

Thanks,
Rob
 
   / My Rake Build
  • Thread Starter
#13  
Wonder how many times I will catch a shin on this. But I can now put my rake in reverse. I added a little stand to hold things up.

See that sweet piece of 4x4x1/4" tubing...Another utility bar in the making. Might paint this one. That piece of steel costs about $20 if I recall.

Rob
 

Attachments

  • rake-rear.JPG
    rake-rear.JPG
    231.3 KB · Views: 300
  • rake-rear (1).JPG
    rake-rear (1).JPG
    233.3 KB · Views: 296

Tractor & Equipment Auctions

2016 John Deere 35G Mini Excavator (A55973)
2016 John Deere...
Unused 2025 CFG Industrial QK16R Mini Excavator (A59228)
Unused 2025 CFG...
2020 CATERPILLAR 320 GC EXCAVATOR (A60429)
2020 CATERPILLAR...
2012 MACK GU (GRANITE) CAB & CHASSIS (A56129)
2012 MACK GU...
2014 SKYTRAK 10054 TELEHANDLER (A58214)
2014 SKYTRAK 10054...
2014 FORREST RIVER SALEM TRAVEL TRAILER (A55745)
2014 FORREST RIVER...
 
Top