LS MT125 Bucket Level Indicator - with pictures

   / LS MT125 Bucket Level Indicator - with pictures
  • Thread Starter
#11  
That's what it's all about. When I ran big loaders they always had auto levelers. You dump the load, pull it into the detent and just lower the bucket as it was going back to level automatically. I'm good enough to stop and feel the level and then the slight tilt but an indicator to run the bucket too as you're moving around is helpful.
 
   / LS MT125 Bucket Level Indicator - with pictures #12  
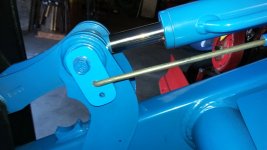
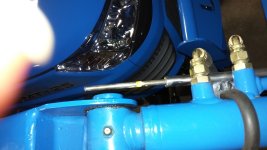
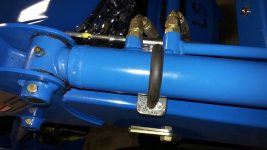
As most of you that have read my posts know, I have a brand new MT125 TLB. I have 10 hours on it now and 9 of those have been in the shop practicing digging with the backhoe on my cement floor. I also had the tractor running getting the backhoe on and off on the dolly I made for the hoe. My driveway is asphalt with the usual shrinkage racks and concrete aprons around my house and in front of the shop. So I bought some devices that clamp on the edge of my loader bucket that keeps that edge up and away from catching "things" (first use of this tractor will be moving snow). Also our little tractors don't have automatic bucket levelers so it's always a slow process to get it down and figure the rotation of the bucket with the cutting edge and get it level. Different manufactures go about this problem in different ways but my trusty LS MT125 has no provisions for a "level indicator".

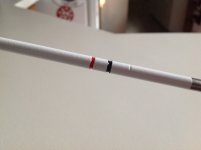
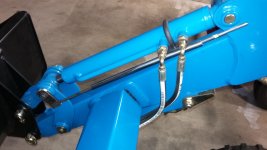
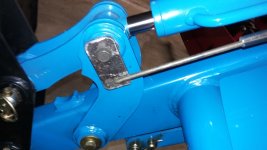
What I have built here is not new or my design by any means. But it is an idea that I could build out of my metal scrap pile and make it work. Also I have chosen to share the "unpainted" pictures as I'm excited to share todays project and once it's painted "blue" like the tractor it will be harder to see what I built. The indicator rod is 1/4" cold roll. The "brackets are 1 1/2" X 1/4" mild steel. I used an 1 1/8" muffler clamp that I put a piece of hose around as I didn't want to mare my cylinder. An interesting note, I mounted this to the cylinder and as the cylinder moves up and down within the arc of it's rotation it keeps the indicator rod from binding. Not by design I just got lucky there and it worked. I am lining the yellow paint on the indicator rod wtih the end of the 1/2 in steel tube as the indication. When I paint it I will make this demarcation mark sharper and bigger to note when it's coming into position.

I played with this in the shop and it is the perfect $1.75 solution (cost of 5' of 1/2" steel tubing) for getting the bucket level on the fly. I built "rider7767's" backhoe dolly and I just wanted to give back with an idea and design of my own. Hope you like it.

Lisa :thumbsup:

Absolute Awsomeness ! I have been somewhat struggling with constantly leaning out to see if the bucket was level. I looked at other ways folks have made indicators, but yours is by far the simplest I've seen! I will be complete w/ wiring the new shop tomorrow, then I get a chance to play w/ making all the mods you guys have perfected. Thanks for posting your projects.
 
   / LS MT125 Bucket Level Indicator - with pictures
  • Thread Starter
#13  
Absolute Awsomeness ! I have been somewhat struggling with constantly leaning out to see if the bucket was level. I looked at other ways folks have made indicators, but yours is by far the simplest I've seen! I will be complete w/ wiring the new shop tomorrow, then I get a chance to play w/ making all the mods you guys have perfected. Thanks for posting your projects.

Thanks for checking out my work here.
I appreciate your feedback too.

Best regards,
Lisa
 
   / LS MT125 Bucket Level Indicator - with pictures #14  
I would make one change. I found that the yellow paint wears off over time and can no longer be seen. What I plan on doing with my next bucket level indicator is remove half the pipe off of the top two inches. Set the indicator so the the top of the rod at the top of the pipe is level. If you want to set the bucket to dig a bit you can set it below level and still see the rod as it's not hidden inside the pipe.

PS: I love where you have located you level indicator. It's well protected and yet easy to glance at while digging.
 
   / LS MT125 Bucket Level Indicator - with pictures
  • Thread Starter
#15  
Thank you "pmsmechanic" for your reply and suggestions. It's so darn cold in my shop right now that painting is difficult (along with everything else). The painting of the marks is my initial work on this to test the concept. Paint does rub off but most of it stays visible. Having it flush is a good idea but at this point I have to leave enough "indicator rod" to stay in the tube. But flush as you pointed out is a "no squint" indication for sure. When it warms up in the spring I'll work on either different paint or cut anoter 1/4" rod and try it with the flush indication as you suggested. But for now this will get me through the winter.

Thanks again for checking out my post and taking your time for suggestions and comments.

Regards,
Lisa
 
   / LS MT125 Bucket Level Indicator - with pictures #16  
Should be able to find a paint or coating that would hold up or you could add a sleeve near the top of the tube to prevent the rod from rubbing or you could reduce the diameter of the tip of the rod slightly where the paint wouldn't rub off.

Great posts, by the way. Keep 'em coming.
 
   / LS MT125 Bucket Level Indicator - with pictures
  • Thread Starter
#17  
Thanks "Doofy" for your comments and idea's. I'll solve this small issue. Love the idea about reducing the diameter of the area to prevent the paint from rubbing off. Neat idea and a simple fix. That may get done before spring! Love it!

Thanks again for your time and comments.

Regards,
Lisa
 
   / LS MT125 Bucket Level Indicator - with pictures
  • Thread Starter
#18  
Should be able to find a paint or coating that would hold up or you could add a sleeve near the top of the tube to prevent the rod from rubbing or you could reduce the diameter of the tip of the rod slightly where the paint wouldn't rub off.

Here you go "Doofy". I removed the indicator rod and took it to my friend with a lathe, he cut a .020" deep groove at my two indicator marks. I then repainted it and can't wait to put it back on. Paint can't rub off now. Just trying different things.
Thanks for the idea. We're improving our tractors by "Committee" with all great idea's presented here.
 

Attachments

  • image.jpeg
    image.jpeg
    1 MB · Views: 214
   / LS MT125 Bucket Level Indicator - with pictures #19  
Here you go "Doofy". I removed the indicator rod and took it to my friend with a lathe, he cut a .020" deep groove at my two indicator marks. I then repainted it and can't wait to put it back on. Paint can't rub off now. Just trying different things.
Thanks for the idea. We're improving our tractors by "Committee" with all great idea's presented here.

Very nice! Let us know how it works. My eye sight is getting so poor I probably would have made them just a little bit wider.
 
   / LS MT125 Bucket Level Indicator - with pictures
  • Thread Starter
#20  
I really wanted more like 3/16" to a 1/4" in groove as you said. But my friend set it up and had it cut before I added any input. At that point I didn't want to get picky about it. I have lot's of 1/4" rod and can play and play. The end run on this may be just cut the rod flush at the black mark. When it emerges from the end of the tube it's level. Simple. But for now it looks kind of fancy, white, multi-color and when I show it off there is something going on there. But a flush indicator is where I may end up with all this. But I'm having fun and sharing for everyone to choose what works best for them.

Thanks for your comment and idea "Doofy".

Lisa
 

Tractor & Equipment Auctions

1986 Diesel C70 Grain Truck (A50514)
1986 Diesel C70...
PENDING SELLER CONFIRMATIONS (A52141)
PENDING SELLER...
Corn Reel (A50514)
Corn Reel (A50514)
2015 BMW 3 Sedan (A50324)
2015 BMW 3 Sedan...
2019 John Deere 8295R MFWD Tractor (A50657)
2019 John Deere...
(2) 1R PLANTERS (A51243)
(2) 1R PLANTERS...
 
Top