lakesidenursery
New member
My house has a 1000' driveway and clearing snow with the FEL and back blade just wasn't cutting it. Being that the driveway is that long, I really didn't want a 3-point snowblower. I kept my eye out last year for snowblower attachments but the right one never turned up. I'm an engineer by day and I knew I could come up with something better.
Awhile back, I built my own pin-on quick attach and it became so convenient that I never remove the loader arms anymore. When I mow the lawn, I simply run the tractor without anything attached to the loader. The arms by themselves aren't too much of a hassle when maneuvering and it sure beats constantly detaching/reattaching the loader. I adapted a bigger bucket from a Kubota L (I think), which is really convenient for moving light loads, including snow. I also have a set of pallet forks I use to move things around the yard, including logs, even in the winter. Because of this, I knew I didn't want to mount the blower in such a way to make it difficult to switch between attachments mid-winter.
I was able to pick up a much-neglected JD 47" snowblower from a JD 425 lawn tractor for pretty cheap. At first I thought I could use the mid-PTO on my Kubota B2920 to power it. However, though the front PTO on a JD 425 spins at 2000 rpm vs the 2500 rpm on my Kubota (would have been easy to overcome), the rotation direction is opposite.
The next idea I had was to run the blower hydraulically, with a pump driven off of the mid-PTO. The B2920 has 21 PTO hp, so with the losses from the hydraulic pump and motor, I'd really have less than 17hp available to the blower, which would only have been useful if I sized the pump and motor perfectly. I'd also have to find a place for a hydraulic reservoir, which would likely make it impossible to attach a 3-point implement at the same time. Plus, that stuff isn't cheap.
So, I decided to run the blower off the rear PTO of the tractor, which has the added feature of being able to run at either 540 or 1000 rpm. That way, if the snow is light enough, I figured I could run the tractor at half of PTO rpm and make a lot less noise/burn less fuel. Here's what I came up with to transfer power from the rear PTO to the front of the tractor:
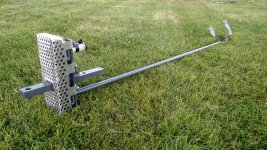
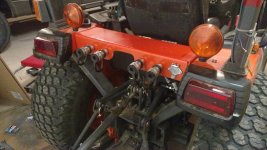
A piece of 1.25" x 2" steel bar replaces the drawbar. All the PTO splines/sprockets/bearings came from Surplus Center. It is a 1:1 ratio that slides into the rear hitch receiver and bolts in the front using the same location as the MMM. I was able to have a few steel tabs and the aluminum cover laser cut at work.
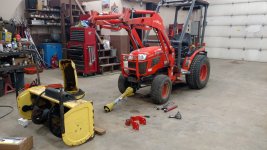
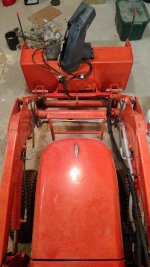
Now that I had the PTO transferred to the front of the tractor, I needed to come up with a mount for the blower that would maximize the vertical travel of the loader arms without causing the PTO shaft to bind. I also didn't want to use a custom PTO shaft so that it would be easy to replace in the future if I did something stupid. I did a lot of measuring and a little design work and came up with this (in gray primer in the picture):
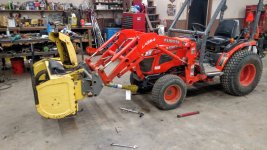
The PTO shaft is available from Northern Tool, and I didn't have to modify it to work. The blower mount uses the original JD mounting points and connects to my pin-on quick attach. The geometry allows me to lift the blower about 18" off the ground before the PTO shaft starts binding, which should be more than enough. I did not make any kind of travel limiter since I will be the only one operating this machine, but I'm sure something simple could be made to do it.
The snowblower originally had a chain and 2 sprockets to take the 2000 rpm input and slow it to a 1000 rpm output for the impeller. I bought some new sprockets and chain and 're-geared' the blower to increase my 540 rpm PTO to 1080 rpm at the impeller. I was able to keep the original output shaft, which greatly simplified things.
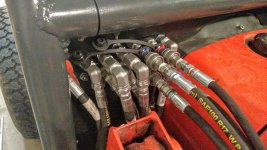
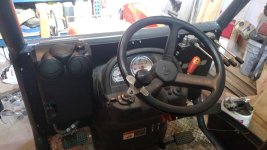
Once I knew the blower was going to work mechanically, I decided to add auxiliary hydraulics to the tractor so that I could control the chute rotation, since the blower was already set up for it. But 1 front hydraulic circuit turned into 2 front and 2 rear (what can I say?). I bought the valve block from Northern Tool, the fittings from Surplus Center, and the hoses are stock length 3/8" from Fleet Farm. I decided to also add a hydraulic tilt to the blower chute while I was at it. The 1/4" hoses to the snowblower are also from Surplus Center. Some orifices slow down the motion of the blower chute.
The whole setup works great, and was done at pretty minimal cost. I didn't have to have any parts machined, but I did have some cut on a laser (which I have available at work). Everything else was fabricated using a drill press, chop saw, die grinder, or MIG welder.
Here's the final product:
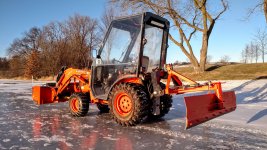
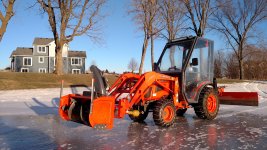
When going down the driveway, I tend to run the blower an inch or so off the ground. I then use the blade to clean up the last inch. That way, I can do the whole width of the drive in only two passes and I minimize the gravel picked up.
Awhile back, I built my own pin-on quick attach and it became so convenient that I never remove the loader arms anymore. When I mow the lawn, I simply run the tractor without anything attached to the loader. The arms by themselves aren't too much of a hassle when maneuvering and it sure beats constantly detaching/reattaching the loader. I adapted a bigger bucket from a Kubota L (I think), which is really convenient for moving light loads, including snow. I also have a set of pallet forks I use to move things around the yard, including logs, even in the winter. Because of this, I knew I didn't want to mount the blower in such a way to make it difficult to switch between attachments mid-winter.
I was able to pick up a much-neglected JD 47" snowblower from a JD 425 lawn tractor for pretty cheap. At first I thought I could use the mid-PTO on my Kubota B2920 to power it. However, though the front PTO on a JD 425 spins at 2000 rpm vs the 2500 rpm on my Kubota (would have been easy to overcome), the rotation direction is opposite.
The next idea I had was to run the blower hydraulically, with a pump driven off of the mid-PTO. The B2920 has 21 PTO hp, so with the losses from the hydraulic pump and motor, I'd really have less than 17hp available to the blower, which would only have been useful if I sized the pump and motor perfectly. I'd also have to find a place for a hydraulic reservoir, which would likely make it impossible to attach a 3-point implement at the same time. Plus, that stuff isn't cheap.
So, I decided to run the blower off the rear PTO of the tractor, which has the added feature of being able to run at either 540 or 1000 rpm. That way, if the snow is light enough, I figured I could run the tractor at half of PTO rpm and make a lot less noise/burn less fuel. Here's what I came up with to transfer power from the rear PTO to the front of the tractor:


A piece of 1.25" x 2" steel bar replaces the drawbar. All the PTO splines/sprockets/bearings came from Surplus Center. It is a 1:1 ratio that slides into the rear hitch receiver and bolts in the front using the same location as the MMM. I was able to have a few steel tabs and the aluminum cover laser cut at work.
Now that I had the PTO transferred to the front of the tractor, I needed to come up with a mount for the blower that would maximize the vertical travel of the loader arms without causing the PTO shaft to bind. I also didn't want to use a custom PTO shaft so that it would be easy to replace in the future if I did something stupid. I did a lot of measuring and a little design work and came up with this (in gray primer in the picture):

The PTO shaft is available from Northern Tool, and I didn't have to modify it to work. The blower mount uses the original JD mounting points and connects to my pin-on quick attach. The geometry allows me to lift the blower about 18" off the ground before the PTO shaft starts binding, which should be more than enough. I did not make any kind of travel limiter since I will be the only one operating this machine, but I'm sure something simple could be made to do it.
The snowblower originally had a chain and 2 sprockets to take the 2000 rpm input and slow it to a 1000 rpm output for the impeller. I bought some new sprockets and chain and 're-geared' the blower to increase my 540 rpm PTO to 1080 rpm at the impeller. I was able to keep the original output shaft, which greatly simplified things.
Once I knew the blower was going to work mechanically, I decided to add auxiliary hydraulics to the tractor so that I could control the chute rotation, since the blower was already set up for it. But 1 front hydraulic circuit turned into 2 front and 2 rear (what can I say?). I bought the valve block from Northern Tool, the fittings from Surplus Center, and the hoses are stock length 3/8" from Fleet Farm. I decided to also add a hydraulic tilt to the blower chute while I was at it. The 1/4" hoses to the snowblower are also from Surplus Center. Some orifices slow down the motion of the blower chute.


The whole setup works great, and was done at pretty minimal cost. I didn't have to have any parts machined, but I did have some cut on a laser (which I have available at work). Everything else was fabricated using a drill press, chop saw, die grinder, or MIG welder.
Here's the final product:


When going down the driveway, I tend to run the blower an inch or so off the ground. I then use the blade to clean up the last inch. That way, I can do the whole width of the drive in only two passes and I minimize the gravel picked up.