RammerJammer
Member
My 1533 is almost a year old and I have been wanting to add some work lights to it. I decided to mount them on the roll bar (ROPS) but didn't want to drill it or weld to it for fear of being accused of weakening it. The certification tag on it makes me want to just leave it alone.
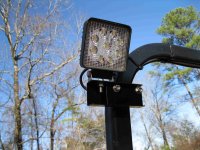
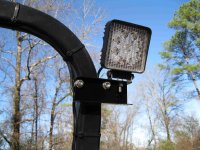
I found some 4 inch square, 27 watt LED lights that appeared to be just right. They mount with a single 10mm diameter bolt.
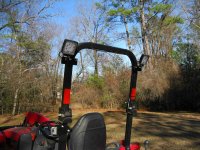
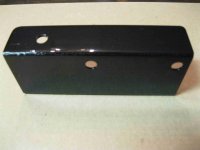
I had some 0.060" aluminum sheet and decided to make the brackets from that material by forming a 2" by 1-1/8" channel. I used two "square" u-bolts to attach the channel pieces to the ROPS. By mounting the lights on the outside of the ROPS, they are not only out of the way when operating the backhoe, they can be swiveled to face forward or backward by loosening the mounting bolt on the lights.
After trying unsuccessfully to get a wiring diagram from the dealer so I could locate a convenient power source, I decided to run power from the battery. I had some 12 gauge, 2 conductor cable which worked well. Mahindra seems to color code the split-loom conduits in the wiring harness and it was easy enough to follow the yellow-marked conduit through the engine compartment. In a few places, I was able to slip my cable through the same cable ties that hold the conduit in place. Otherwise, I used cable ties to secure the new cable. However, once I got beyond the firewall, things got interesting. I managed to get the cable in place but it was a bit tedious because quite a few ties were needed to keep the new cable out of harm's way.
The positive (red) conductor in the cable connects to the battery through a 15 amp ATO fuse in an inline fuse holder.
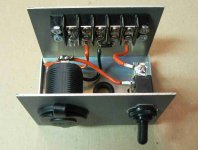
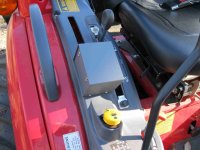
OK, the wire is in place and the brackets are made. Now, what about a switch? I decided to add a small metal box to the front portion of the right fender. My tractor doesn't have a control lever in the outer slot of the right fender. So, I decided to utilize that empty slot by clamping the box to the fender using a couple of machine screws, some nuts and 2 small pieces of aluminum on the underside of the slot. That way, the box can easily be removed for repair or if it is no longer needed. I made the metal box from the same 0.060 aluminum. It houses the switch and, as a bonus, a cigarette lighter socket. It is 2-3/4" wide, 4 inches long and 3 inches high. I chose the width to match the most prominent portion of the gray plastic that runs on either side of the slot. Mounting the switch and socket in the removable box means no holes to drill. Tractor can easily be returned to "stock" condition in the future.
After running the two conductor cable and seeing how much trouble it was, I came to the conclusion that the second wire shouldn't be wasted on a mere ground. After all, it could be used to power a horn or front-mounted lights or who knows what later on. Finding a ground near the right fender looked easy - There were two empty "threaded" holes (actually, nuts welded to the underside) in the large steel plate that the seat mounts on. However, Mahindra had very carefully isolated that large plate from the chassis and those seemingly useful holes were useless. The bolts used to mount the plate were connected to the chassis and provided a good spot to attach a ground wire. Well, after I replaced one of the original 30mm long bolts with a 40mm bolt and added a nut to the extra threads on the longer bolt.
I guess the isolated seat mounting plate is to dampen vibration? Anyone? Regardless, the plate is not at ground potential and won't work as a grounding point.
The photos show the individual parts along with the internal wiring of the switch/socket box. Instead of making your own brackets and box from scratch, you could use 2" aluminum channel and an aluminum Mini-box of a suitable size. Something smaller than 2" channel should work just fine provided it is made from thicker material - Say, 1/8" or more. You could even make the box from a couple of pieces of channel. I tried to make the brackets just strong enough to hold the lights yet weak enough to 'give' in case they came in contact with anything so that certified ROPS wouldn't be damaged.
The closest paint I had to match the gray plastic on the tractor was Rust-oleum 7221 - Textured Dark Pewter. That color is not so easy to find now days because, it seems, almost everyone wants to sell you six cans instead of one.
The waterproof toggle switch, the lighter socket, the lights and the paint can be found on that left coast auction site. Some Lowes stores have the paint - Stock number 244422.
The best price I have seen on the 27 watt LED lights is $20.99 for four of them delivered. I checked the current draw and it was 1.6 amps. So, they are more like 22 watts but proved to be plenty bright for my needs. Other places sell similar lights for 50 bucks and up - EACH. So, these may not be the greatest lights in the world but, at $5.25 each, you can't go too far wrong. You can also get them in individually and in lots of two but the unit cost goes up. For lots of 4, try this link: 4X 4&#�39;&#�39; 27W Flood Square LED Work Light Offroad Boat Car Tractor Truck SUV ATV | eBay
This was a sort of slow-motion, labor of love project that came together over a month or two. I enjoy designing and building things like this. The small box turned out pretty tight given that I'd never fabbed one like it before. Might have been beginner's luck!
PETA notice: No holes were drilled in this tractor during the performance of this modification.
And, yes, the lights, switch and socket were made in China. But, what isn't now days? Of the course, the tractor comes from Japan by way of India. So, if you own a Mahindra, whether it started in Korea or Japan or India, the Made in USA proposition was settled long ago anyway.
I'll be happy to answer any questions you may have but, hopefully, I have covered most of them in this long post!
I found some 4 inch square, 27 watt LED lights that appeared to be just right. They mount with a single 10mm diameter bolt.
I had some 0.060" aluminum sheet and decided to make the brackets from that material by forming a 2" by 1-1/8" channel. I used two "square" u-bolts to attach the channel pieces to the ROPS. By mounting the lights on the outside of the ROPS, they are not only out of the way when operating the backhoe, they can be swiveled to face forward or backward by loosening the mounting bolt on the lights.
After trying unsuccessfully to get a wiring diagram from the dealer so I could locate a convenient power source, I decided to run power from the battery. I had some 12 gauge, 2 conductor cable which worked well. Mahindra seems to color code the split-loom conduits in the wiring harness and it was easy enough to follow the yellow-marked conduit through the engine compartment. In a few places, I was able to slip my cable through the same cable ties that hold the conduit in place. Otherwise, I used cable ties to secure the new cable. However, once I got beyond the firewall, things got interesting. I managed to get the cable in place but it was a bit tedious because quite a few ties were needed to keep the new cable out of harm's way.
The positive (red) conductor in the cable connects to the battery through a 15 amp ATO fuse in an inline fuse holder.
OK, the wire is in place and the brackets are made. Now, what about a switch? I decided to add a small metal box to the front portion of the right fender. My tractor doesn't have a control lever in the outer slot of the right fender. So, I decided to utilize that empty slot by clamping the box to the fender using a couple of machine screws, some nuts and 2 small pieces of aluminum on the underside of the slot. That way, the box can easily be removed for repair or if it is no longer needed. I made the metal box from the same 0.060 aluminum. It houses the switch and, as a bonus, a cigarette lighter socket. It is 2-3/4" wide, 4 inches long and 3 inches high. I chose the width to match the most prominent portion of the gray plastic that runs on either side of the slot. Mounting the switch and socket in the removable box means no holes to drill. Tractor can easily be returned to "stock" condition in the future.
After running the two conductor cable and seeing how much trouble it was, I came to the conclusion that the second wire shouldn't be wasted on a mere ground. After all, it could be used to power a horn or front-mounted lights or who knows what later on. Finding a ground near the right fender looked easy - There were two empty "threaded" holes (actually, nuts welded to the underside) in the large steel plate that the seat mounts on. However, Mahindra had very carefully isolated that large plate from the chassis and those seemingly useful holes were useless. The bolts used to mount the plate were connected to the chassis and provided a good spot to attach a ground wire. Well, after I replaced one of the original 30mm long bolts with a 40mm bolt and added a nut to the extra threads on the longer bolt.
I guess the isolated seat mounting plate is to dampen vibration? Anyone? Regardless, the plate is not at ground potential and won't work as a grounding point.
The photos show the individual parts along with the internal wiring of the switch/socket box. Instead of making your own brackets and box from scratch, you could use 2" aluminum channel and an aluminum Mini-box of a suitable size. Something smaller than 2" channel should work just fine provided it is made from thicker material - Say, 1/8" or more. You could even make the box from a couple of pieces of channel. I tried to make the brackets just strong enough to hold the lights yet weak enough to 'give' in case they came in contact with anything so that certified ROPS wouldn't be damaged.
The closest paint I had to match the gray plastic on the tractor was Rust-oleum 7221 - Textured Dark Pewter. That color is not so easy to find now days because, it seems, almost everyone wants to sell you six cans instead of one.
The waterproof toggle switch, the lighter socket, the lights and the paint can be found on that left coast auction site. Some Lowes stores have the paint - Stock number 244422.
The best price I have seen on the 27 watt LED lights is $20.99 for four of them delivered. I checked the current draw and it was 1.6 amps. So, they are more like 22 watts but proved to be plenty bright for my needs. Other places sell similar lights for 50 bucks and up - EACH. So, these may not be the greatest lights in the world but, at $5.25 each, you can't go too far wrong. You can also get them in individually and in lots of two but the unit cost goes up. For lots of 4, try this link: 4X 4&#�39;&#�39; 27W Flood Square LED Work Light Offroad Boat Car Tractor Truck SUV ATV | eBay
This was a sort of slow-motion, labor of love project that came together over a month or two. I enjoy designing and building things like this. The small box turned out pretty tight given that I'd never fabbed one like it before. Might have been beginner's luck!
PETA notice: No holes were drilled in this tractor during the performance of this modification.
And, yes, the lights, switch and socket were made in China. But, what isn't now days? Of the course, the tractor comes from Japan by way of India. So, if you own a Mahindra, whether it started in Korea or Japan or India, the Made in USA proposition was settled long ago anyway.
I'll be happy to answer any questions you may have but, hopefully, I have covered most of them in this long post!
Attachments
-
 Both Light Mounted Oblique.jpg341.3 KB · Views: 160
 -
 Switch Socket Interior.jpg72.6 KB · Views: 172
 -
 Left Light Mounted.jpg187.1 KB · Views: 161
 -
 Right Bracket Close.jpg70.1 KB · Views: 128
 -
 Right Light Mounted.jpg189.6 KB · Views: 132
 -
 Box on Fender from Left.jpg116.2 KB · Views: 173
 -
 Box on Fender Top Front.jpg134.4 KB · Views: 169
 -
 Brackets and Bolts.jpg60.5 KB · Views: 152
") I used two switches for the lights.
I used two switches for the lights.
