Home Built UTV

/ Home Built UTV #1  

burner1

New member
Joined
Dec 14, 2015
Messages
19
Location
evansville, in
Tractor
Kubota
Seems so many UTV's are built for "Playing". I needed an off road truck so to speak.

I originally bought a Cushman. It worked out for what I needed but I soon found the rear suspension to be impossible for anything but concrete. So I made a triangulated 4-link and airbag suspension. Worked out well and I did use it a lot but it was a junk vehicle in need to total overhaul.

c9.jpg


cush%20haul.jpg


Cushmans were not really put together to be overhauled well and I was looking at making some changes. So, I built my own of road truck from scratch. I just thought I would share it with you. This is the short version. It is electric BTW:

Build12.jpg


Build18.jpg


Build26.jpg


Build37.jpg


Paint3.jpg


Done1.jpg


Fire.jpg
 

Attachments

  • c9.jpg
    c9.jpg
    119.6 KB · Views: 745
/ Home Built UTV #3  
Nice. How many hours do you have into the "modifications"?
 
/ Home Built UTV #4  
Discuss the power system please?

Awesome Fab work. I'm envious.

Thanks for the post.

Welcome to TBN. Don't be a stranger!!! :)
 
/ Home Built UTV #5  
Is that a circle burner sittin in the corner or a Buggy?? My Gang really like Buggies..... :)

20150523_143211 (1280x720).jpg
 
/ Home Built UTV
  • Thread Starter
#6  
Thanks guys,

I don't know about hours but it took about 2years here and there. I have many other side projects so I was glad I got it done.

I started originally with Cusman Truckster axle from parts. It had a 2-speed gearbox attached to the front:

Build1.jpg


The gear box was a 2:1 reducer. I looked at some numbers and thought the axle ratio of 8.2:1 might need more speed. I turned the unit around and set it up as a speed doubler. I am powering it with a D&D ES 15-6 electric motor.

I was greedy. In low gear it goes 28mph. I really have no need to go any faster and I have never set up the actuation to shift to 2nd gear. I am getting a rumble form the coupler though. I have the pulleys and belts to set up a reduction. I will make first gear closer to 18mph with top speed closer to 35. It will increase the TQ in low and if I drive 25 down the road I don't have to have the foot on the floor.

Since it is home built I had the State Police do an inspection last week so I can get a DNR tag and drive it to a few of the neighbors on the roads.
 
Last edited:
/ Home Built UTV
  • Thread Starter
#7  
The steering rack was from a MGB. I cut down and welded it to fit the geometry. I am running with about 6 degrees of caster which is too much. I need to make an a-arm change to fix it. Not hard but getting the front springs off with a compressor is a pain.

The front uprights are from Honda 300ex. Has 4 wheel disk brakes. I set up the rear calipers outside the wheel. They would not fit inside the wheel:


Assembly15.jpg


Build10.jpg


Build13.jpg


Assemble2.jpg


You can dive down in my photo directories. There are a lot more photos.
 
/ Home Built UTV
  • Thread Starter
#11  
Thanks,

I would like to get the UTV (not ATV) manufacturers to pick up on the usefulness of a vehicle which is more like a truck then a trail vehicle. I have not had it that long but we got caught up on a ton of projects around the house and shop. This is before I built the bed. After I built the bed we hauled the leaves in the bed itself with a tarp:

Leaf.jpg


The front passenger seat comes out quickly because I have a family member who will not allow me to drive it if she does not go along!

Leaf2.jpg
 
/ Home Built UTV #12  
The Intimidator UTV's must have heard some of your thoughts. They have a "truck" series with a longer bed. My only complaint is that it doesn't dump, otherwise I'd probably own one.
Truck Series - Intimidator 4x4 UTVs

Love your fabbing skills, I wish I had them :)
 
/ Home Built UTV
  • Thread Starter
#13  
I like the fold down sides on that.

As far as skill, it just comes from doing. BTW it was built 99% with a $400 13 year old 110v MIG welder.
 
/ Home Built UTV
  • Thread Starter
#14  
One more thing to work on, I welded a trailer receiver tube vertical in the bed. You can see it in the following image. The plan is to buy a Harbor Freight JIB crane. I am going to weld it to a trailer hitch so I can drop in when needed. It will be nice when moving things around like engines.

Assemble3.jpg
 
/ Home Built UTV #15  
Very nice!
 
/ Home Built UTV #16  
Finally someone builds a UTV I've wondered if that is easy to do. Looks not so easy though... nice job. Too funny that you have GAS on the front when you said it is an electric. What does the GAS Stand for?
 
/ Home Built UTV #17  
You sir have some serious skills. Impressive work. Thanks for sharing.
 
/ Home Built UTV
  • Thread Starter
#18  
Finally someone builds a UTV I've wondered if that is easy to do. Looks not so easy though... nice job. Too funny that you have GAS on the front when you said it is an electric. What does the GAS Stand for?

GAS is a company which I am building and selling Turn signal, light controllers and power relay boards. This is also a test bed for some of them.

I actually chose an electric vehicle because of how it is used. It may sit a while then be used for short trip moving bulky items. No need to worry about bad gas, fouled plugs, etc.

As far as building 90% is frame of mind. Obviously one would have to have some basic fabrication skills, but it's kind of like buying your first house. You never knew how to hang a door till you created a partition and hung your first door. Here was the thought process:

1. Drive train, pick type, power, etc. This includes axle, axle ratio, transmission if need be. I chose the electric motor with Cushman rear axle.

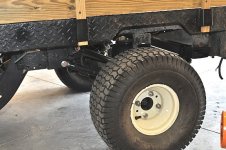
2. Chose suspension. For the rear I like the triangulated 4-link set up. It is smooth running 28mph over open field! Fronts are double wishbone using Honda 300EX uprights. Chose what you are going to do for brakes. Fronts are stock which fit the Honda Wheels and uprights. Rear are adapted to what I had. A bit of an experiment but working well.

3. Take all your knowns and set your frame around them. Knowns for me was battery compartment, motor and trans location, sitting position, bed size, feet, suspension setup, mounts, steering rack, height, travel, extra room for what ever accessories you will need, controllers, etc. You may not know how you are going to lay them out but leave enough room to work it.

4. From that sort out a general frame layout. For me it got me to these stages:

Build15.jpg


Build17.jpg


Build18.jpg


Once you got to that point you can forget the base build and work on the details

It required the roof roll bars for integrity:

Notice I only had one bar front and back across top. I eventually had to add a second to make mounting provisions for windows:

Build22.jpg


At this point it's just working out the details. Fender mounts, etc. Fenders are trailer fenders form Tractor Supply. Notice the second bar top of front and rear window area. I had to get past the curve to get a flat section to make a window opening. These are just the details you work through. There are also now tubes welded on the door frame for adding a door latter. I don't have to do those things now.

Build24.jpg


Welding on body panels to give it some sort of a body. Notice the windows have a sheet metal opening welded in. I had automotive safety glass cut. It is installed using a rubber locking seal from McMaster. It's not hard to do.

Build26.jpg


You have to plan ahead as much as you can for things, in my case, motor controllers, emergency brake, shifter linkage, gas and brake pedals, etc. This is the area under the seats. Seats were from Surpluscenter. Seat mounts can be adjusted fwd and back. Area under include mounting for motor controller, large high power relays, shifter and emergency brake, etc:

Build30.jpg


Assemble8.jpg


Brake is Wilwood, accelerator I bought at a swap meet. It is for an over road truck I got at a swap meet for $10. I 3D printed an adapter to use the potentiometer I needed for the controller.

Build27.jpg


Build28.jpg


Assemble9.jpg


So any way this was my thought process. In short, Big picture of what you want, work out critical details, then move to less critical details.
 
/ Home Built UTV #19  
Great explanation. And it fits any build, doesn't matter the intended end. Gotta have the vision first and then build toward it. Same processes are used when we build off-road Buggies.

I always say "Give a young man an equipped shop and a pile of iron and the end result will be a view inside his brain. And the view is always different and always effective!!!! :)

20150919_191110 (1280x720).jpg 20150919_194259 (1280x720).jpg
 
/ Home Built UTV
  • Thread Starter
#20  
Thanks, I try to tell people they can do more then they think they can!
 

Marketplace Items

2001 MACK RD688S ROLL OFF TRUCK (A65643)
2001 MACK RD688S...
20' One-Trip Shipping Container (A66285)
20' One-Trip...
International 130 Manure Spreader (A66408)
International 130...
KUBOTA SVL97-2 SKID STEER (A64279)
KUBOTA SVL97-2...
Bainbridge,Georgia (A65640)
Bainbridge,Georgia...
REMINGTON ELECTRIC POLE SAW (A62613)
REMINGTON ELECTRIC...
 
Top