Daver1963
Platinum Member
- Joined
- May 14, 2013
- Messages
- 674
- Location
- Idlewild, Tn
- Tractor
- Kubota L2800DT w/LA524 FEL, Cub Cadet XT1
Back in December I saw this thread Good landscape rake - cheap. To summarize, if you don't want to read this thread, member RedDirt built a landscape rake from hay rake replacement teeth, a piece of pipe, and some angle iron. I decided I could do something similar and attach it to my King Kutter carry-all. Here are the results:
1) 2)
2)  3)
3)  4)
4)  5)
5)  6)
6)  7)
7) 
Pictures:
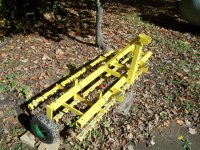
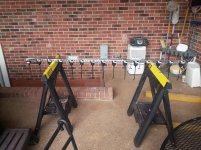
1. Yard rake on saw horses
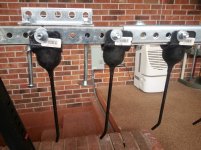
2. Close-up of the rake teeth and clamp
3. Tractor with Carry-all on.
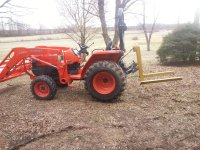
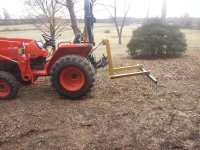
4. Tractor with rake - side view
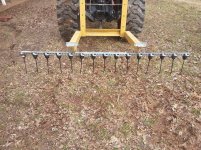
5. Tractor with rake - back view
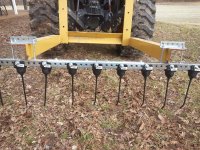
6. View of clamps on Carry-all
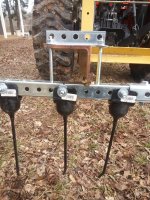
7. Closer view of clamp.
Parts:
1. Rake teeth 15@ $1.99 each
Herschel Adams Universal Rubber Rake Teeth T16-0182 by Herschel Adams for $1.99 : Rural King
2. Steelworks 4-ft x 1-1/4-in Plated Steel Perforated Angle 1@ $14.08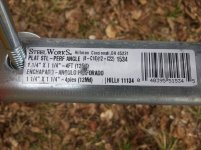
Cut into: 2 - 5 inch; 2 - 19 inch
Shop Steelworks 4-ft x 1-1/4-in Plated Steel Perforated Angle at Lowes.com
3. Steelworks 3-ft L x 1-1/4-in W x 1-1/4-in H Plated Steel Perforated Square Tube 2 @ $17.24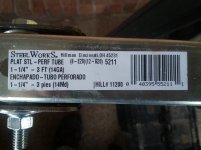
Shop Steelworks 3-ft L x 1-1/4-in W x 1-1/4-in H Plated Steel Perforated Square Tube at Lowes.com
4. 5/16 bolts, 2ス" long, qty: 15
5. 5/16 bolts, 5ス" long, qty: 4
6. 5/16 bolts, 2" long, qty: 4
7. 5/16 nuts, qty: 23
8. 5/16 lock washers, qty: 30 or so
9. 5/16 flat washers, qty: 60 or so
10. 5/16 fender washers, qty: 4
Construction:
1. The two 19 pieces of angle were used to hold the two square tubes together. Four 5/16" - 2" bolts were used to connect the pieces. I had to adjust these as I put the teeth on.
2. The hay rake teeth were spaced every 5 holes on the square tubes. The spacing of the holes on the tubes and angle iron were 1 so that the teeth are space at 5 intervals. The hay rake teeth also have a slight dogleg bend at the bottom and I made sure they all faced the same direction. The flat washers and lock washers were used to take up some space between the bar and hay rake teeth as needed. Except for tines that were on both the angle and square tube every other tine was double lock washered and used 4 flat washers.
3. The 2 pieces of angle iron cut 5" long, the 5/16 bolts - 5"?ス?ス long, 4 fender washers, 2 lock washers, 2 5/16 nuts were used to make clamps to hold to the King Kutter Carry-all. The clamps were spaced to fit the carry-all.
4. The rake was connected to the Carry-all with the dogleg of the tines facing inwards toward the tractor.
Performance:
I determined how low I wanted it to go and set the stopper on my draft control to that. To try it out I used it on some pine needles that were on a slope. Results:
1. The rake was pulling the pine needles along, but it was also digging into the ground. I'm going to try flipping the rake 180?ー so that the dogleg of the tines faces away from the tractor.
2. After the tines had raked all the needles it could rake I needed to lift the tines out of the pile, but the Carry-all would not raise it high enough. This is just due to the dimensions of the Carry-all. To fix this I'm going to have fabricate a 3 point hitch that will allow me to lift it higher. I will post pictures of that when I get it done. The plan is to use angle iron.
1)
 2)
2)  3)
3)  4)
4)  5)
5)  6)
6)  7)
7) 
Pictures:
1. Yard rake on saw horses
2. Close-up of the rake teeth and clamp
3. Tractor with Carry-all on.
4. Tractor with rake - side view
5. Tractor with rake - back view
6. View of clamps on Carry-all
7. Closer view of clamp.
Parts:
1. Rake teeth 15@ $1.99 each
Herschel Adams Universal Rubber Rake Teeth T16-0182 by Herschel Adams for $1.99 : Rural King
2. Steelworks 4-ft x 1-1/4-in Plated Steel Perforated Angle 1@ $14.08

Cut into: 2 - 5 inch; 2 - 19 inch
Shop Steelworks 4-ft x 1-1/4-in Plated Steel Perforated Angle at Lowes.com
3. Steelworks 3-ft L x 1-1/4-in W x 1-1/4-in H Plated Steel Perforated Square Tube 2 @ $17.24

Shop Steelworks 3-ft L x 1-1/4-in W x 1-1/4-in H Plated Steel Perforated Square Tube at Lowes.com
4. 5/16 bolts, 2ス" long, qty: 15
5. 5/16 bolts, 5ス" long, qty: 4
6. 5/16 bolts, 2" long, qty: 4
7. 5/16 nuts, qty: 23
8. 5/16 lock washers, qty: 30 or so
9. 5/16 flat washers, qty: 60 or so
10. 5/16 fender washers, qty: 4
Construction:
1. The two 19 pieces of angle were used to hold the two square tubes together. Four 5/16" - 2" bolts were used to connect the pieces. I had to adjust these as I put the teeth on.
2. The hay rake teeth were spaced every 5 holes on the square tubes. The spacing of the holes on the tubes and angle iron were 1 so that the teeth are space at 5 intervals. The hay rake teeth also have a slight dogleg bend at the bottom and I made sure they all faced the same direction. The flat washers and lock washers were used to take up some space between the bar and hay rake teeth as needed. Except for tines that were on both the angle and square tube every other tine was double lock washered and used 4 flat washers.
3. The 2 pieces of angle iron cut 5" long, the 5/16 bolts - 5"?ス?ス long, 4 fender washers, 2 lock washers, 2 5/16 nuts were used to make clamps to hold to the King Kutter Carry-all. The clamps were spaced to fit the carry-all.
4. The rake was connected to the Carry-all with the dogleg of the tines facing inwards toward the tractor.
Performance:
I determined how low I wanted it to go and set the stopper on my draft control to that. To try it out I used it on some pine needles that were on a slope. Results:
1. The rake was pulling the pine needles along, but it was also digging into the ground. I'm going to try flipping the rake 180?ー so that the dogleg of the tines faces away from the tractor.
2. After the tines had raked all the needles it could rake I needed to lift the tines out of the pile, but the Carry-all would not raise it high enough. This is just due to the dimensions of the Carry-all. To fix this I'm going to have fabricate a 3 point hitch that will allow me to lift it higher. I will post pictures of that when I get it done. The plan is to use angle iron.
