I'm still thinking through the do it yourself vs. hiring out for the paint job. I priced out rattle cans just as a base line to start from. I'm going to be painting about 80 square feet of metal when all is said and done. I figure this will cost about $60 for primer and top coat. I based that on 15 square feet per can that I found on the Rustoleum website and on the cost of paint at my local hardware store...$5.08/can after tax.
I figure if I can get someone to do the paint for $60 I will jump at it. I have a smaller air paint sprayer, and I might be able to do the job cheaper buying larger containers of paint, but if someone will do the prep, prime, and paint for the cost of rattle cans, I'm there. I've still got some time to think it over. I'm probably only half done with the fabrication.
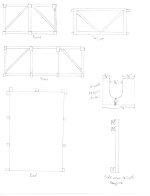
Also, I'm posting a scan of some sketches I've done for the sides. I've decided to make the sides removable just in case. The stake pockets are out of the same 2" tubing that I made the cylinder brackets out of. I'm also putting 3" section of this tubing at the top of each upright to act as stake pockets for the side extensions when I get them built.
Take a look at the tailgate latch design. I wanted a system to allow the tailgate to pivot at the top like a dump truck tailgate or pivot at the bottom like a pickup truck tailgate. I also wanted one handed operation. My wife came up with the system I sketched out. She claims it wasn't her idea, but she was the only one in the truck talking to me about it, and I didn't come up with it, so I'm blaming her. It's actually a pretty elegant design. I just hope it works.
The things sticking out of the top of the tailgate are 3/4" pins. One on each side of the top and one on each side of the bottom. Each side wall of the trailer will have three "Hooks" welded to the back as illustrated in the attached sketch. When I want the tailgate to swing, I put the top pins in the top hooks and the bottom pins swing freely. When I want the tailgate to open and shut like a pickup bed, I put the bottom pins in the bottom hooks and the top pins in the second hooks down from the top. The bottom hooks have a little bit longer slot so that I can lift the tailgate to pull it out of the top hooks without it coming loose from the bottom slot. When the tailgate is down, the bottom pins rest in the same bottom slot, and a cable or chain keeps the tailgate horizontal, parallel to the ground.