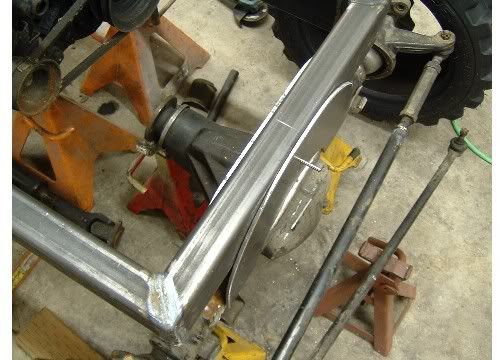
DIY Home built compact tractor

   / DIY Home built compact tractor #61  
GT2 said:
I was hoping that my heavy steel axle pivot plates (one on the front and one on the rear of the axle) would be strong enough to resist axle twist.
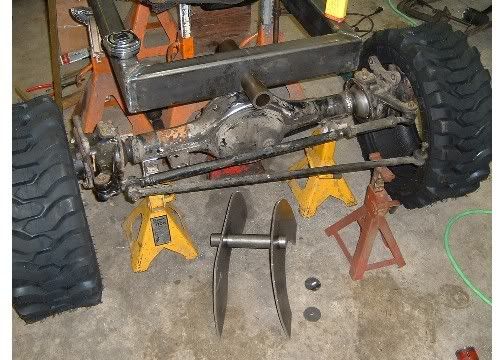
However your radius rod arms idea makes sense. Maybe I can add them later if it needs it.
Thanks for the ideas!:)
Tim

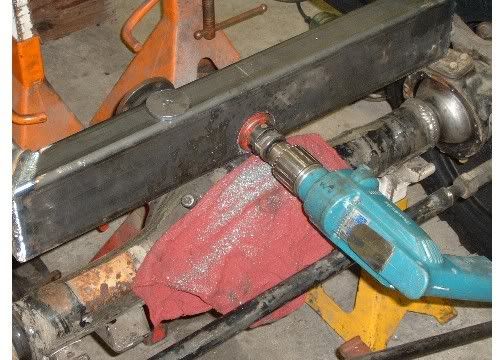
Just put a king pin as low as possible, and make it 4-5" long. Next problem is that for stability is better to have low king pin, as axle has smaller "sway" to side when one wheel go low. And driving shaft will have less side movement.
Radius arms can't be mounted here (as are on Bronco page), as they change wheelbase due to their movement radius.
 
   / DIY Home built compact tractor #62  
Awesome project. Wish I had the time and skills.

Backing up a bit - you will want to be careful with the oil pan. The oil pickup is pretty close clearance wise to the bottom of the pan. In other words a dent can starve the motor of oil.

Best to have an oil pressure gage. These motors run high oil pressure especially cold. My 81 Pickup runs 140 PSI going down the road cold. Drops to 50 when warm.

And FYI in case you're not aware, you should have 52 HP stock and a redline of 5,700 or so. Way more oooomph that the Sami's gas motor. And you have performance options. If you can find an 86-92 turbo motor, upgrade the pump and injectors, add an intercooler and you're easily at 100 HP. Woohoo!

And one more thing: Everyone swears that the reverse gear in these trannys is really weak. I have not experienced a failure but I baby the truck in reverse because I've been warned. I hope it holds up in your application.

Keep the posts coming!
 
   / DIY Home built compact tractor
  • Thread Starter
#63  
ZJ_HR said:
30" mens outer diameter of the wheel, not rim only. Am I right?
Yes, OD.:)
 
   / DIY Home built compact tractor
  • Thread Starter
#64  
Asymtave said:
Awesome project. Wish I had the time and skills.

Backing up a bit - you will want to be careful with the oil pan. The oil pickup is pretty close clearance wise to the bottom of the pan. In other words a dent can starve the motor of oil.

Best to have an oil pressure gage. These motors run high oil pressure especially cold. My 81 Pickup runs 140 PSI going down the road cold. Drops to 50 when warm.

And FYI in case you're not aware, you should have 52 HP stock and a redline of 5,700 or so. Way more oooomph that the Sami's gas motor. And you have performance options. If you can find an 86-92 turbo motor, upgrade the pump and injectors, add an intercooler and you're easily at 100 HP. Woohoo!

And one more thing: Everyone swears that the reverse gear in these trannys is really weak. I have not experienced a failure but I baby the truck in reverse because I've been warned. I hope it holds up in your application.

Keep the posts coming!

Whoo.. 100HP, I would proly twist the frame with that, and the higher torque!:D
Thanks for the info.
Tim
 
   / DIY Home built compact tractor #65  
ZJ_HR said:
30" mens outer diameter of the wheel, not rim only. Am I right?

ahh... this is America, i forgot... When the Dutch refer to wheel size in inches, its the rim size beause only rim size and steel pipe sizes are measured in inches... ;)
 
   / DIY Home built compact tractor #66  
I cant wait till you finish this beast,I have thought about doing something along these lines before but just never went thru with it.Keep up the good work.
 
   / DIY Home built compact tractor #67  
Maybe I missed it somewhere...but how are ya gonna SLOW this down to a useable speed?
 
   / DIY Home built compact tractor #68  
bobodu said:
Maybe I missed it somewhere...but how are ya gonna SLOW this down to a useable speed?
Bobodu check post #51
 
   / DIY Home built compact tractor
  • Thread Starter
#69  
I drilled a pilot hole for the pivot point. First I drilled the frame, then held each plate up there and marked them.
Here the plates are hanging in place on a 1/4" drill bit.
trac29.jpg


Then I threw the plates up on my mill...err.. drill press and hole sawed out the 1.5" pin holes.
trac30.jpg


Then I hole sawed out the frame holes.
trac31.jpg


Heres a pic with the pivot pin in the plates and tube in the frame.
trac32.jpg


Now its off to my friends shop and use his lathe to cut the pin and bushings to length.:)
 
   / DIY Home built compact tractor #70  
GT2, Good progress.

Couple points. As you probably know, the radius rods are to prevent front to back motion of the front axle. It is important that you add them! Otherwise the front frame will be twisted to junk on the first pot hole, rock, stump or other obsticle you encounter.

I would also beef up the front frame (and side frame where the radius rods attach) to take up the extra stress. Then again, I would rather weld than repair!

Good looking project so far!

jb
 
   / DIY Home built compact tractor
  • Thread Starter
#71  
john_bud said:
GT2, Good progress.

Couple points. As you probably know, the radius rods are to prevent front to back motion of the front axle. It is important that you add them! Otherwise the front frame will be twisted to junk on the first pot hole, rock, stump or other obsticle you encounter.

I would also beef up the front frame (and side frame where the radius rods attach) to take up the extra stress. Then again, I would rather weld than repair!

Good looking project so far!

jb
I assume you read the previous posts concerning Radius Rods.
My concern is that since the axle cant twist now, radius rods will twist the axle during movement and cause cracks.
Now I can make the rods long and lower the rearward pivot point so it is level with the axle, to lessen the " twisting and steering" effect. But I'm not sure if its going to be enough.
What If I used rods that had only one pivot point at the axle. This would help resist fore and aft movement of the axle, but not twist it?
Of corse this design would not resist any axle torque twist.
 
   / DIY Home built compact tractor
  • Thread Starter
#72  
Bushing welded to the frame and surface ground.
trac33.jpg


Rear plate welded to the axle.
trac34.jpg


The front axle hanging in place all by its self!
Still need to modify the pin.
trac35.jpg
 
   / DIY Home built compact tractor #73  
Like John B mentioned I still think you will need something like radius rods to keep the axle housing from twisting. The Ford ones I mentioned in the previous post are not solid steel to steel. They have rather hefty rubber bushings on them and considering the limited amount of travel this axle will have the rubber bushings would proably be able to flex enough to prevent binding.

Another suggestion. Your front axle pivot, is it going to be lubricated? You might consider center drilling and cross drilling it and installing a grease fitting so you can grease the bushing/pin to prevent wear.
 
   / DIY Home built compact tractor
  • Thread Starter
#74  
DieselPower said:
Like John B mentioned I still think you will need something like radius rods to keep the axle housing from twisting. The Ford ones I mentioned in the previous post are not solid steel to steel. They have rather hefty rubber bushings on them and considering the limited amount of travel this axle will have the rubber bushings would proably be able to flex enough to prevent binding.

Another suggestion. Your front axle pivot, is it going to be lubricated? You might consider center drilling and cross drilling it and installing a grease fitting so you can grease the bushing/pin to prevent wear.
My next run to the wrecking yard I'll take a look at some Ford rods.

Yes I plan to cross drill or something to lube the pin.
Thanks, Tim
 
   / DIY Home built compact tractor #75  
GT2, you can't use any side links between the axle and the frame. I
think ZJ_HR stated it first: a radius rod won't work here.
All twisting resistance is in the center pivot, which looks substantial
as you built it. Look at any compact tractor....the front axle pivots
freely on the center pivot only. Grease zerks for your pivot are
mandatory, as stated.

One suggestion: put additional gussets or braces inside your frame
to further resist twisting the frame at the center pivot under 4wd load.

As an illustration, a recent failed pivot pin/bushing I replaced on my
JD955 caused only about 1/2" front-to-back movement at the
front wheels. Failure was due to inadequate lubrication. When replaced,
my new 25mm pin and bushing allowed maybe 1/16" movement.
 
   / DIY Home built compact tractor #76  
I have worked on tractors for many years and have seen a few of them with a v shaped brace. Here is something that I sketched in MS Paint just to give you an idea of what I am talking about. This is the first time I have tried to attach an image, so I hope it works.

As long as both pins pivot on the same axis, this would work. You can adjust it up or down, or change the rearward angle of the brace for clearance as long as the pin centers stay lined up.
 

Attachments

  • Brace on Front Axle.JPG
    Brace on Front Axle.JPG
    20.3 KB · Views: 3,085
   / DIY Home built compact tractor #77  
dayrunr2 said:
I have worked on tractors for many years and have seen a few of them with a v shaped brace. Here is something that I sketched in MS Paint just to give you an idea of what I am talking about. This is the first time I have tried to attach an image, so I hope it works.

As long as both pins pivot on the same axis, this would work. You can adjust it up or down, or change the rearward angle of the brace for clearance as long as the pin centers stay lined up.

You are right, that's only correct way how to make axle stronger, but question is can it be fitted there?
Due to engine mounting and driving shafts?
 
   / DIY Home built compact tractor
  • Thread Starter
#78  
dayrunr2 said:
I have worked on tractors for many years and have seen a few of them with a v shaped brace. Here is something that I sketched in MS Paint just to give you an idea of what I am talking about. This is the first time I have tried to attach an image, so I hope it works.

As long as both pins pivot on the same axis, this would work. You can adjust it up or down, or change the rearward angle of the brace for clearance as long as the pin centers stay lined up.
Ahh, now that makes sense. But as ZJ said, I'll have to check for clearance.
Thanks for the idea!:)
 
   / DIY Home built compact tractor #79  
GT2,

I was looking back through your pictures and found what Iwas looking for. In reply #39, the first picture in that set is a mock-up shot from the side. The transfer case and the front drive shaft are also in place (or somewhat near where they will end up, maybe :rolleyes: )

As I said before, the angle rearward and the overall length can be altered as long as the pin centers remain aligned. I hope you don't mind but I took the picture I refered to and sketched on my idea of mounting points.;)

This should give plenty of clearance to the drive shaft and if located in the right place, one cross member could also support the rear of the engine/transmission/transfer case.

Hope all of this makes sense.

MIke
 

Attachments

  • trac21.jpg
    trac21.jpg
    36.4 KB · Views: 3,018
   / DIY Home built compact tractor #80  
Very ambitious! nice job.
 

Tractor & Equipment Auctions

2019 KUBOTA SVL75-2 SKID STEER (A60429)
2019 KUBOTA...
2017 Ford Transit 350 Passenger Van (A59230)
2017 Ford Transit...
2019 VOLVO DD25B DOUBLE DRUM ROLLER (A60429)
2019 VOLVO DD25B...
207279 (A52708)
207279 (A52708)
2024 CATERPILLAR 255 SKID STEER (A60429)
2024 CATERPILLAR...
2020 INTERNATIONAL MV607 REEFER BOX TRUCK (A55745)
2020 INTERNATIONAL...
 
Top