Diesel fueling system for CUT owners

   / Diesel fueling system for CUT owners #1  

dfkrug

Super Member
Joined
Feb 3, 2004
Messages
7,198
Location
Santa Cruz Mtns, CA
Tractor
05 Kioti CK30HST w/ Prairie Dog backhoe, XN08 mini-X
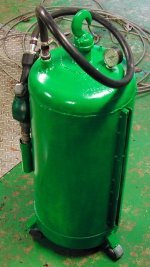
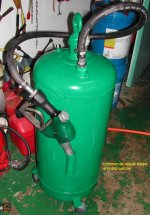
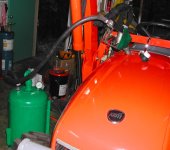
This is my second design of a fueling station for my compact tractors.
Some TBN members may recall my first approach, a modified jerry can
that used air pressure to dispense fuel.

http://www.tractorbynet.com/forums/build-yourself/102731-diesel-fueling-made-easy-easier.html

It worked, but a jerry can is not a pressure vessel and the fill port did
not seal all that well. It only held about 4.5 gallons, too.

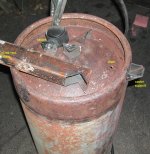
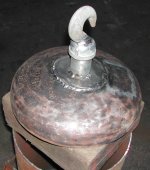
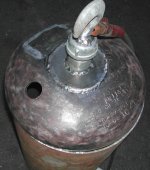
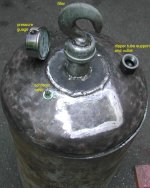
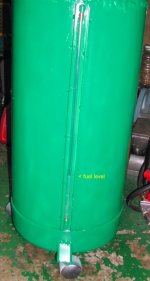
My new design easily holds 12 gallons of fuel, leaving plenty of space
for compressed air. It will primarily be useful to those of us who don't
use lots of fuel. I use between 5 and 10 gallons per month, max. I hate
hoisting 5 gallons of any liquid to shoulder height to fill my tractors. I don't
like the stinky spills either. This tank is very easy to fill, either with
5-gal portable containers, or hoisted into the back of a pickup. I chose
pneumatic pressure to power my fueling system because it is very convenient
and fast. I fuel my tractors in or near my workshop where I store them.
That is where I keep my compressor and air lines, but this new system
can also be pressurized there and taken out into the field.

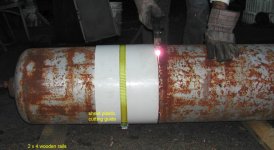
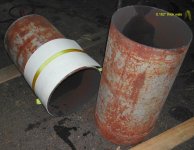
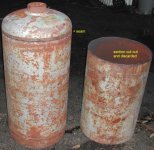
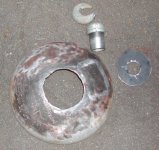
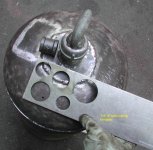
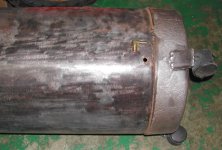
My new design uses a cut down 20-gallon propane tank that I acquired for
free. This tank is a little over 4-ft tall and 13 inches in diameter.
 

Attachments

  • a_propane_tank.JPG
    a_propane_tank.JPG
    63 KB · Views: 2,606
   / Diesel fueling system for CUT owners
  • Thread Starter
#2  
Cutting up old propane cylinder.

I used a plasma cutter, with a plastic guide to get as square a cut
as possible. I used a scrap of 3/16" flexible plastic with a straight
edge and bound it to the tank with a strap. Lining up the straight
edge assures a square cut. (This is a great trick for marking or cutting
any cylindrical material.) Photo D shows how tight the two cuts came
out.

Rolling the tank along wooden 2x4s allowed me to cut in one continuous
pass. This tank is nearly 3/16" thick! Two cuts were done in about
10 minutes.

After cutting, I had to clean out the tank.....that was the hardest part
of the whole project. I used an angle grinder with wire wheel. RUSTY!
 

Attachments

  • b_cutting_tank.jpg
    b_cutting_tank.jpg
    126.7 KB · Views: 1,820
  • c_cut_tank.jpg
    c_cut_tank.jpg
    184.7 KB · Views: 1,543
  • d_cut_tank_top.jpg
    d_cut_tank_top.jpg
    155.8 KB · Views: 1,702
   / Diesel fueling system for CUT owners
  • Thread Starter
#3  
The tank bottom was interesting. It had two drain plugs, both of
brass with lead centers. The strange metalurgy must be to arrest any
electrolysis inside the tank. This tank dates back to 1929, according to
the earliest pressure test stamp on top.

This photo shows the bottom, along with some gussets I made from some
scrap tubing. These will support 3 casters.
 

Attachments

  • e_tank_bottom.jpg
    e_tank_bottom.jpg
    197.2 KB · Views: 1,665
   / Diesel fueling system for CUT owners
  • Thread Starter
#4  
Now the top.

First I free-hand cut the existing top off. First photo shows the filler
plate and a chunk of 1.5 inch pipe and pipe cap. The nipple and cap will
form the filler hole, and the hook will be the handle. Voila, photo G.

Next I needed a 1.5" hole and a couple smaller ones for a schrader valve
and a pressure guage. Photo H shows how I cut the big one, using my old
friend, the plasma cutter. First I drill a small pilot hole, then I hold my
aluminum template where I want the hole. 15 seconds later, you see the
hole in photo I. If I do not drill a pilot hole, the plasma cutter splashes
back for a fractional second until it penetrates the steel. That's not a big
problem if I am wearing a mask, but it can lead to damaging my template.
The big hole is for the fitting that will support the dipper tube and the hose
fitting for the nozzle.

Photo J...all done with the top.
 

Attachments

  • f_tank_top.jpg
    f_tank_top.jpg
    140.3 KB · Views: 1,323
  • g_tank_filler.jpg
    g_tank_filler.jpg
    140.9 KB · Views: 1,212
  • h_top_hole.jpg
    h_top_hole.jpg
    142.3 KB · Views: 1,161
  • i_top_hole_2.jpg
    i_top_hole_2.jpg
    123 KB · Views: 1,177
  • j_top_done.jpg
    j_top_done.jpg
    118.3 KB · Views: 1,514
   / Diesel fueling system for CUT owners
  • Thread Starter
#5  
Next I drilled and tapped two holes for a sight tube level guage.
I also welded steel guards on each side of the tube, for protection.
Clear PVC should hold up to the diesel fuel, as long as I don't allow
UV to age it.
 

Attachments

  • k_level_guage.jpg
    k_level_guage.jpg
    120.4 KB · Views: 1,488
   / Diesel fueling system for CUT owners
  • Thread Starter
#6  
And here is the finished product.

I stole the hose and commercial nozzle from my previous filler system.
The hook filler cap allows me to get a good seal just using my hand to
tighten, as well as a way to lift the whole tank into my pickup.

The second hardest part of the project was passing the leak test. Since
I do most of my welding outside to avoid fumes, it is easy to get a very
slight invisible "micro-porosity" in parts of the weld. 50 psi of air finds all
of those. Small leaks are not crucial as all welds are above the fuel line,
but I eliminated all leaks anyway. I used a MIG welder (Hobart Ironman 210).
That is why some of my welds are as pretty as they could be (big).

Photo M shows the nozzle holder and drip catcher. This nozzle is amazingly
leak-free. Photo N shows my sight guage and guard. The fuel level will be
even more visible when I switch to red diesel.
 

Attachments

  • l_finished.jpg
    l_finished.jpg
    82.9 KB · Views: 1,866
  • m_finished2.jpg
    m_finished2.jpg
    134.1 KB · Views: 1,610
  • n_finished3.jpg
    n_finished3.jpg
    66.5 KB · Views: 1,665
   / Diesel fueling system for CUT owners
  • Thread Starter
#7  
Fill R up!

This system works even better than I expected. I put about 10 gal
into it the other day. I pressurized to to about 10psi, which took about
10 sec. Then I added 5 gal of fuel to my tractor, which took about
15 sec. 3 seconds/gal. Sure beats a hand pump!
 

Attachments

  • o_fill_r_up.jpg
    o_fill_r_up.jpg
    135.3 KB · Views: 1,783
   / Diesel fueling system for CUT owners #8  
Wow Amazing, I sure love it when a plan comes together. And on the cheap too.
 
   / Diesel fueling system for CUT owners #9  
Now that's just way too slick.:) Think
I'll have to make one myself. That's if
I can afford the diesel, $4.399:mad: this morning
here in beautiful Eastern Connecticut.

Kowabunga!:eek:

Bill
 
   / Diesel fueling system for CUT owners #10  
That is a job well done:)
It works like a champ to boot.
 
 
Top