Correcting for warpage

/ Correcting for warpage #1  

joshuabardwell

Elite Member
Joined
May 6, 2012
Messages
2,897
Location
Knoxville, TN
Tractor
Bobcat CT225
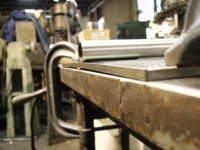
I wonder if anybody more experienced could give me tips on correcting for warpage. Like, recently I tried to build, basically a three-sided channel. No matter how carefully I aligned the side walls before welding, afterwards, they were out of true. I got a suggestion to fix it by clamping them and then beating on the welds with a big mallet, which worked, but surely that's not how pros do it. What do the pros do? Do they torch the joints after welding and bend the pieces into place? Or do they do something beforehand that prevents the warpage? I see all this stuff out there in the world, and it sure looks square, and I have no idea how it's accomplished. I know that warping is just a part of welding, but if that's true, then how does anybody make anything that's actually a 90-degree angle?

Now that I write out the question, I wonder if warpage isn't really the right word for what I'm asking about. I know about backstepping and stitch welding and other techniques for correcting warpage. I guess what I'm really asking about is how to compensate for the shrinking/expansion of the weld joint itself, that pushes right angles out of true.
 
/ Correcting for warpage #2  
Sounds as if some well placed clamps while welding and left until cool will help. Metal moves to the heat. Good luck.
 
/ Correcting for warpage
  • Thread Starter
#3  
Sounds as if some well placed clamps while welding and left until cool will help. Metal moves to the heat. Good luck.

Will it? I was under the impression that the contraction of the weld metal that occurs during cooling would put stress on the joint that would pull the pieces even after cooling.
 
/ Correcting for warpage #4  
You can clamp it and wait till it cools to take the clamps off or you you can start slightly out of square and use the contracting weld to move your piece into square
 
/ Correcting for warpage #5  
I'd clamp the crap out of the pieces, weld them up, let them cool, and then unclamp. I've never tried FiremanMike's technique; but I suspect it takes a lot of experience to know how much out of square to make your setup in order for the weld to pull itself square. I know I'm not good enough to be successful with that technique.
 
/ Correcting for warpage #6  
At the shop we would often stitch weld or tack weld small pieces that were clamped.

The idea was not to get anyone area too much hotter than adjacent areas... sometimes preheating would also be used.

For critical welds... than entire assembly would go into an oven to stress relieve...
 
/ Correcting for warpage #7  
Can you post some pictures of what you're building? For some reason I can't visualize it.
Here is a good video about heat travel on square tube. Well the first 5-minutes are good, then the guy starts playing around. Personally I would never place that many tacks on that small of a project.
When ever I build something I monitor the measurements, squareness, plumb, level, etc, etc, and place the welds according to where I want to pull it. Weld sequence is really hard to get a handle on. Then the more heat that is applied things change. Even when tacking a project up, I place the tacks so they help pull things in the direction I want. Placement is one thing, the size of the weld, or tack comes into play also.


The Fabricator Enters the Twi1ight Zone! - Episode 7 - YouTube
 
/ Correcting for warpage #8  
Some times pre bending a project is a big time saver.
I snagged these pictures off another site.
 

Attachments

  • Prebend1.jpg
    Prebend1.jpg
    42 KB · Views: 253
  • Prebend2.jpg
    Prebend2.jpg
    39 KB · Views: 271
  • Prebend3.jpg
    Prebend3.jpg
    32.6 KB · Views: 226
  • Prebend4.jpg
    Prebend4.jpg
    30.5 KB · Views: 242
/ Correcting for warpage
  • Thread Starter
#9  
Shield Arc: Here are some pics.

2013-02-08 20.30.40.jpg

The last pic shows the "spreader" that I improvised to try to get the thing back into alignment. I set the joint up as a totally non-overlapping corner and then welded the fillet on the outside. I also put a single bead down the inside fillet after welding up the outside, more on principle than anything else--it's not relevant to this discussion as the warpage happened before I did that. One thing that confused me was, I expected that the side-walls would pull outwards as the weld metal cooled and contracted, but they didn't at all. They pushed inwards. I can't for the life of me figure out how that physics worked out. What I did was I put pins through the bushings and then used a clamp to pull the side-walls in so that they bound against the bushings. I hoped that as the weld cooled it would pull the walls back out, but it did just the opposite.

Oh, and if you are thinking, "Gosh it's dumb that he put the bushings in first and then tried to weld up the walls. There's no way they'll stay in alignment." Yeah. I figured that out. The hard way. :laughing: Now I am thinking that the right thing to do would be to first weld up the channel and get it all square and true and then cut the holes and insert the bushings, and I'm thinking more generally about how one would get everything square and true in a case like this.

In your example of pre-bending, I'm surprised that would work, because you have stretched the metal, but you haven't made the bend "take". I would think that once you remove the clamps, the tension that's already in the metal would want to pull it back to flat PLUS the tension from the weld would pull it even further. Is that not how it works?

Thanks for the help.

PS: I think I recognize that dime. Is that a 1966?
 
/ Correcting for warpage #10  
If you can anticipate this weld shrinkage/distortion, then you can design your welds so that you stitch weld on both sides. This will do 2 things:
1) Allow you to put down short, hot welds with good penetration without heating up the whole piece.
2) Use the weld to pull the material back to where it should be.

Or, you could tack some temporary gussets/stiffeners which get cut off after everything has cooled.

When you plan out your welds, try to weld in an order that eliminates long, slender shapes, favoring a "boxy" structure first.

When I was doing production fabrication I learned to weld with the stick in my right hand and a 2 lb ball peen in the left, which allowed me to correct the warpage as I welded - basically hot working the shape as I went. If you try this don't forget your hearing protection. What?
 
/ Correcting for warpage
  • Thread Starter
#11  
It sounds like there is general agreement that holding the pieces in place until the weld cools will eliminate much distortion. As basic as that might be, I didn't realize that. I guess I thought that the weld would put tension into the structure and the tension would still be there when the clamps were removed, unless you did something like peen the weld. Leaving the piece clamped will be the first thing I try.
 
/ Correcting for warpage #12  
yes, and the peening is still a good idea. It's not to technical to "peen", or maybe it is but I have never treated it as such.
 
/ Correcting for warpage #13  
I take it as the back side is a corner joint? If so, I would have tacked everything up good. Check for squareness. Smacked it back in shape, placed a large C-clamp on the front side. Back step welded the backside corner joint. Let cool, remove the C-clamp, no doubt it would want to open up some, then I would place a fillet weld inside to pull it back square.
 
/ Correcting for warpage #14  
What I do is stitch weld one side then the other, in short welds, using as many clamps as posible, I use a spray bottle to cool it off, wait about 5 minutes, while I chip it off and clean it, many times I use my air chisel to clean and stress relieve it, then stitch it some more, I will many times tack it to my welding table. I like to keep the material cool, just above, being able to handle it without gloves. It is not a race.
 
/ Correcting for warpage #15  
What I try to do, with some luck, is aline everything up just like I want it. I will tack weld, starting in the center then go to each corner. Flip the piece and tack again, opposite of the first tacks. I will do the flip and tack thing two or three times, checking for straightness as I go. Once everything is tacked and true, I will start running short stitching beads, again starting in the middle and working toward the edge and flipping the piece between each stitch. I keep a heavy hammer handy and I aint afraid to use it.
 
/ Correcting for warpage
  • Thread Starter
#16  
I've been doing some work on a small welding table, and had some ideas about how to help make sure it's square. The table is mostly made of 2" square tubing. For the top, to make sure it ended up square, I realized that I could easily put tacks as shown below, allowing them to act as a hinge and allowing me to make final adjustments to the angles before welding the legs into the corners.

Open Corner.jpg

Getting the legs square in both directions was a little challenging. I came to see that the order the tacks were put in was critical. If the tack is put in on the inside of a joint, then the joint can hinge inwards on the tack without breaking the tack, but if you were to pull outwards, it would break the tack. The opposite would be true if the tack was put on the outside of the joint. What I finally ended up with was this.

First Tack.jpg

If the vertical leg is perfectly square, then don't bother with this silliness, but since it probably isn't perfectly square, rotate it so that it angles outwards rather than angling inwards in any direction. Then tack the inside corner. This tack location allows the leg to hinge inward in both directions.

Second Tack.jpg

Next square up the leg in one direction and, holding it square, tack the opposing outside part of the joint. The two existing tacks now hold the leg square in the one direction, while creating a hinge that can be easily bent inwards in the remaining direction.

Third Tack.jpg

Finally, square up the leg in the remaining direction and tack the opposing outside part of the joint. These three tacks should now hold the leg square to the frame. If the leg is not square in any direction, simply grind out the opposing tack, leaving the remaining two tacks to act as hinges while you square it up.

Hope this made sense, and I'm definitely receptive to any feedback on alternative or improved methods of accomplishing the desired outcome. Obviously, this is a problem that has been well solved by fabricators through the years, and I'm certainly reinventing the wheel. This is the inevitable consequence of not getting formal training.
 
/ Correcting for warpage #18  
that weld in the middle is to long as some said stitch it work in short 1" beads


like this alternating sides slowly from the center out.

then fill in the spaces after it cools and is correctly alignment.


_ _ _ _ _ _ _ one side

. _ _ _ _ _ _ _ other side

Another trick for the bushings is to make them go all the way through piece ream or bore to size after welding is done then cut out the center for needed clearance.
 
/ Correcting for warpage #19  
One rule of welding is:p
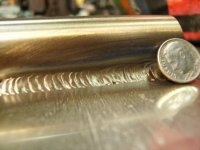
rovided the total heat input is the same,the quicker the rate of input,the less the distortion for a given weld.What this means is that the quicker the weld can be deposited,the less distortion there will be,provided the total amount of weld is the same.This is one reason I prefer flux core(with shielding gas) over other welding processes.It has a higher deposition rate than mig or stick and helps to reduce distortion.Even so,other procedures such as backstepping and patience should still be used.
 

Marketplace Items

2020 DRAGON 150BBL ALUMINUM (A58214)
2020 DRAGON 150BBL...
UNKNOWN  500BBL WHEELED FRAC TANK (A58214)
UNKNOWN 500BBL...
300 Gallon Front Mounted Saddle Tank (A60463)
300 Gallon Front...
2022 FORD F-250 STX CREW CAB TRUCK (A59823)
2022 FORD F-250...
2023 John Deere 333G for Parts (A61306)
2023 John Deere...
2005 16ft. Big Tex 2.5 Ton T/A Utility Trailer (A60352)
2005 16ft. Big Tex...
 
Top