Checking the timing on a Kubota L2500

   / Checking the timing on a Kubota L2500 #11  
Rob I purchased the gauge at wally world they where the set of 3 oil,temp,&amp. disassembled the oil & temp and installed them in the dash, there like 1 1/2" in diam. look good match the fuel gauge. There was no place on the engine to install the temp gauge so I drilled the top tank on the radiator and soldered the fitting in the tank the temp gauge is not electric it reads the temp till engine is cooled down. Oil gauge has the tube to gauge not electric oil pres runs 60 cold 50 to 55 warm. Cost of the gauges was 19.95
 
   / Checking the timing on a Kubota L2500
  • Thread Starter
#12  
Thanks Camshaft. I went by Autozone and pick up a mech water temp for $17. I opened it up and discovered a 1/4" pipe and 3/8" pipe fitting. Also some other fitting but I think it's to big for the kubota hole. I already have the taps for a 1/4" pipe so all I need it the tractor parts. Just got an email from Tractorsmart and they should be here next Thursday. If I getup there this weekend I might go head and drill and tap the one on the engine.

Rob
 
   / Checking the timing on a Kubota L2500 #13  
I had an L2250 of the '85-'90 series. The temp gauge would run in the center until I started pulling a 5' brush hog in thick bahia grass on a 95 degree day. The temp would climb to 3/4 or more and I'd go clean the radiator fins and screen. I never tried to run it longer to see if it would overheat. Cleaning the airlow seemed to help, but I think the little tractors tend to run warm when working hard in hot weather.
 
   / Checking the timing on a Kubota L2500
  • Thread Starter
#14  
geneP said:
I had an L2250 of the '85-'90 series. The temp gauge would run in the center until I started pulling a 5' brush hog in thick bahia grass on a 95 degree day. The temp would climb to 3/4 or more and I'd go clean the radiator fins and screen. I never tried to run it longer to see if it would overheat. Cleaning the airlow seemed to help, but I think the little tractors tend to run warm when working hard in hot weather.

I'm starting to see a trend from my fellow L2*** buddies. Thanks for all the input.

Rob
 
   / Checking the timing on a Kubota L2500 #15  
rob i thought i might give you an idea, ive been a diesel mech for 12 years on gm engines and I have yet to see a timing issue cause a overheating concern but i have a good story.
when i was young in the business i bought a 4.3 short wide 5 speed truck the thing started getting hot in stop and go traffic, lots of heat no air movement right. well after a new water pump fan clutch pulling the radiator and having it clleaned it still did it, i was so glad the experienced techs i was learning from were so willing to spend my money. then one day i was doing a used car check out for resale and it was the same everything as my truck. so i thought what the heck and stole the radiator cap from that truck and put it on mine, poof problem solved. my old cap tested good but didnt perform as designed. now with that said my dad has an old well i know john deere 455 diesel lawn and garden guess what fixed his over heating problem yup radiator cap. sometimes we over look the simple things. Over ther years I have fixed numerous trucks with the same complaint with a 12 buck GM rad cap. I dont ever use aftermarket anything because of the failures and headaches ive seen the products cause. this may be your problem or may not but its definatly worth remembering to all who read.
thanks for the pics to by the way i have some guys asking about turning up the pump on their toro lawn mowers with diesel kubotas in them.

just wondering are you thinking pump timing is causing higher combustion temps? wouldnt that be evident with increse in exhaust smoke? have you watched the flow of coolant in your radiator to make sure you have a good fast stream? is your coolant clean and the recomended ratio? ive only seen a few diesel engine actually get hot or over heat and all those were either major engine failures, cooling system concerns, but never fuel delivery concerns. I have seen gas burners get hot due to base timeing out of whack or plugged up exhaust. exhaust might be another source of concern for a diesel, just have not seen that YET.

TODAY TOMORROW IS YESTERDAY
 
   / Checking the timing on a Kubota L2500
  • Thread Starter
#16  
Good Story! I've gone through some simple stuff but will post an update tomorrow when I get the pics off the camera. I forgot to mention last time I also replaced the thermostat...again with another kubota. Now things seem to be stablized..in the cooler weather anyway. Look for a post tomorrow...installing a temp gauge on a L2500.

Thanks,
Rob
 
   / Checking the timing on a Kubota L2500 #17  
In my quest to conquer my overheating problem, this weekend I checked the timing per the manual. Really pretty simple.

1) I removed the fuelline on #1 injector at the pump, rotate the engine until you see fuel move in the delivery tube. You want to stop at the slightest movement.

2) When I did this for a living I used this tool. Sort of a sight glass to easily see the fuel move. I would have to remove the intake manafold to put this on so I bypasses it.

3) remove the side place on the bell housing and observe the timing marks. you can see the 20 degrees on the right, the line on the left is 15 degrees. Specs call for 17-19 degrees. The camera angle might be off but I'm pretty much right on 17 degrees.

No adjustments on the timing today. But those remembing my overheating woesI have some sort of good news. I ran the L pretty hard pulling a disk. The temp got a little over the half way mark and remained there. However it was a cool day, we''ll see this summer.

Rob
Thanks for the informative response! And a few years later the saga continues :)

My BOSCH inline pump doesn't seem to have the view-port or I'm too dumb to find it. It's on a normally aspirated F6L912 in my 1991 Deutz-Fahr-Dx-6.05 (european model).
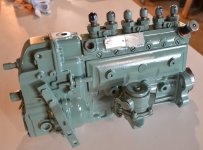
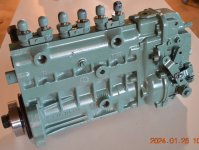
DSC_0004.JPG DSC_0006.JPG

The good book says to time it with a drip check but I have no idea what pressure to use and don't wanna blow the casing up with the only hand pump I have, an injector testing pump. This ritual requires the inlet port to be pressurised and the #1 outlet port to to have a u-tube where a forming drop is to be observed. It doesn't say what to see before the drip nor after, is it a last drop or a first one, etc. I would have expected a more professionally written procedure like

1 - Back the crank to about 90 degrees before compression TDC
2 - Hang a u-tube on #1 outlet port (line to #1 injector removed)
3 - Pressurize the inlet port 20-40psi(?) with a hand pump, maintain pressure.
4 - Observe no dripping out of u-tube (or no-flow as the case may be "I JUST DON'T KNOW!")
5 - Turn crank sneaking back up toward compression-TDC
6 - Stop when Fisrt/(OR is it Last?) drop forms on end of u-tube, THAT is "Commencement of Delivery"

I got this so screwed up I really wanna do another drill instead BUT my pump doesn't seem to have a view-port. The last 912 I did was in 2008 and on that one I just reused the pump and reinstalled it to punchmarks made during stripping.

This is a rebuilt pump with the cover screws sealed, the minute I break those open the value of the pump goes to 'core' but if necessary I can look in there too. Would really appreciate step-by step guidance on this so that I don't just FUBAR the whole procedure. I've got compression-TDC very precisely marked.

+++++++++++++++++++++++++++ Addendum
This pump doesn't BTW seem to have a timing pin OR a view-port

200-300-VS-2-3psi-crop.png

I have since found the above info but it's a bit ambiguous from 2-3psi to 200-300psi
 
Last edited:
 
Top