Building our retirement home

   / Building our retirement home #281  
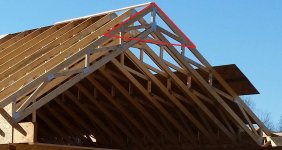
...The intent of the cross-members was solely for the look of the interior ceilings. We did not want the typical point at the top of our vault. You will notice the top of the great room window is cut flat to match the contour...

Of course you are correct on the intent of the cross members, but SirReal is also correct that in the "as-built" condition they will become the equivalent of collar ties and will probably be not up to that job.

If you do nothing more than get some 2x4 or even better, 2x6 lumber and cut pieces with the same angle as the roof pitch, you can span from roof to roof at the same level as the existing cross members, attaching them to the bottom and top chords of the trusses. This will not be visible in the finished product and will add significant strength.
 
   / Building our retirement home
  • Thread Starter
#282  
If you do nothing more than get some 2x4 or even better, 2x6 lumber and cut pieces with the same angle as the roof pitch, you can span from roof to roof at the same level as the existing cross members, attaching them to the bottom and top chords of the trusses. This will not be visible in the finished product and will add significant strength.

Another good idea :)
 
   / Building our retirement home #283  
Correct, they would be sistered right to the existing ones and will help with the support and prevention of the outward forces. It would not change the appearance of the finished porch roof but would actually help bind the structure. I would span both cords of the truss to add maximum holding ability.
 
   / Building our retirement home #284  
Of course you are correct on the intent of the cross members, but SirReal is also correct that in the "as-built" condition they will become the equivalent of collar ties and will probably be not up to that job.

If you do nothing more than get some 2x4 or even better, 2x6 lumber and cut pieces with the same angle as the roof pitch, you can span from roof to roof at the same level as the existing cross members, attaching them to the bottom and top chords of the trusses. This will not be visible in the finished product and will add significant strength.

I like this idea, and would recommend doing it before the final roof shingles are put on, so that the added reinforcement will be "tensioned" with the added roof weight.

You will have swallow birds regardless, looking for a dry place to build nests. I used to have to get out the water hose the same day I noticed them trying to build a nest.
 
   / Building our retirement home #285  
Swallows aren't that bad to have around, are they? They eat a lot of bugs and are interesting to watch
 
   / Building our retirement home #287  
They make a huge mess on your porch below their nest.

I suppose. I have barn swallows and don't much care about the mess in the aisleway. But wouldn't want it on my covered deck off the house. But they never took up residence on the deck... just the barn
 
   / Building our retirement home #288  
I agree with sir real and dave. Although even with a tension rod at patio level, the bottom of the posts could then possibly shift inwards, instead of the ground level area moving outward. If there was a steel "tie" of sorts at the bottom and patio level of the posts, then it would be more secure. What they are suggesting about sistering the collar tie, is the same intent I had with the plywood, although I believe the plywood would give a better chance of holding over time. 3/4" plywood, in the shape shown below, both sides, glued to all truss members and NAILED, not screwed, as screws may snap, the nails will bend some if there is spreading. Thats how I would do it, but I am no engineer. As said above how much costs, and how ugly the end result if indeed it does have problem?
trussbeef.jpg
 
   / Building our retirement home #289  
... 3/4" plywood, in the shape shown below, both sides, glued to all truss members and NAILED, not screwed, as screws may snap, the nails will bend some if there is spreading...

Anything is better than what is existing. I don't know about the strength of nails in plywood, but in 2x dimensional lumber a 16d common nail rates for 150 pounds of shear force. Three 16d nails in both the top and bottom chord of the trusses on each side would rate for 900 lbs of spreading force. I don't know if this is enough or not, but it is certainly a substantial improvement. Talk to a local engineer.

You have to be careful about this, because many framers will use 16d "cooler" or "short" nails in their nail guns, which are substantially smaller in diameter than the common nails (I think 0.131" vs. 0.162"diameter). You would need more of these smaller nails, at least 5 into each chord, and 6 is better.

I have used both types of nails myself, and the 0.131" ones are much easier to use and easier on the nail gun. Just be sure to use enough. If you want the common nails, you will have to personally stand there and watch the framer all the time, because most will not understand the difference and the smaller ones are just so much easier.

The other fastening option is that Simpson makes a self drilling 1/4" bolt which looks something like a mutant lag bolt. (Strong Drive SDS Heavy Duty Connector Screw) In a 3' length, it rates for about 280 pounds of shear. They are pretty proud of these and the cost is a lot more than nails, but they are a lot better fastener and you don't need that many of them. I have bought these at Home Depot many years ago, and I think they still carry them.

I agree that ideally collar ties should be added before putting the shingles on. OTOH putting them on afterward is better than not putting them on at all.
 
   / Building our retirement home
  • Thread Starter
#290  
The roof went on before any additional support could be added, but I like the idea of adding the bracing by the ties. I have a few weeks before any work is slated for the underside of the trusses.
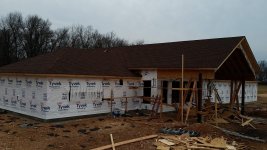
20151212_163242.jpg

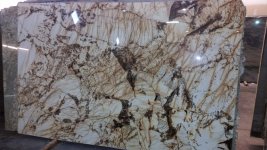
We've finally settled on our granite for the counter tops. Sandalus in the kitchen. Fusion in the master bath and Viena Oro in the guest bath and for the basement bar.
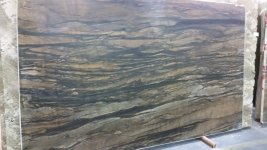
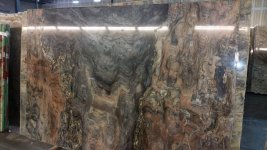
20151208_151327.jpg 20151214_123502.jpg 20151214_133128.jpg

In the last few days, we met with someone to help us plan our lighting options. Also a quick walk-thru with the electrician and with the insulation and sheetrock folks. Got the whirlpool, toilets and bath sinks ordered - but holding off on the hardware (faucets/lines) until we get a little further along.

I'm still trying to decide what kind of outdoor floods to use. My goal is to be able to light 360 degrees around the house. I'd like to hear thoughts on halogen vs LED. Indoors, I really want to go with LED as much as possible but have concerns on flicker. Opinions seem to vary widely on this - especially since almost every switch in the house will be a dimmer.

The fireplace, a Superior WCT40CRWSI, should arrive next week.

Our 2500' power/water trench from H___ is still unfinished. This has been a nightmare and a financial disaster - lol. The electrical conduit has been strung out along the run and fill gravel has been delivered. I cannot wait until this thing is filled in and I can stop thinking about it!!!!! Water from the well will join the trench about midway. Also, we learned the local electrical coop will be expanding their fiber Internet service to the area next year. So, we're adding a run of 1" conduit.

The ground floor windows "may" be installed on the 28th, assuming the delivery goes as planned. Although the upper windows in the great room will still be open, I think the house will be dry. We'll get on those as soon as the lowers are in place. The uppers will be cut-to-fit and we need to lowers in first to be sure all the upper/lower panes wind up in alignment.

Finally, all the trash/debris left behind by the builders is getting cleaned up. A lot of it resulted from tear-out, as we tended to change our minds along the way :) The upstairs room is one example - going in AFTER the rafters had been installed. Some of the lumber was reused but quite a bit hit the pile. I've been culling through it as I go and have started stacking what is best to be used for my own list of projects. As soon as I get the area clear, I'll be ready to have the front/rear porches and the driveway poured.

Things are inching forward and the house is beginning to take some shape. I also tore down my "temporary" well-house and had it rebuilt with blocks. Some of the scrap lumber will be used for the roof. And, just to be sure we never get any rest, someone recently crashed a car into one of our rental properties. LOL We decided to do a complete remodel - just completed.
 
Last edited:

Tractor & Equipment Auctions

2014 Ford F-350 Altec AT200A Insulated Crane Service Truck (A48081)
2014 Ford F-350...
(9) ROLLS OF HD CHAIN LINK MESH WIRE (A50460)
(9) ROLLS OF HD...
UNUSED Woven Landscape Fabric Squares (A50860)
UNUSED Woven...
2022 Chevrolet Tahoe FL SUV (A48082)
2022 Chevrolet...
Roll-off Dumpster With Tires (A49346)
Roll-off Dumpster...
1999 LULL 644B-42 HIGHLANDER TELESCOPIC FORKLIFT (A50458)
1999 LULL 644B-42...
 
Top