Building a stick frame house in the woods in 90 days

   / Building a stick frame house in the woods in 90 days #1,151  
Ron,
Yes your sketch is correct in showing the way we do the rake piece, Yes with a 2x4 gable you would need to use a 1x2 for proportion. I also set the 1x piece even with the top of the sheathing and only bend back in to cover the 1x piece. You are correct that both methods provide the same protection. I am not looking only for protection, i am trying to get as many bends in the rake to make it more ridgid. That is what keeps waves to a minimum. As far as nailing from below, Have you ever done this? We have not had a problem with denting the coil. We are using s.s. trim nails when attaching with no need to pre-drill. To be honest the prebent L i think your talking about is not something i would use on my house, so no i would not use it on someone else's. Its looks cheap with rolled profiles going down it but that is just my view. When the extra 1x piece is installed and you get down to making the "boot" in basic you bend an undersill, tuck it under the 1x over your rake and then slide your "boot" piece into that undersill

Builder,
I was doing the previous message from memory as well as this one. I saved some of Peters images for reference but not the text that went with them or with the replies. Too many pages now to hunt back, as stated by others. I guess in all fairness whenever we refer to a previous statement we should hunt back and find it and include it in the new reply. As I recall now, without hunting back, you were "chiming in" to support another fellow who is actually a NYC police detective, according to his profile, that had said something like, he had done thousands of Z facia without any problems. Whatever it was, one of you changed his tune to support the other.

The problem with Peters roof was in some places they left the roof sheathing panel overhanging the 2 x 4 and on others they didn't. I recall discussions about sawing it off even before the fascia was applied, but they used spacers behind the Z fascia instead.
At any rate, what is, is....
I certainly would not accept/ pay for the job on the rake trim on the front of the garage or the lousy shingle trim on any of the rake edges. I thought they would have fixed the fascia and re-trimmed the shingles by now, before messing with them causes the sealing strips damage..

My house does have the cheap preformed fascia and T drip edge. The underlayment, drip edge and shingles were replaced last fall, due to storm damage last summer. The roofer followed the same criteria as the original installation. I probably could have paid extra to get the fascia redone also, like you prescribe with the added board and formed coiled aluminum but I didn't. It might have even had negative consequences regarding overhang depth codes, if the roof is ever blown entirely off.
Except for the fascia warbling at the soffit box on one end of the house that gets a lot of direct sunshine, I'm satisfied.
Here are a couple pics of the box and roof edge from my deck of the room over the basement garage part of the house.
Notice how neat the shingles are cut. They were cut to length prior to nailing down and there is a starter strip under them
going from the spouting end to the ridge to assure an even straight edge. There is no way to get an edge that good by chalk line
cutting in place with 3D shingles.
However, they need to try re-trimming the shingles on Peters house with a board underneath to give a better cutting surface while the
present fascia is off and being replaced. IMO
Also a sketch I made to compare how an L fascia and T drip edge go together to form a look similar to your method from a little distance.
I apologize if I have misinterpreted what anybody has said in these threads. It happens all the time among other members, but that is no excuse for me.:ashamed:
Ron

 
   / Building a stick frame house in the woods in 90 days #1,152  
When you say shrink, I am thinking lengthwise. Are you saying that a 2x10 actually loses 1/4-3/8 in width so more like 9 1/8 or 9 1/4? If so, that is amazing.
-Stu

I've never seen this in lumber, but have with PT wood. In my experience, the bow changes over time and the blocking is important to keep it to a minimum. Everyone knows that you install it bow up, but you never know if it will flatten out, or even sag over time. What usually happens in one or two will bow down, most will flatten out and a few will keep the bow up. Same thing with ceilings, but with ceilings it easier to create a L shaped beam across the joists to keep them flat. With floors, you either have to add more beams or a lot of blocking.

Walls do this too. It's not uncommon to have to replace a few studs after all the framing is done because one of them went all twisty and crazy on you a few weeks after installing it.

I've never done the metal fascia, so I can't comment on how it's supposed to be done or how to fix it. I agree with Builder that just adding more nails to it is a short term cover up that will continue to be an issue. I use Hardie for my fascia. Metal and vinyl is used around here to cover up rotten wood and hide problems.

Eddie
 
   / Building a stick frame house in the woods in 90 days #1,153  
Ok, I am not trying ot be argumentative here but I still don't get it. If it shrinks dimensionally in width then that should lower the floor above consistently by the amount of shrinkage, right? Are you saying that because the center support is also wooden it will shrink by twice that much at the center since you have 2x resting on 2x lumber? If so, I can potentially see that. The center support beams for my house are steel as are in Peter's own home but not this one.
-Stu

Stu,
I am not saying that the 6x6 post will shrink in height. The 2x member "beam" as you call it a center support will shrink in height causing that area to shrink more. The outside ends rest on the foundation so no problem there. You are correct the whole floor will shrink as one but due to the beam being a 2x member that will also shrink that is were the problems come in.
 
   / Building a stick frame house in the woods in 90 days #1,154  
Builder,

Notice how neat the shingles are cut. They were cut to length prior to nailing down and there is a starter strip under them
going from the spouting end to the ridge to assure an even straight edge. There is no way to get an edge that good by chalk line
cutting in place with 3D shingles.
However, they need to try re-trimming the shingles on Peters house with a board underneath to give a better cutting surface while the
present fascia is off and being replaced. IMO
Also a sketch I made to compare how an L fascia and T drip edge go together to form a look similar to your method from a little distance.
I apologize if I have misinterpreted what anybody has said in these threads. It happens all the time among other members, but that is no excuse for me.:ashamed:
Ron

Ron,
I always install a starter course along the rake edge, Looks much neater from underneath. Do all the guys do it? No. Is it really needed? No. It all comes down to how guys have been shown how to do things. Some guys do the least possible others go above and beyond. I would like to think that due to my practices and work standards that is why after this past down fall in the construction business that is why i am still in business. Alot of guys closed up shop.
Nothing wrong with the way your roof was done i would say its done that way 9 out of 10 times. Most guys don't do the rake ends with bending back and over the way we do it so a rake edge or drip edge would be needed. I think if a siding guy that we don't normally work with showed up and saw how we did it he would wonder what the heck he was going to do. It is more work for the siding guys to do it the way we do.
Peter in no way am i saying that your builder is doing a bad job i just want to make that clear. Like anyone else i like some things and dislike others.
All in all i think he is doing right by you.
But i still can't figure out why they didn't make a drip edge on site with the coil stock on hand.
Enjoy the build your almost at home plate.
Oh yeah, big A++ on your builder using Ditra for your tile floor.:thumbsup:
 
   / Building a stick frame house in the woods in 90 days #1,155  
I've never seen this in lumber, but have with PT wood. In my experience, the bow changes over time and the blocking is important to keep it to a minimum. Everyone knows that you install it bow up, but you never know if it will flatten out, or even sag over time. What usually happens in one or two will bow down, most will flatten out and a few will keep the bow up. Same thing with ceilings, but with ceilings it easier to create a L shaped beam across the joists to keep them flat. With floors, you either have to add more beams or a lot of blocking.

Walls do this too. It's not uncommon to have to replace a few studs after all the framing is done because one of them went all twisty and crazy on you a few weeks after installing it.

I've never done the metal fascia, so I can't comment on how it's supposed to be done or how to fix it. I agree with Builder that just adding more nails to it is a short term cover up that will continue to be an issue. I use Hardie for my fascia. Metal and vinyl is used around here to cover up rotten wood and hide problems.

Eddie

Eddie,
What are you using for lumber? The only lumber around here that the shrinking is very minimal is K.D. Spruce. Everything else forget about it, its gonna shrink.
In fact when we remove the existing house rim joist or "outside box" to tie in new floor joist for an addition, You can never get them in, you have to chamfer the ends of the joist or leave to existing rim joist on and bolt on a new ledger, use K.D. spruce as floor joist.
 
   / Building a stick frame house in the woods in 90 days #1,156  
The X bracing being discussed goes halfway between the beams between the joist as I illustrated in the attached pic.
The joist ends are overlapped and nailed together where they sit on the beams so twisting is not likely to occur there. It's out in the middle
where the top of the joist is bridged by the subfloor but the bottom is left free to move, where the trouble could develop which
translates to a lateral twisting of the bottom. This causes the top edge of the joist to want to twist off level as well resulting
in a raised wavy floor above with potential grout or tile cracking. The floor is the base of everything. If it moves so does anything
above it, including vertical walls in the interior cavity.
I agree with Eddie about the reading of the joist before installation and we have talked about this before with the attributes of yellow pine.
The nominal width of a 2 x 10 is 1-1/2 x 9-1/4. Kiln dried yellow pine should not do much shrinkage in use as cross beams or floor joist in a basement.
I measured mine last night, and after 20 years, with a warm air trunk line running adjacent to one side, it is still 9-1/8+.
A 4' long level on the floor above is still level and I have no cracks in the tile grout.
Just lucky, I guess, but if you build something extra strong, it will probably have less problems in the future. Look at the houses built 100 years ago
and still standing straight and proud. The houses being built today will probably not be standing 100 years from now. Of course everyone will probably
be living in underground structures or caves by then anyway.
Ron
 
   / Building a stick frame house in the woods in 90 days #1,157  
Ron and Eddie,
I think you guys are using K.D. Yellow pine? If so i can't comment on that as around here it is all douglas fur or K.D.Spruce. I apologize for any confusion i should of asked what was being used. Even then i couldn't comment as i have no experience with yellow pine as joist, the only yellow pine around here is P.T. lumber and that is real bad with shrinking.
As far as mid span bracing for the floor joist on Peters house i like to use the metal bridging. Seeing how it can no longer be used in Peters house as it needs to be installed before sub floor goes on as previously posted. The only thing that could be added now is blocking just like they have over the beam. I would recommend putting sub floor adhesive on the top edge of the block before sliding up into place. Not much you can due where the duct is already running in the joist bays with out having to take stuff apart.
Depending on the deflection of his floor he may be ok as far as cracking of grout and tile. I am sure or atleast hope that was all figured out before hand.
The Ditra should do the trick as far as a decoupling membrane in aiding with cracking of grout and tile.
 
   / Building a stick frame house in the woods in 90 days #1,158  
Eddie,
What are you using for lumber? The only lumber around here that the shrinking is very minimal is K.D. Spruce. Everything else forget about it, its gonna shrink.
In fact when we remove the existing house rim joist or "outside box" to tie in new floor joist for an addition, You can never get them in, you have to chamfer the ends of the joist or leave to existing rim joist on and bolt on a new ledger, use K.D. spruce as floor joist.

I'm sure you have noticed and have had to deal with the the nominal size reductions in framing lumber.
Many years ago houses were framed with rough sawed lumber that was the dimension they are called and usually proud of that number. Exterior sheathing was real wood as were roofs. Wood siding was redwood, interior walls were either wood lathe and plaster, or 3/8 small panels of dense plasterboard like material covered with plaster, da, da , da...
I bet today it would be very hard to find anybody that could really do a plaster wall or even get the materials. You guys probably just cover them over with sheetrock.

I can remember 50 years ago on a home I owned having to play framing games because the nominal size of a 2 x 4 just 15 years prior when the house was built had been reduced so much.
It's like buying a gallon of ice cream today. Try finding a carton that has 128 oz in it. :2cents:
Ron
 
   / Building a stick frame house in the woods in 90 days #1,159  
pacerron said:
Builder,
I was doing the previous message from memory as well as this one. I saved some of Peters images for reference but not the text that went with them or with the replies. Too many pages now to hunt back, as stated by others. I guess in all fairness whenever we refer to a previous statement we should hunt back and find it and include it in the new reply. As I recall now, without hunting back, you were "chiming in" to support another fellow who is actually a NYC police detective, according to his profile, that had said something like, he had done thousands of Z facia without any problems. Whatever it was, one of you changed his tune to support the other.

Ron,

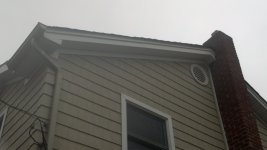
I ACTUALLY am a NYC detective. What does that have to do with this discussion. I have been doing residential home construction for 30 years. I have owned a construction company for the last 17 years. I guess you didn't read my entire profile and see that I have been swinging a hammer since I could pick one up. I didn't change my tune earlier in the thread. I thanked BuilderML for taking the time to explain the process in detail. I have refrained from posting any further in this thread because talking about these issues with someone who has never physically done it thousands of times is pointless. Books and the internet searches do not replace decades of practical knowledge. I, like BuilderML have kept my construction company afloat during these bad times because of quality work and referrals from satisfied customers. Below is pics of my home and how I do facia/gable trim. Sorry for the quality of the photos but it is raining buckets here right now. :)


image-3560456792.jpg


image-2768135215.jpg


Pete,
Get the siding sub contractor back and have him redo those gable fascia trim pieces. There looks like there might be enough roofing overhang to accept a 1x2 to be added to the fascia board and then recapped with a double Z. As long as there is at least 3/4 inch of roofing overhanging the trim it will be ok. They also need to turn the metal around the corner so there is an overlap with the trim that will be behind your gutter. I say this because it looks like there is exposed wood at the corner. Thanks for taking the time to post your progress and great house build thread!!
 
   / Building a stick frame house in the woods in 90 days #1,160  
Peter,
The fascia issues have been well explained now and your pictures are worth a thousand words in case the contractor tries to to kiss off the problems or charge you extra. If you took them at a higher resolution than the 72 that you posted you may want to use the higher resolution shots to get in really close and explain to the contractor. Attached are a few with the numbers that I blew up with just the zoom in in the viewer. This is not the way to do it of course.
Another issue you may want to add to your grenade bag and take more pictures as well is of the siding. Another guy asked you about how they would flash the deck joining to the house after cutting holes in the rim joist for deck support. I don't recall an answer or pictures that explained it. There was one picture that hinted at what they might have done on the outside, attached. Also specific instructions from Hardie to keep pooling water from disintegrating the siding. I would suggest that you read the entire pdf, only 4 pages, for what other issues you may discover.
http://www.jameshardie.com/pdf/install/hardieplank-hz5.pdf

I will become a, I think they call it " lurker" now since I seem to be getting under everybody's skin, which was not my intent.
Good luck on completion of your mom's home. I will be watching from the virtual world.
Ron
 

Tractor & Equipment Auctions

2017 HINO BOX TRUCK (A51222)
2017 HINO BOX...
2015 CATERPILLAR 259D SKID STEER (A51242)
2015 CATERPILLAR...
2016 Ford F550 4x4 Bucket Truck with Altec AT41 - 46FT Rotating Bucket and Jib Winch (A51039)
2016 Ford F550 4x4...
2014 Chevrolet Tahoe SUV (A49461)
2014 Chevrolet...
2019 VOLVO VNL760 TANDEM AXLE SLEEPER (A51219)
2019 VOLVO VNL760...
2020 INTERNATIONAL LT625 SLEEPER (A50854)
2020 INTERNATIONAL...
 
Top