Auxiliary Light Project

   / Auxiliary Light Project
  • Thread Starter
#21  
Project update.
My forward facing lights arrived today and I have spent some time working with them.
I'm a little premature in posting these pictures, but I just couldn't wait.
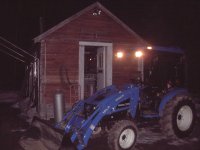
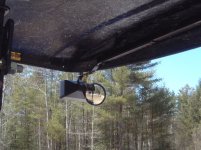
I still have some fine tuning to do on the mounting system and I am still waiting for the flasher and switch box to arrive before everything can be wired up permantly. But I have decided to mount them so they hang under the canopy rather then sit above it. Attached is a evening picture of the light powered up.
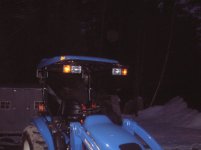
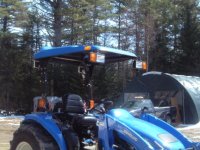
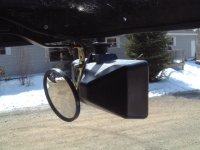
The 2nd picture will give you a better indication of what the lights actually are. I think my idea, although maybe not original, is rather ingenious.
 

Attachments

  • 253575-Front PlowLights C (8) reduced.jpg
    253575-Front PlowLights C (8) reduced.jpg
    91.2 KB · Views: 492
   / Auxiliary Light Project
  • Thread Starter
#22  
I found these lights on eBay one evening while browsing and thought to myself. These are perfect !!! They are designed for exactly what I want to do.
They are a set of New / 2nd hand, never used Peerlux Snow Plow lights. If each light assembly weighs 1lb. I would be surprised. Having both head light and flasher in one weather proof housing, kills 2 birds with 1 stone.
 

Attachments

  • 253581-Front PlowLights C (1) reduced.jpg
    253581-Front PlowLights C (1) reduced.jpg
    87.8 KB · Views: 497
   / Auxiliary Light Project
  • Thread Starter
#23  
Ok, To further last night update.
It is daylight and I am not trying to fumble in the dark. I am comfortably happy with the instalation of the front lights. The brackets are all painted, lights mounted and the mirrors are reinstalled. I am of course still waiting for the Whelen flasher and the Able 2 switch box to arrive, so at present, none of the lights work /forums/images/graemlins/frown.gif All good things come to those who wait. /forums/images/graemlins/tongue.gif
Attached a several pictures from differant angles. I think using the plow lights was pure genious. Don't mind me while I pat myself on the back. /forums/images/graemlins/grin.gif
 

Attachments

  • 253876-Front Plow Lights E (7) reduced.jpg
    253876-Front Plow Lights E (7) reduced.jpg
    92.4 KB · Views: 440
   / Auxiliary Light Project
  • Thread Starter
#24  
Picture 2
 

Attachments

  • 253879-Front Plow Lights E (2) reduced.jpg
    253879-Front Plow Lights E (2) reduced.jpg
    92.1 KB · Views: 356
   / Auxiliary Light Project
  • Thread Starter
#25  
I made the light bracket / extension from some old power pole, cross arm, support braces. There a fairly heavy stock and a real pain to bend. I had to put an offset in them in order to duck under the canopy's edge.
 

Attachments

  • 253882-Front Plow Lights E (6) reduced.jpg
    253882-Front Plow Lights E (6) reduced.jpg
    91.6 KB · Views: 356
   / Auxiliary Light Project
  • Thread Starter
#26  
Picture 4, close up of driversside light , bracket and mirror head
 

Attachments

  • 253887-Front Plow Lights E (13) reduced.jpg
    253887-Front Plow Lights E (13) reduced.jpg
    93.3 KB · Views: 370
   / Auxiliary Light Project
  • Thread Starter
#27  
Picture 5
 

Attachments

  • 253888-Front Plow Lights E (18) reduced.jpg
    253888-Front Plow Lights E (18) reduced.jpg
    90.3 KB · Views: 300
   / Auxiliary Light Project
  • Thread Starter
#28  
Picture 6, View from rear of tractor
 

Attachments

  • 253894-Front Plow Lights E (1) reduced.jpg
    253894-Front Plow Lights E (1) reduced.jpg
    90.3 KB · Views: 294
   / Auxiliary Light Project
  • Thread Starter
#29  
Picture 7 Another angle
 

Attachments

  • 253898-Front Plow Lights E reduced.jpg
    253898-Front Plow Lights E reduced.jpg
    83.1 KB · Views: 295
   / Auxiliary Light Project #30  
Mark,

Once again you have outdone yourself. /forums/images/graemlins/cool.gif Very nice. I can't quite tell how you attached the brackets for the lights from your pics. The whole setup looks really good and now the mirrors appear "hidden" behind the lights which is nice.
 
   / Auxiliary Light Project
  • Thread Starter
#31  
TD,
The bracket / extension are approx. 30" long or so. By design they already have a hole on each end. They are bolted to the canopy support arms, using the front canopy bolt (had to drill a hole in light bracket) and I fastened the back end of the bracket using the exhisting hole and a heavy duty self drilling screw up into the canopy support arm.
The self drilling screws are called Tek Screws, the came with my garage and are what holds / locks all the pipe section together. Awesome heavy duty screws.
 
   / Auxiliary Light Project #32  
Mark,

I guessing they are a little more stable that way as well, since the front ends of those canopies tend to vibrate a little (at least mine does). I like your new and improved brackets and the mirrors just kind of piggy back along.
 
   / Auxiliary Light Project
  • Thread Starter
#33  
TD,
Yup. Everything seems nice and stable and rugged, but there's a tiny amount of vibration at idle, which completly goes away when I throttle up. and there's a little bit of wiggling / jiggling as you drive around. That, in my opinion can't be heped.
 
   / Auxiliary Light Project #34  
Agreed, you just can't stop the vibration. I put rubber washers her there and everywhere in my mirror project and I hope it helps but................
 
   / Auxiliary Light Project #35  
That looks like a real proffessional job!

May I drift a bit off course & ask you if that cloth building in the background is yours? You seem to have some snow around, and you have it fairly close to some trees. Living in Minnesota, I always wondered how those things hold up, esp with trees around. I would think any falling branches would be a problem.

--->Paul
 
   / Auxiliary Light Project
  • Thread Starter
#36  
Paul,
Yes the garage is mine. It is a 26'W x 24"L Classic Plus garage from Clear Span / Farm Tek
The covering is actually quite heavy duty. I am sure that the right branch at the right angle etc. etc. would and could go through it. But, what in life ISN'T a gamble.
I can say that it is the Best $1500.00 S & H included, I Ever spent.
If I can give you any more info on it I would be more than happy to. Ask away. /forums/images/graemlins/smile.gif
 
   / Auxiliary Light Project #37  
I love the idea of snowplow lights, too. You might even have yourself something with high and low beams there. /forums/images/graemlins/smile.gif
 
   / Auxiliary Light Project
  • Thread Starter
#38  
Gary,
Yes, they do have high & low beam. I was thinking of just switching the high beam, but if I can replace one of the switchs in the box with a single pole, double throw. Then I can have a center position for off, and then switch both beams. I don't know if such a switch is available. I could always switch the high and low beams from seperate switchs if necessary. I would most likely have them on the high beam side MOST of the time, so truly needing the low's is a ???
They also have parking lamps and of course the brighter hazard lamp. I will probably just use the hazard lamp portion of them.
I picked them up on eBay from a man in PA for $83 S&H included. This is the Company that makes these particular ones Grote They are incredibly light weight. I almost thought the box was empty when it arrived. I have seen them at this site Grote Perlux for $105.99
I can't wait to get everything hooked up and running /forums/images/graemlins/grin.gif
 
   / Auxiliary Light Project #39  
</font><font color="blue" class="small">( Gary,
Yes, they do have high & low beam. I was thinking of just switching the high beam, but if I can replace one of the switchs in the box with a single pole, double throw. Then I can have a center position for off, and then switch both beams. I don't know if such a switch is available. )</font>

I took a quick look over at the Whelen site but didn't see any options for "spdt" switches. The other thought I had was you sometimes see split switches in these type of boxes but I didn't see this option either. The switches used are probably pretty standard size so you might have luck at your local NAPA dealer finding the switch you want. It would be a shame not to utilize the full potential of your new lights! /forums/images/graemlins/grin.gif /forums/images/graemlins/grin.gif
 
   / Auxiliary Light Project #40  
Mark, although I'm not positive I believe the headlight part of those lights will tend to send light up in the air and cutoff the light towards the ground because they are mounted opposite of their design. If you could rotate the headlight sealed beam 180 degrees you would get a better light pattern toward the ground. Maybe someone else will chime in. Bill C
 

Tractor & Equipment Auctions

2009 JACK COUNTY KILL TRAILER (A58214)
2009 JACK COUNTY...
2018 FREIGHTLINER CASCADIA TANDEM AXLE DAY CAB (A59905)
2018 FREIGHTLINER...
HYD BREAKER HAMMER (A60429)
HYD BREAKER HAMMER...
*Selling at Royal Auction Tampa, FL Location* (A59228)
*Selling at Royal...
2006 CHEVROLET EXPRESS SERVICE VAN (A59904)
2006 CHEVROLET...
UNUSED PAIR OF MINI RUBBER TRACKS (A52706)
UNUSED PAIR OF...
 
Top