BigBoyToys
Gold Member
I decided to purchase and install the 40 Amp Alternator Upgrade Kit (B7324) in my 2006 B3030. I recently sold my Jeep which had a winch that I used to pull equipment out of my basement, nothing weighing more than probably 400-500 lbs. I decided to install a Badlands ZXR 5000 winch on the tractor, and this drove me to upgrade from the 14 amp dynamo to the 40 amp alternator. I also want to install a couple LED work lights as well, so I figured the kit was a good investment.
I poked around and found a couple threads discussing the upgrade, but couldn't find one specifically on the B3030.
I bought the 40 Amp Alternator Kit B7324 from Coleman Equipment. It was $271 including shipping, and I received it in three days.
Prior to installing the kit, I decided to make sure I could remove the dash and cowling, and access what I needed to. I used a set of plastic "Trim Removal Tools" to pry the dash tabs away from the cowling/shroud. Once separated, you need to disconnect the RPM cable from the tachometer to move it back. I then removed the steering wheel to have more room to work. There's a single screw on top of the shroud that needs to be removed. Once removed, the shroud needs to be pulled outward and upwards. The two bottom tabs have a hook to keep it in place. With it free, I just pulled the bottom of it outward to be able to access the voltage regulator and harness.
I started by removing the front grill and side cover. I didn't remove the FEL, as you can see, there was plenty of room to access everything. I then disconnected the NEG 12V battery terminal.

I marked one of the two dynamo wires with some yellow electrical tape to distinctly identify them. Once disconnected I put some shrink tubing over the exposed connectors.
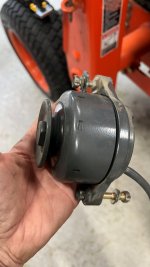
I removed the upper and lower bolts holding the dynamo in place, and removed the assembly. Weird looking little thing!!! I then removed the belt as a new one is provided.

There are two 10mm bolts that secure the dynamo bracket in place. The kit comes with a new alternator bracket which must be used, and you use the two bolts you removed to secure it. These bolts were easy to loosen with a 10mm wrench. They were just "snug". I went by feel when tightening them with the new bracket. Didn't feel it was critical to torque them, and it would have been difficult to get a torque wrench in there.
The oil dipstick tube is in the way of mounting the new alternator. The kit comes with a new dipstick that can be inserted directly into the block by removing the dipstick tube. There is a metal bracket welded to the tube that is secured by the lower alternator bolt. I couldn’t “bend” the tube and maintain the placement of the bracket. I’m going to cut the bracket such that I can fab up a new piece and weld it to a portion of the existing bracket. For now, I just used the new dipstick to continue with the install. With the new dipstick you have to remove the side panel every time to check the oil level...that's a PITA!
When installing the alternator, I had to go back and loosen the two bracket bolts, and “match up” the upper alternator bolt hole with the bracket slot, with the alternator in place. There is enough play in the bracket that the top hole will not lineup if you randomly secure it in place. Just loosely secure the bracket in place without the alternator, then you can adjust it with the alternator in place. I just tighten the lower alternator bolt enough to align the top. I was able to get in there with a small 10mm wrench and get the two bracket bolts snug enough so it wouldn't move. I removed the alternator and tightened the bolts.

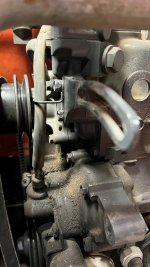
Installed the alternator once the bracket was properly adjusted. I used the smaller diameter bolt with a sleeve that goes in the lower alternator bolt hole, and a spacer behind the lower alternator bolt hole indicated by the red arrow in the image below.
The belt tension should be adjusted so there is 7-9mm of deflection in the middle run of the belt. That's roughly a 1/4". I checked it from the alternator pulley to the crank pulley.

With the alternator in place, I routed the new wiring harness from the engine compartment to the cowling under the dash.
I routed the new red alternator wire and terminal through the rubber boot to connect to the starter. I then connected the other end of the red wire to the alternator lug, and the white plastic connector as shown below.

I remove the voltage regulator which is mounted to the steering column. I used a long and short 3/8" extensions to be able to reach the bolt holiding it in place. With it loose I disconnected the harness connector to it.

The new harness has a connector that will connect to the voltage regulator connector.

There is a relay that comes with the kit which connects to the new harness. I attempted to secure it to the steering column where the voltage regulator was mounted, but the screw was too long. It was getting really tight, and the relay was still really loose. I ended up just using a tie wrap and securing it to the large existing harness. The relay is circled, and the voltage regulator connector is pointed to with the arrow.

With everything connected, I figured I'd start the tractor and make sure the new alternator was working. I reconnected the neg battery terminal and attached a volt meter to the terminals. Measured 12.9 volts with the tractor off and 14.4 volts with it running...SUCCESS!!!!!!
It took me around an hour to get the dash and cowling disassembled on a Saturday morning. Last night it was just over a couple hours to install the kit, and get the cowling and dash back in place. So right around three hours total. Really happy I did the upgrade. Hopefully this is helpful to someone who might decide to do the upgrade.
I poked around and found a couple threads discussing the upgrade, but couldn't find one specifically on the B3030.
I bought the 40 Amp Alternator Kit B7324 from Coleman Equipment. It was $271 including shipping, and I received it in three days.
Prior to installing the kit, I decided to make sure I could remove the dash and cowling, and access what I needed to. I used a set of plastic "Trim Removal Tools" to pry the dash tabs away from the cowling/shroud. Once separated, you need to disconnect the RPM cable from the tachometer to move it back. I then removed the steering wheel to have more room to work. There's a single screw on top of the shroud that needs to be removed. Once removed, the shroud needs to be pulled outward and upwards. The two bottom tabs have a hook to keep it in place. With it free, I just pulled the bottom of it outward to be able to access the voltage regulator and harness.
I started by removing the front grill and side cover. I didn't remove the FEL, as you can see, there was plenty of room to access everything. I then disconnected the NEG 12V battery terminal.
I marked one of the two dynamo wires with some yellow electrical tape to distinctly identify them. Once disconnected I put some shrink tubing over the exposed connectors.
I removed the upper and lower bolts holding the dynamo in place, and removed the assembly. Weird looking little thing!!! I then removed the belt as a new one is provided.
There are two 10mm bolts that secure the dynamo bracket in place. The kit comes with a new alternator bracket which must be used, and you use the two bolts you removed to secure it. These bolts were easy to loosen with a 10mm wrench. They were just "snug". I went by feel when tightening them with the new bracket. Didn't feel it was critical to torque them, and it would have been difficult to get a torque wrench in there.
The oil dipstick tube is in the way of mounting the new alternator. The kit comes with a new dipstick that can be inserted directly into the block by removing the dipstick tube. There is a metal bracket welded to the tube that is secured by the lower alternator bolt. I couldn’t “bend” the tube and maintain the placement of the bracket. I’m going to cut the bracket such that I can fab up a new piece and weld it to a portion of the existing bracket. For now, I just used the new dipstick to continue with the install. With the new dipstick you have to remove the side panel every time to check the oil level...that's a PITA!
When installing the alternator, I had to go back and loosen the two bracket bolts, and “match up” the upper alternator bolt hole with the bracket slot, with the alternator in place. There is enough play in the bracket that the top hole will not lineup if you randomly secure it in place. Just loosely secure the bracket in place without the alternator, then you can adjust it with the alternator in place. I just tighten the lower alternator bolt enough to align the top. I was able to get in there with a small 10mm wrench and get the two bracket bolts snug enough so it wouldn't move. I removed the alternator and tightened the bolts.
Installed the alternator once the bracket was properly adjusted. I used the smaller diameter bolt with a sleeve that goes in the lower alternator bolt hole, and a spacer behind the lower alternator bolt hole indicated by the red arrow in the image below.
The belt tension should be adjusted so there is 7-9mm of deflection in the middle run of the belt. That's roughly a 1/4". I checked it from the alternator pulley to the crank pulley.
With the alternator in place, I routed the new wiring harness from the engine compartment to the cowling under the dash.
I routed the new red alternator wire and terminal through the rubber boot to connect to the starter. I then connected the other end of the red wire to the alternator lug, and the white plastic connector as shown below.
I remove the voltage regulator which is mounted to the steering column. I used a long and short 3/8" extensions to be able to reach the bolt holiding it in place. With it loose I disconnected the harness connector to it.
The new harness has a connector that will connect to the voltage regulator connector.
There is a relay that comes with the kit which connects to the new harness. I attempted to secure it to the steering column where the voltage regulator was mounted, but the screw was too long. It was getting really tight, and the relay was still really loose. I ended up just using a tie wrap and securing it to the large existing harness. The relay is circled, and the voltage regulator connector is pointed to with the arrow.
With everything connected, I figured I'd start the tractor and make sure the new alternator was working. I reconnected the neg battery terminal and attached a volt meter to the terminals. Measured 12.9 volts with the tractor off and 14.4 volts with it running...SUCCESS!!!!!!
It took me around an hour to get the dash and cowling disassembled on a Saturday morning. Last night it was just over a couple hours to install the kit, and get the cowling and dash back in place. So right around three hours total. Really happy I did the upgrade. Hopefully this is helpful to someone who might decide to do the upgrade.
")