Wiring up diverter valve... recommendations?

   / Wiring up diverter valve... recommendations? #1  

Dadnatron

Veteran Member
Joined
Mar 24, 2016
Messages
1,113
Location
Versailles, KY
Tractor
JD 5100e with FEL
I just purchased a back blade with 3 hydraulic cylinders. It is used and off Auction, so I haven't actually even seen it in person yet.

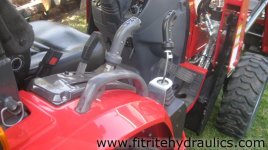
The blade has a diverter valve already installed directly on the blade. The previous owner only had 2 sets of connections, but 3 cylinders to operate. Apparently, rather than put the valve on his tractor, he put it directly onto the blade.

I know the basics of what I need to do, however, there are a couple things of which I am unsure.

1. Is there any good source of accurate information and instructions on the web which you would recommend?
2. I have one 'float' and one 'regular' lever. Is there a preference for which I would use/hook up to in this case?
3. Any words of wisdom which will cut down on curse words during the installation of the switch and wiring would be appreciated.

PS: Actually, I just saw an additional pic showing the switch which comes with it. It is funny, as there are a couple pics on the site NOW which were not showing up prior to the Auction. This looks like a separate switch which is likely simply hooked up to a power supply and then attached to the diverter valve.


backblade 2.JPGBackblade.JPGbackblade 3.JPG
 
Last edited:
   / Wiring up diverter valve... recommendations? #2  
A diverter is pretty simple. Apply voltage & the solenoid diverts the hydraulic flow from 1 set of plumbing to another.

Figure out what the max amp draw is & make sure the wire can support that & fuse it for under the max rating if the wire. I'm guessing 5@ or so.

I only see float being of value on the tilt function (or a hydraulic toplink which I don't see). I'd put your float spool on tilt. If tilt is on the diverter just make sure that it is the default . There is no sense in needing to apply & leave power to the diverter to leave it in float.

Should be no problems to swap hoses around on the diverter if needed.
 
   / Wiring up diverter valve... recommendations? #3  
I find that it is FAR more convenient to have the control switches on the control lever. I would install a separate control grip on your existing control lever and have ALL controls at your finger tips with out having to move your hand. :cool:

I also agree with Fallon, use the float feature valve for your controlling valve. There are times when it is nice to have the tilt function in float mode. :thumbsup:

Looks like a nice blade, I hope you don't have to much tractor for it. ;)
 
   / Wiring up diverter valve... recommendations?
  • Thread Starter
#4  
Looks like a nice blade, I hope you don't have to much tractor for it. ;)

I'm hoping so as well. That is the biggest downside to online purchase. I know that it isn't the 'heavy' version, and if it looks too light... well, I guess I'll CL it and keep looking.

And I agree, I'd much rather have the switches on the handle. This is just what came with it. And, when I get your top/side link, I'll likely need to get diverter valves to put on the tractor anyway, so adding another 'option switch' would just be hooking up another button on the handle.

My biggest hesitancy with the handles with lots of buttons, is that I use the lever a lot of times, while using other implements, and I just hit it quickly to adjust, and I don't look at it. I grab and push, and I'm somewhat worried, that I will be hitting buttons all the time (which might be inconsequential) because I'm not looking at the handle. Perhaps I would just learn to not 'go for the knob' and to grasp and push it lower on the handle.
 
   / Wiring up diverter valve... recommendations? #5  
The button thing becomes second nature. I have a 3 switch grip on my small tractor, can't remember ever accidently hitting any of the switches. Now sometimes when first getting on the tractor I will use the WRONG switch,:ashamed: but never inadvertently. :no: The gray grip has 2 buttons and a single trigger switch. These have worked out very well for me.

The E models are big for "T&T" sets. Doing a 65, 100 and an 85 this week. :thumbsup:
 

Attachments

  • 11.jpg
    11.jpg
    307.3 KB · Views: 149
   / Wiring up diverter valve... recommendations?
  • Thread Starter
#6  
Brian,

I was all set to purchase a triple diverter valve kit from you, and just saw that you are no longer selling them.

Now that you are out, can you recommend a reliable source for them? I currently have 2 valves with a power beyond 'port' labeled, but empty. Basically, it is just the 'end' of the hydraulic block.

I'd like to hook up a triple diverter so I can keep my toplink/sidelink connected and have 3 banks of valves remaining. I still haven't wired up the blade system from this thread. I have been running ragged and everything else has been used, except for this blade. I grabbed it yesterday and jury rigged a run around with a couple alligator clips and a hot plug. But this isn't going to fly.
 
   / Wiring up diverter valve... recommendations? #7  
Brian,

I was all set to purchase a triple diverter valve kit from you, and just saw that you are no longer selling them.

Now that you are out, can you recommend a reliable source for them? I currently have 2 valves with a power beyond 'port' labeled, but empty. Basically, it is just the 'end' of the hydraulic block.

I'd like to hook up a triple diverter so I can keep my toplink/sidelink connected and have 3 banks of valves remaining. I still haven't wired up the blade system from this thread. I have been running ragged and everything else has been used, except for this blade. I grabbed it yesterday and jury rigged a run around with a couple alligator clips and a hot plug. But this isn't going to fly.

You can get those diverter valves from many places online. Baileynet.com, surplus center, hydraulic store.com, etc.

The single diverters.....most are usually stackable. They have threaded ports to use as a single...but if you look close outside the threads is a machined groove for an o-ring. You can buy 3 of them and stack them together.....and just use the threaded ports on the ends of the valve
 
 
Top