Sodo
Elite Member
- Joined
- Apr 21, 2012
- Messages
- 3,219
- Location
- Cascade Mtns of WA state
- Tractor
- Kubota B-series & Mini Excavator
Thought some folks might be interested in this 1.25" shaft weld repair I did a couple months ago.

I bought a Massey Ferguson #31 sickle mower with a broken crankshaft (end of 2013). I intended to weld it with my 120v MIG, and started reading up on the forum. I knew my method was more feasible than forum wisdom lets out but had a hankering for a 2nd welder anyway. A few months later, I bought a Miller Multimatic200 (115/230v, MIG/TIG/Stick, rated for up to 3/8" steel on 230v). But I did not think to question my 5000W generator, mostly because of the lack of info on the forum, nobody's posting about generators.
I probably should have joined WeldingWeb and asked there but I kinda thought that place would be more hostile, an assumption that may have been wrong. But I did post this in "TBN repairs" because it seemed like there were more folks in "Repairs" who had an end-goal in sight (success ! ) than what I'd been seeing in "TBN Welding" which is almost always "you can't do that" and "By the way, I'm a pro and you're not".
So I worked out a plan to fix the shaft, cranked up the generator and the MultiMatic200, but discovered that the 5,000w generator could not accommodate more than the 1/4" thickness preset on the welder. If I set it on 5/16" and welded, the motor would pull down. Dang! But on the 1/4" setting it was fine.
Hmmmm. This time was my window of opportunity to work on the project. The grass is already too tall, I need to start cutting last week! So,,,,,, GO ? or STOP ? I decided that since I'm welding around and around on the same spot, which will concentrate the heat, that I'm going to "GO" not stop. The actual welding is several pages into the original repair thread so I'll repeat a blow-by-blow here of the welding with pics at top, and maybe a better project explanation.
========= HERES the story =================
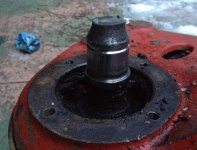
Here's a pic showing the broken shaft (needs a pulley/sheave there).
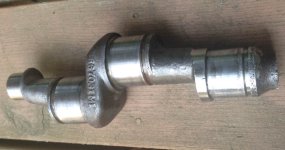
An example crankshaft.
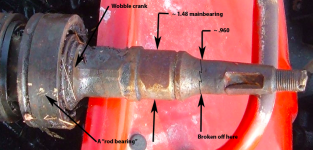
Here's my broken crankshaft. Measured the bearing land at right to be 1 3/8". After a lot of round and round with machinists and other folks in the TBN repair forum I decided to just weld on the MAX size keyed shaft that I could, which was 1 1/4".
One of the crank journals operates the sickle back and forth. The other journal operates the balancers to counteract the weight of the sickle bar. Massey calls it a "Dyna-Balance".
Finding center to drill for a dowel. It drilled like butter.
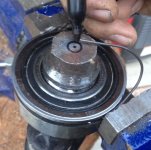
Have a 1/8" rod (7018 welding rod) fairly close to center on the 2 shafts. I intended to whack it around until I got reasonable alignment then weld it in place. But whenever I'd whack it, the ( now zigzag'd ) alignment dowel would just rotate to a new angle, and not 'hold' my calibrated "whack". Also it became apparent that vertical would be better for true-ing it.
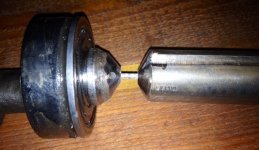
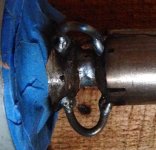
Next iteration was to weld little loops of 1/8" rod (7018 rod) to hold the alignment better. There's clearance to get the nozzle in for the root weld, and blue tape to keep welding spatter off the shaft & bearing.
Replacement bearing is no longer available, a good bearing is like GOLD (for this #31 sickle). Was very careful to protect it.
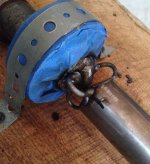
Changed to vertical for the truing process.
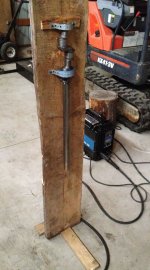
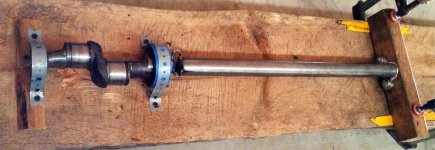
Here's the welding jig that I made. I need only 3 inches of shaft but the 20 inches extension helped in alignment.
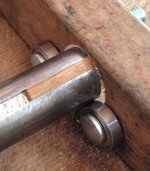
A wooden keyway plug to smooth it out on the v-block rollers
The root weld to about 1/2" diameter.
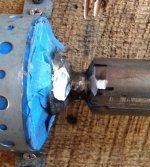
Ground off the loop and their tackwelds, removed the bearing and the tape and the plumbers tape too. The shaft has a bearing at the left and the right is rolling in the bearing cradle (like a v-groove cradle but with 2 cartridge bearings). It's ready to build up.
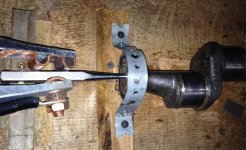
You may or may not have thought about how to attach the ground clamp to this rotating weld - neither did I. But this worked perfectly. It's a centerpunch crammed into the machinist's center hole (on the other end of the shaft).
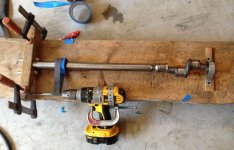
I thought a motorized turning shaft would be the way to go. This DeWalt drill motor setup looks simple but took hours to get it right and it worked great, nice. slow smooth rotation. But I didn't consider the one KEY detail. Even if I happened to get it set to the right speed to start, by the second turn, the rotation speed must reduce as the weld increases diameter.
So took it all off and rolled the shaft with my left hand while welding with my right hand. It was dicey to say the least.
Here's the weld. Again, this was welded using 230v with welder set at the 1/4" thickness preset, which was the maximum the 5,000W generator could support. I was very very surprised that it turned out so well in ONE shot. I was all prepared to have to cut it off and use up some of my 20" shaft and try again.
Even to this day I walk by the mower and look at that weld, and pat myself on the back again, I can hardly believe it. Anyway the amount I had to grind to get the bearing to slide up onto its 1 3/8" land, was so miniscule, very very surprising. On the left side the melt pooled up against a painted sheetmetal wrap (roof flashing) that I wrapped around to protect the bearing land.

Three pertinent (and TBN timely) observations:
1) The 1/4" thickness preset on the MultiMatic 200 uses exactly the same power at 230v as it does at 115v. With .030" wire & C25 it's 19.5v @ wire speed 310. So this weld would have been the same on 115 as 230v. The weld is on a 1 1/4" shaft, the setting is 1/4", the manufacturers recommended max thickness is 3/8" but I did not have the supply power to get past the 1/4" preset.
2) I did the whole "buildup" in one shot and it was so bright orange hot at the end - I was afraid that it was going to sag! It did not appear to sag.
3) I had not yet heard of duty cycle limitations (that affect TBN members so often:laughing , but the MM200's 20% duty cycle did not shut down during this continuous weld.
Here's the gearbox
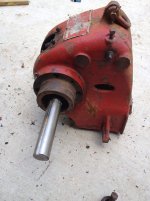
Another view.
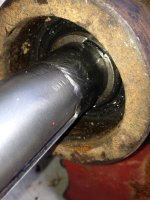
Got some great help on TBN, the guys helped me to find Browning style sheaves and everything I needed to keep moving. Just a great experience. The mower cost me $150 and the parts were $100+, but the time on the internet was atrocious. Then the mechanic-ing was many hours too, stuck bolts, stuck clips and the welding process was an 8 hour day. But the Sickle's in nice, little used condition and arguably worth ~$1400.
And the mower works GREAT! I can't tell if it vibrates more than "normal", actually can't imagine it vibrating any less, it's pretty smooth running for a device with that much monkey-motion goin on.
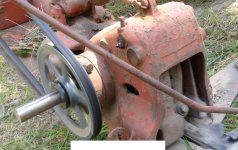
Gotta cut more shaft off someday, the grass wraps around it.
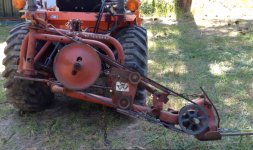
Hope this story is of use to those who need to repair stuff or like to see what has been done. If any questions I'll answer as best as I can.
I bought a Massey Ferguson #31 sickle mower with a broken crankshaft (end of 2013). I intended to weld it with my 120v MIG, and started reading up on the forum. I knew my method was more feasible than forum wisdom lets out but had a hankering for a 2nd welder anyway. A few months later, I bought a Miller Multimatic200 (115/230v, MIG/TIG/Stick, rated for up to 3/8" steel on 230v). But I did not think to question my 5000W generator, mostly because of the lack of info on the forum, nobody's posting about generators.
I probably should have joined WeldingWeb and asked there but I kinda thought that place would be more hostile, an assumption that may have been wrong. But I did post this in "TBN repairs" because it seemed like there were more folks in "Repairs" who had an end-goal in sight (success ! ) than what I'd been seeing in "TBN Welding" which is almost always "you can't do that" and "By the way, I'm a pro and you're not".
So I worked out a plan to fix the shaft, cranked up the generator and the MultiMatic200, but discovered that the 5,000w generator could not accommodate more than the 1/4" thickness preset on the welder. If I set it on 5/16" and welded, the motor would pull down. Dang! But on the 1/4" setting it was fine.
Hmmmm. This time was my window of opportunity to work on the project. The grass is already too tall, I need to start cutting last week! So,,,,,, GO ? or STOP ? I decided that since I'm welding around and around on the same spot, which will concentrate the heat, that I'm going to "GO" not stop. The actual welding is several pages into the original repair thread so I'll repeat a blow-by-blow here of the welding with pics at top, and maybe a better project explanation.
========= HERES the story =================
Here's a pic showing the broken shaft (needs a pulley/sheave there).

An example crankshaft.

Here's my broken crankshaft. Measured the bearing land at right to be 1 3/8". After a lot of round and round with machinists and other folks in the TBN repair forum I decided to just weld on the MAX size keyed shaft that I could, which was 1 1/4".
One of the crank journals operates the sickle back and forth. The other journal operates the balancers to counteract the weight of the sickle bar. Massey calls it a "Dyna-Balance".

Finding center to drill for a dowel. It drilled like butter.

Have a 1/8" rod (7018 welding rod) fairly close to center on the 2 shafts. I intended to whack it around until I got reasonable alignment then weld it in place. But whenever I'd whack it, the ( now zigzag'd ) alignment dowel would just rotate to a new angle, and not 'hold' my calibrated "whack". Also it became apparent that vertical would be better for true-ing it.

Next iteration was to weld little loops of 1/8" rod (7018 rod) to hold the alignment better. There's clearance to get the nozzle in for the root weld, and blue tape to keep welding spatter off the shaft & bearing.
Replacement bearing is no longer available, a good bearing is like GOLD (for this #31 sickle). Was very careful to protect it.

Changed to vertical for the truing process.

Here's the welding jig that I made. I need only 3 inches of shaft but the 20 inches extension helped in alignment.

A wooden keyway plug to smooth it out on the v-block rollers

The root weld to about 1/2" diameter.

Ground off the loop and their tackwelds, removed the bearing and the tape and the plumbers tape too. The shaft has a bearing at the left and the right is rolling in the bearing cradle (like a v-groove cradle but with 2 cartridge bearings). It's ready to build up.

You may or may not have thought about how to attach the ground clamp to this rotating weld - neither did I. But this worked perfectly. It's a centerpunch crammed into the machinist's center hole (on the other end of the shaft).

I thought a motorized turning shaft would be the way to go. This DeWalt drill motor setup looks simple but took hours to get it right and it worked great, nice. slow smooth rotation. But I didn't consider the one KEY detail. Even if I happened to get it set to the right speed to start, by the second turn, the rotation speed must reduce as the weld increases diameter.
So took it all off and rolled the shaft with my left hand while welding with my right hand. It was dicey to say the least.

Here's the weld. Again, this was welded using 230v with welder set at the 1/4" thickness preset, which was the maximum the 5,000W generator could support. I was very very surprised that it turned out so well in ONE shot. I was all prepared to have to cut it off and use up some of my 20" shaft and try again.
Even to this day I walk by the mower and look at that weld, and pat myself on the back again, I can hardly believe it. Anyway the amount I had to grind to get the bearing to slide up onto its 1 3/8" land, was so miniscule, very very surprising. On the left side the melt pooled up against a painted sheetmetal wrap (roof flashing) that I wrapped around to protect the bearing land.

Three pertinent (and TBN timely) observations:
1) The 1/4" thickness preset on the MultiMatic 200 uses exactly the same power at 230v as it does at 115v. With .030" wire & C25 it's 19.5v @ wire speed 310. So this weld would have been the same on 115 as 230v. The weld is on a 1 1/4" shaft, the setting is 1/4", the manufacturers recommended max thickness is 3/8" but I did not have the supply power to get past the 1/4" preset.
2) I did the whole "buildup" in one shot and it was so bright orange hot at the end - I was afraid that it was going to sag! It did not appear to sag.
3) I had not yet heard of duty cycle limitations (that affect TBN members so often:laughing
Here's the gearbox

Another view.

Got some great help on TBN, the guys helped me to find Browning style sheaves and everything I needed to keep moving. Just a great experience. The mower cost me $150 and the parts were $100+, but the time on the internet was atrocious. Then the mechanic-ing was many hours too, stuck bolts, stuck clips and the welding process was an 8 hour day. But the Sickle's in nice, little used condition and arguably worth ~$1400.
And the mower works GREAT! I can't tell if it vibrates more than "normal", actually can't imagine it vibrating any less, it's pretty smooth running for a device with that much monkey-motion goin on.

Gotta cut more shaft off someday, the grass wraps around it.

Hope this story is of use to those who need to repair stuff or like to see what has been done. If any questions I'll answer as best as I can.
Last edited:

