Tips for 3x20's 50 hour change

   / Tips for 3x20's 50 hour change #1  

Rob-D

Veteran Member
Joined
Oct 20, 2006
Messages
2,473
Location
Catskills
Tractor
John Deere 3320
Hi Gang,
Just did the 50 hour on my 3320 and several things are different from the 2x20's.
First, there are no magnets in the steel filter, you change the complete filter. Seems like a waste as this part isn't especially cheap but since it called for it I did it.
The other thing that is different is the large cap that keeps this filter in place. I takes a little work to get off and you really need a strap wrench to do it. I didn't have one so I fabricated a steel band and used a vise grip with a rubber sheet to get it off.

Everything else seems to be basic but the other task I did was change the front axle oil too. I saw some fine metal dust in the oil so I think this was a good idea along with the NdFeB magnets that I put in the drain plugs. I got this idea from working on Porsches and have been using it for the last 30 years or so.

Rob
 
   / Tips for 3x20's 50 hour change #2  
In regards to the large hydro filter my dealer was insistant on not changing it and just cleaning it. But my **** retentive nature won that battle and I did indeed change it. I figured that it was a small price to pay compared to the cost of the tractor. If you do the hydro system including the front axle it sure is alot of oil to play with. I'm about to change all mine once the weather heats up abit. Have you taken any action shots with the thumb and bucket?
I'd like to see the thumb fully extended with the bucket against it and fully rectracted with the bucket fully curled.

Matt
 
   / Tips for 3x20's 50 hour change
  • Thread Starter
#3  
In regards to the large hydro filter my dealer was insistant on not changing it and just cleaning it. But my **** retentive nature won that battle and I did indeed change it. I figured that it was a small price to pay compared to the cost of the tractor. If you do the hydro system including the front axle it sure is alot of oil to play with. I'm about to change all mine once the weather heats up abit. Have you taken any action shots with the thumb and bucket?
I'd like to see the thumb fully extended with the bucket against it and fully rectracted with the bucket fully curled.

Matt

Hi Matt,
Well, with my retentive nature I'm saving the old filter! It looks perfect to me.

I think the front axle oil is a good idea after the controversy that has plagued it around here. It only takes another 1.2 gallons of oil and I figure since I'm making a mess now is the time to do it. Besides I figured this was a good time to put the magnet in the drain plug.

Here's another thing I do, I leave the loader and BH on and I move them into positions where all the pistons are contracted. (the BH is straight up in the air and the loader is on the ground with the bucket facing down. I figure this pushes all the old oil back into the tractor and is better than leaving them off where it is impossible to get all the cylinders completely contracted.

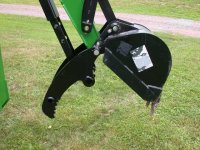
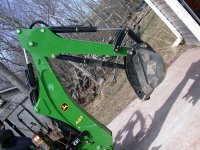
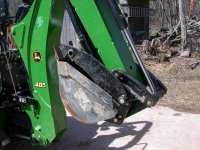
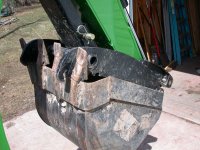
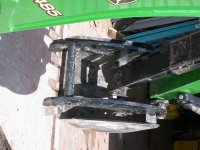
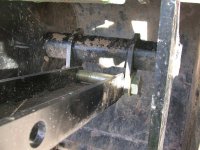
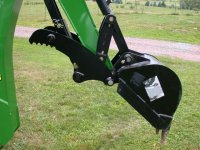
Here's some shots of the thumb the first one is in the max out position and the next is most retracted:

Rob
 

Attachments

  • Thumb-home.JPG
    Thumb-home.JPG
    50.3 KB · Views: 186
  • Thumb-max.JPG
    Thumb-max.JPG
    56.2 KB · Views: 175
  • thumb-more pics 003.jpg
    thumb-more pics 003.jpg
    61.4 KB · Views: 180
   / Tips for 3x20's 50 hour change #4  
Rob, thanks so much I'm actually looking for pics of the bucket curled tight to the thumb. Both with the thumb retracted and fully extended. I'm trying to fab the arm for the factory thumb with my 448. And pics would be super helpful. Good idea on keeping the filter. I think I had metal shavings in all my fluids initially. The filter I held off changing was the inline hydro filter and I really wish I hadn't waited so long. I was having this intermintant cavitation and it turned out to be the inline filter had the end break off and block the suction side of the filter. The odd thing was when I picked up the replacement it was a bit smaller. I asked the dealer about the size difference and he told me they had issues with the manufacture of the original style. I think it was around $50 but I would have like to avoid the cavitation and possible pump damage by replacing the filter sooner.

Matt;)
 
   / Tips for 3x20's 50 hour change
  • Thread Starter
#5  
Rob, thanks so much I'm actually looking for pics of the bucket curled tight to the thumb. Both with the thumb retracted and fully extended. I'm trying to fab the arm for the factory thumb with my 448. And pics would be super helpful. Good idea on keeping the filter. I think I had metal shavings in all my fluids initially. The filter I held off changing was the inline hydro filter and I really wish I hadn't waited so long. I was having this intermintant cavitation and it turned out to be the inline filter had the end break off and block the suction side of the filter. The odd thing was when I picked up the replacement it was a bit smaller. I asked the dealer about the size difference and he told me they had issues with the manufacture of the original style. I think it was around $50 but I would have like to avoid the cavitation and possible pump damage by replacing the filter sooner.

Matt;)

Matt,
I just found this, I'll go take some more pics for you.
Rob
 
   / Tips for 3x20's 50 hour change
  • Thread Starter
#6  
Matt,
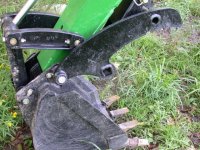
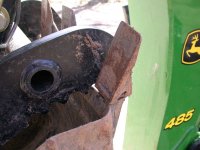
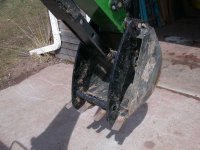
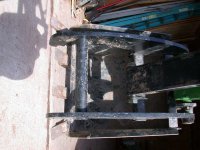
Here's some photos, let me know if you need more.
Rob
 

Attachments

  • Bucket4.JPG
    Bucket4.JPG
    80 KB · Views: 201
  • Bucket3.JPG
    Bucket3.JPG
    44.1 KB · Views: 149
  • Bucket2.JPG
    Bucket2.JPG
    69.5 KB · Views: 152
  • Bucket1.JPG
    Bucket1.JPG
    66 KB · Views: 181
  • Bucket5.JPG
    Bucket5.JPG
    53.4 KB · Views: 155
  • Bucket7.JPG
    Bucket7.JPG
    55.3 KB · Views: 151
  • Bucket8.JPG
    Bucket8.JPG
    53.3 KB · Views: 160
  • Bucket9.JPG
    Bucket9.JPG
    52.2 KB · Views: 161
   / Tips for 3x20's 50 hour change #7  
Rob, thank you so much for all the pics. It has been super helpful. Oddly enough none of my local dealers are stocking BH's anymore an one didn't even know of the thumb option. Did you get any pic of the new light install you mentioned in the other post? I've been wanting to add them to the rops but since I almost never use my tractor at night I've back burnered it.

Matt
 
   / Tips for 3x20's 50 hour change
  • Thread Starter
#8  
Rob, thank you so much for all the pics. It has been super helpful. Oddly enough none of my local dealers are stocking BH's anymore an one didn't even know of the thumb option. Did you get any pic of the new light install you mentioned in the other post? I've been wanting to add them to the rops but since I almost never use my tractor at night I've back burnered it.

Matt

My lights sat here all winter and, truthfully, I don't have a lot of use for them either but there are times when they are a blessing. Since I already had the light guards the extra price wasn't that bad.
What I did was run a wire from the bottom of the ROPS to the hole where the wire goes in by the lights mounting bracket. I pulled the wire through with a pliers and then tied the wire for the light through it and pulled them down. I guess if you use a heavier wire you can do it from the top. The rest was pretty easy but I did take off the BH to get into the harness area. Personally I like the idea of the wires in the ROPS, its' too easy to catch them on limbs and such.

As for the BH, boy I'm glad I got it! When I priced out the hoe with thumb it came in over 9k but it's a little beefer and now I'm getting ready to install geothermal so it will cut that cost.
What I did find was that the 3 point doesn't lift the bigger hoe well and I wind up using the stabilizer arms to get it in place. Now that I've learned how to do it I can get the hoe on and off in several minutes. Although I left it on all winter with the 59" snow blower in the front without any trouble.

This tractor is turning out to be more than I expected of it and I feel like it will do what I need without going to a bigger machine.

Rob
 
   / Tips for 3x20's 50 hour change #9  
You need to bump the relief valve up to the rated setting so it can lift the hoe. If you do a search you'll see lots of discussion on it. My dealer checked mine when they installed the hoe and I guess it common to be set a bit low at the factory. I was thinking of installing the work light my own way. I was going to mount the forward light on the light guards and mount two rear facing on the underside of the top of the rops. I figure I'll install two switches to control them.

Matt
 
   / Tips for 3x20's 50 hour change
  • Thread Starter
#10  
You need to bump the relief valve up to the rated setting so it can lift the hoe. If you do a search you'll see lots of discussion on it. My dealer checked mine when they installed the hoe and I guess it common to be set a bit low at the factory. I was thinking of installing the work light my own way. I was going to mount the forward light on the light guards and mount two rear facing on the underside of the top of the rops. I figure I'll install two switches to control them.

Matt

Thanks Matt,
I thought I checked the hydro pressure when I got the tractor but maybe I didn't. I'll check it when the weather clears.
Rob
 

Tractor & Equipment Auctions

2019 FREIGHTLINER CASCADIA TANDEM AXLE SLEEPER (A54607)
2019 FREIGHTLINER...
2003 Lincoln LS (A50324)
2003 Lincoln LS...
Kuhns AE10 Small Square Bale Accumulator - 10-Bale Efficient Handling System (A55301)
Kuhns AE10 Small...
2002 International 9200i Truck (A55218)
2002 International...
2012 PETERBILT 388 DAYCAB (A53843)
2012 PETERBILT 388...
2010 Ford Edge SE SUV (A51694)
2010 Ford Edge SE...
 
Top