You are using an out of date browser. It may not display this or other websites correctly.
You should upgrade or use an alternative browser.
You should upgrade or use an alternative browser.
Snow Equipment Owning/Operating SNOW REMOVAL PICTURES
- Thread starter macmax55
- Start date
/ SNOW REMOVAL PICTURES
#31


Couple of Achers
Gold Member


mixerdriver
New member
I feel for you snow belters, but I am also a little envious. Looks like a lot of seat time to enjoy your machines. The pictures of the tph-mounted snowblowers make me think you guys could use some massage therapy from the wifes after a day of blowing . Or maybe some readjustment from a chiropractor!!!. Looks like they could be a REAL PAIN in the neck to use
. Or maybe some readjustment from a chiropractor!!!. Looks like they could be a REAL PAIN in the neck to useCouple of Achers
Gold Member
Acher.
You have a close up of the hydraulic chute tip? I done mine a bit different. You can use a longer cylinder that way and have more control.
Mine works good as it is and I do not move it often.
I actually use mine quite a bit. The ideal cyl would be a 5" stroke. I could not find one, so that left me with a 4" or 6". I didn't feel a 4" would give me enough adj. so I ordered a 6" from Surplus Center. To get a 6" cyl to fit when retracted, I needed to order the cyl with a 1/2" rod. https://www.surpluscenter.com/item.asp?UID=2156122620360416&item=9-1649-06&catname= The problem with the 6" stoke is the fully extended it is too long. I went around and around on the best way to get the 6" cyl to fit. It was discussed on TBN in another thread. I thought of putting a chain to limit the stoke, I also considered cutting off the tie rod end and then cutting an inch off the rod and welding the tie rod end back on. Neither of those ideas was real easy for me since I don't weld and the chain I would have needed to use was really too big to get it to work. So the easies thing for me to do way lengthen the actuator to accommodate the longer cyl. I use existing holes, and made bushings where ever I could and drilled new holes where I had too. It was necessary to make an angled actuator to get the cyl to travel through it's complete throw without binding. When all said and done, it may look a little funny, but it works wonderfully.
Attachments


kevinj
Veteran Member
- Joined
- Jul 5, 2003
- Messages
- 1,421
- Location
- West MI
- Tractor
- BX-1860, L3940HSTC, B7500, Farmall M, Farmall 560D
I actually use mine quite a bit. The ideal cyl would be a 5" stroke. I could not find one, so that left me with a 4" or 6". I didn't feel a 4" would give me enough adj. so I ordered a 6" from Surplus Center. To get a 6" cyl to fit when retracted, I needed to order the cyl with a 1/2" rod. https://www.surpluscenter.com/item.asp?UID=2156122620360416&item=9-1649-06&catname= The problem with the 6" stoke is the fully extended it is too long. I went around and around on the best way to get the 6" cyl to fit. It was discussed on TBN in another thread. I thought of putting a chain to limit the stoke, I also considered cutting off the tie rod end and then cutting an inch off the rod and welding the tie rod end back on. Neither of those ideas was real easy for me since I don't weld and the chain I would have needed to use was really too big to get it to work. So the easies thing for me to do way lengthen the actuator to accommodate the longer cyl. I use existing holes, and made bushings where ever I could and drilled new holes where I had too. It was necessary to make an angled actuator to get the cyl to travel through it's complete throw without binding. When all said and done, it may look a little funny, but it works wonderfully.
I used the ball end 4" stroke. It is plenty of travel. That allowed me to just bolt it on with 2 - 3/4" bolts. I did move the arm a small amount to center the cylinder in the travel range.
I cannot quite reach full travel on either end but can put snow down right next to the blower or out as far as I need.
The chute travels further than needed. I played with mine 2 winters before I put the cylinder on to see the travel requirements.
Timber
Veteran Member
This is great fun to read all of these and muck like everyone else, I simply couldn't wait until the snow hit this year to try out my home made plow. I agree, let's not let the ladies know how much fun this is, they may want to take over the chore and then we'll have to build something else... actually, that wouldn't so bad either... either way there's fun for all...
Dan
Hi Dan,
Charlie here, I am interested in your cab, I have a B7800 and I am considering making plans to build a cab for my tractor, both of them actually. I am in Massachusetts and between the Eastern Equine in the summer and the snow in the winters I want to build year round solid cabs. My thoughts are steel frame & fiberglass shell. Could you post some pictures of you cab on all 4 sides if you would be so kind
Thank you
Charlie
MrBobcat230
Member
Had a nice gentle 4''-5'' snowfall last night, just though I'd share.


We had 15" two weeks ago with blizzard conditions (35+ mph winds). This past three days saw another 12-14" with some of the strongest and sustained winds that I can remember. We were at 40-45mph for about 6 hrs through Christmas eve. These are the type of storms I recall from my childhood.
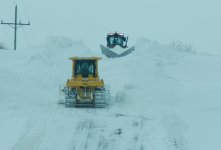
Here's the 'lil red hero of the weekend (for me)... and the county road crew getting through 10-15 ft drifts with a dozer and v-plow grader.
One more dump like these last two will make it very interesting. There's no place to put any additional snow!
Here's the 'lil red hero of the weekend (for me)... and the county road crew getting through 10-15 ft drifts with a dozer and v-plow grader.
One more dump like these last two will make it very interesting. There's no place to put any additional snow!