BukitCase
Elite Member
- Joined
- Feb 17, 2012
- Messages
- 2,753
- Location
- Albany OR
- Tractor
- Case 580B, Long 460, Allis-Chalmers 160
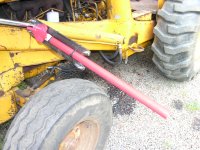
My Case 580B has a few cylinders still leaking, so far I've kitted both swing and both stabilizer cyl's and one of the loader curl's - the other loader curl, 1 of the boom cyl's and the hoe bucket curl are all in need of TLC, some more than others.
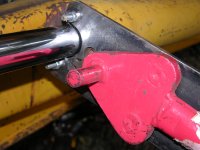
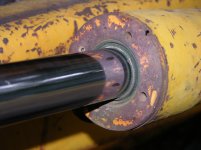
I made a tool out of 1/4" flat bar that, along with a rebar bender for a cheater, worked OK for some of the cyl's but the loader curl wasn't gonna cooperate til I retracted it, grabbed the rosebud and changed its color from ugly yellow to a dull cherry red, then managed to get a 36" pipe wrench to just barely grab the thin (about 1/4") lip on the gland nut, remove the gland, let things cool, dig out the burnt junk, polish things up and put it back together.


At one point, I had a hydraulic pull-back ram hooked to the end of my 36" rebar bender and another porto-power pushing the flat plate against the end cap so the pins wouldn't slip out of those little holes - as a result, the grade 5 bolts for the pinholes sheared off - I changed 'em to grade 8's, they SNAPPED off - that's when I grabbed "rosey" and the pipe wrench.
That was 2 years ago just before shoulder surgery. Slow forward to today - it's about time to do the other curl, it's leaking enough to make it to the top of the list.
The problem - Same as the other curl cylinder - plus, I'm hoping that each of the other cyl's (8 left to go) doesn't become a life-long crusade like the last one.
I'm hoping that at least one of the serious hydraulic guys here have beaten this problem and have an easier (not necessarily free) way to get this done during THIS lifetime
I considered the Case spanner tool, but from pics I saw it looked less robust than the one I made. Hard to tell without actually fondling it
Any serious help/epiphanys greatly appreciated... Steve
I made a tool out of 1/4" flat bar that, along with a rebar bender for a cheater, worked OK for some of the cyl's but the loader curl wasn't gonna cooperate til I retracted it, grabbed the rosebud and changed its color from ugly yellow to a dull cherry red, then managed to get a 36" pipe wrench to just barely grab the thin (about 1/4") lip on the gland nut, remove the gland, let things cool, dig out the burnt junk, polish things up and put it back together.


At one point, I had a hydraulic pull-back ram hooked to the end of my 36" rebar bender and another porto-power pushing the flat plate against the end cap so the pins wouldn't slip out of those little holes - as a result, the grade 5 bolts for the pinholes sheared off - I changed 'em to grade 8's, they SNAPPED off - that's when I grabbed "rosey" and the pipe wrench.
That was 2 years ago just before shoulder surgery. Slow forward to today - it's about time to do the other curl, it's leaking enough to make it to the top of the list.
The problem - Same as the other curl cylinder - plus, I'm hoping that each of the other cyl's (8 left to go) doesn't become a life-long crusade like the last one.
I'm hoping that at least one of the serious hydraulic guys here have beaten this problem and have an easier (not necessarily free) way to get this done during THIS lifetime
I considered the Case spanner tool, but from pics I saw it looked less robust than the one I made. Hard to tell without actually fondling it
Any serious help/epiphanys greatly appreciated... Steve

