Semi-New Member Returns after Building an ICF House

   / Semi-New Member Returns after Building an ICF House #1  

sriddle1

Silver Member
Joined
Apr 2, 2014
Messages
221
Location
SW New Hampshire
Tractor
ACTIVE: JDX730 DAYS GONE BY: JD3010, JD790, JD425
Hello, Just returning to TractorByNew after my wife and I physically built an Insulating Concrete Form (ICF) home in SW New Hampshire during 2013. We used 247 cubic yards of concrete and 5.5 tons of rebar. I would be more than happy to share our experiences if you're planning on building a structure like this. I acted as the General Contractor, ran the interior wire and installed the flooring. We used Build Block 8" Core ICF Blocks and stacked them from the Footings up to the top of the 1st floor @ a height of 21'-4". We had a commercial concrete business supply the bracing and managed the pours for us. Right now focused getting the interior finish work completed, we'll be going outside soon (I hope) to establish a lawn and setting some stone fences using the JD790 with Front Loader. I'll be using my rachet rake purchased when the word got out from this site that Tractor Supply was selling them discounted, probably in August of 2012 timeframe.
 
   / Semi-New Member Returns after Building an ICF House #2  
Welcome from Wisconsin
 
   / Semi-New Member Returns after Building an ICF House #3  
Sounds like an interesting build. Do you have some pictures that you could share?

Eddie.
 
   / Semi-New Member Returns after Building an ICF House
  • Thread Starter
#4  
Eddie,

I'll try to get some posted in the next day or two, I see uploading PICs is a bit more complicated (PIC sizing wise) than in 2011. The outside of the house doesn't look different from others however the walls are 2.5" of EPS, 8" of concrete and another 2.5 EPS. I used all the James Hardie Products on the exterior over the ICFs, the Build Block brand of ICFs have webs every 6". The house is approx 1,736 sq.ft footprint in the basement and on the 1st floor. My wife and I ran PEX over EPS in the basement slab and installed Slant Fin Radiant Baseboard on the 1st floor. Since taking occupancy this past Nov we were averaging (when it was below freezing all the time) about $12.00 a day for the boiler, hot water heater and cooktop.
 
   / Semi-New Member Returns after Building an ICF House
  • Thread Starter
#5  
2013 Insulating Concrete Form (ICF) Project

Eddie,

My wife and I followed the PCA (Portland Cement Association) 100-2007, Prescriptive Design of Exterior Concrete Walls for One and Two Family Dwellings. New Hampshire requires a Single Family Dwelling construction to follow 2009 IRC and R611.1 in that document allows for either PCA100 or ACI318. Because of our Soil Composition we opted to go with PCA 100. Our footings were 30" Wide X 12" Height with vertical rebar. IMAGE # 3714 depicts the footings already down, in-ground plumbing accomplished, 6" drainage pipe inside and outside the foot perimeter, 3/4" crushed stone between footings, Stego Vapor Barrier applied. IMAGE # 3766 depicts Owens Corning Formular 400 applied over the Stego Barrier, seams tapped with Tyvek Tape + NIBCO Barrier- 1/2" PEX stapled on top of EPS + Welded Wire Mesh over that tied together w/6" overlap. IMAGE # 3786 depicts the most critical stage in building an ICF Structure, setting the two courses of block which were shimmed LEVEL (double checked with Lasar), glued to the footings using Wind Lock Foam Adhesive then Cable Tied every direction side X side, top to bottom. Once the blocks were glued and tied we poured the 5" slab in-between the empty blocks and adding wooden blocking on the outside for reinforcement. IMAGE # 3817 depicts we're underway with the window and door "Bucking" Installation, i.e., Treated Wooding Frames = I.D. of the Window and Door Rough-In rqmts. For the doors I added an additional 7" to the sides and top to allow for Door Swings and to be able to install the case next to the door jams vs. sitting out way on the interior walls, my 8" core Blocks = a total 13" depth exterior to interior surface. Also, this image shows the Concrete Sub's Vertical Bracing attached to the slab and screwed into the ICF Webs. That痴 it for now, more to come tomorrow?.
 

Attachments

  • IMG_3741.JPG
    IMG_3741.JPG
    293.5 KB · Views: 360
  • IMG_3766.JPG
    IMG_3766.JPG
    331.4 KB · Views: 337
  • IMG_3786.JPG
    IMG_3786.JPG
    265.6 KB · Views: 349
  • IMG_3817.JPG
    IMG_3817.JPG
    324.3 KB · Views: 361
   / Semi-New Member Returns after Building an ICF House
  • Thread Starter
#6  
Re: 2013 Insulating Concrete Form (ICF) Project

CONTNUED........... IMAGE # 3814 depicts the completion of the Basement Level ICF Stack (9" ceiling height) with a view of the Walk-Out Basement; all other walls below grade. For waterproofing, coating of TAMKO TWP-2 Water-Based Primer then TAMKO's peal and stick TW-60. As a final layer I added a sheet of TAMKO 15mil Vapor Barrier with seams taped. Below Grade and rear walk-out ICF walls #4 rebar horizontally/continuous with the appropriate overlap splice in each course and tied. #4 rebar installed vertically throughout depending on the wall location and PCA-100 load calculations. Stirrups, #5 rebar and various custom bends ordered from a local steel company. IMAGE # 4014 shows the addition of the 1st or Main Floor (10' Ceiling Height). You can see the Window and Door Bucks, the beginning of the 1st 10" thick Retaining Walls to the right and the Stego Wrap is clearly seen to the left over TAMKO. The Floor Trusses are 20" Open Web Design to allow for easy HVAC runs, Top Bearing Cord resting on LVL Ledger Board tied to the poured ICF walls using Simpson Strong Tie's ICFVL Ledger Connector System. IMAGE # 4054, just an inside view of the Vertical Bracing screwed into the floor trusses over on top of the sheathing to allow for 1st floor ICF Block Installation. IMAGE # 4253 depicts the front elevation of the house, I used HB&G's 12 inch PermaCast Structural Load Bearing (18,000 lbs max) Columns on both the front and rear elevations, double stacked in the rear. In this PIC the hip roof trusses and front gable are visible. IMAGE # 4499 is the Rear Elevation as we scrambled to get everything primed and painted with a finish coat, 90% Finish Coat complete before the winter. For the exterior envelope I used all the primed James Hardie products, i.e., vented and unvented soffit, lap siding, etc. Also used AZEK and BORAL Truexterior material for trim + AERATIS T&G Decking for the rear porch. Before the siding was applied, at top of Stego and TAMKO waterproofing to planned bottom of lap siding I applied STYRO Industries TUFF II Pre-Mixed Coating over their fiberglass mesh. I used it on my previous build and had no problems. James Hardie was installed over the ICF Blocks using Simpson Strong Tie's Simpson DSVT212S #10 x 2-1/2" QuikDrive Collated DSV Decking Screws @ spacing every 12". All cuts in the Hardie products were primed and lap siding butt joints flashed. IMAGE # 4505 Front Elevation and ready for finish coat once we get through this too long winter. So, long story short (if there can be one) if anyone plans on building an ICF Structure please don't hesitate to ask any questions. As you can see my April '13 thru October '13 Build was fun filled
 

Attachments

  • IMG_3841.JPG
    IMG_3841.JPG
    150.7 KB · Views: 267
  • IMG_4014.JPG
    IMG_4014.JPG
    102.3 KB · Views: 272
  • IMG_4054.JPG
    IMG_4054.JPG
    139 KB · Views: 264
  • IMG_4253.JPG
    IMG_4253.JPG
    156.2 KB · Views: 281
  • IMG_4499.JPG
    IMG_4499.JPG
    140.2 KB · Views: 341
  • IMG_4505.JPG
    IMG_4505.JPG
    161 KB · Views: 335
   / Semi-New Member Returns after Building an ICF House #7  
Thanks for those pics, sriddle1. I am really attracted to ICF for construction - but it sure can be costly.
 
   / Semi-New Member Returns after Building an ICF House #8  
Thanks for all the information and pictures. You did an amazing job!!!! Now that it's done and you have lived in it awhile, how would you compare it to stick built houses? Energy wise and just the overall feel of the house? Would you do it again?

Eddie
 
   / Semi-New Member Returns after Building an ICF House
  • Thread Starter
#9  
Eddie,

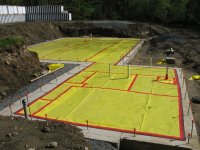
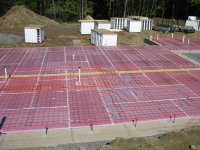
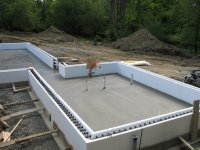
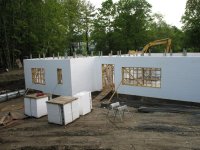
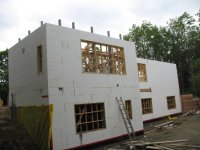
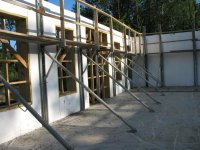
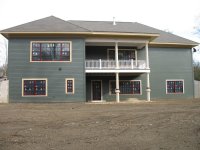
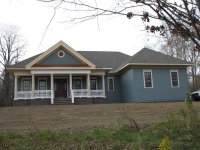
Thanks for your kind words. COST STANDPOINT: I found it was 15-20% higher vs. having the exterior walls 2X6 stick built + adding closed cell foam between studs, sheathing, etc, again just on the Exterior Walls. Just to ensure I was making a sound decision I gathered (5) bids in each category, Stick vs. ICF. Higher Cost Driver: Exterior James Hardie Lap Siding Installation Labor - After reading lots of material and reviewing blogs I settled on having it screwed into the ICF Web every 12", that's a good chunk of change rather than a sub zooming along shooting it on with a nailer over the sheathing. I can't think of any other cost drivers since the ICF Blocks only affect the exterior walls. Once the Drywall Sub understood the embedded web spacing @ 6" and how that was identified on the Build Block Product, he commented it was easier than installing over a 16 OC studded wall so no cost impact. To ensure there weren't any issues with him hitting electrical wire that I ran, I used the WIND LOCK 2-QC Hot Knife cutting a 1/2" channel all the way down to the poured concrete at a depth of 2.5" to set the wire runs. I backfilled the channels with Great Stuff- Cracks and Gaps which is yellow'ish so it was clearly visible. PRE-PLANNING: Only comment about electrical, plumbing and HVAC efforts, you really-really-really have to pre-plan each and every penetration and identify/install any sleeves you need in the ICF block before the concrete is poured. When I designed the house I used Chief Architect Lite Software. That package allowed me to easily identify where they needed to be placed and after we stacked the block with the bucking installed we used our WIND LOCK Hot Knife to add the sleeves + used the WIND LOCK Professional Foam Adhesive to bond them to the block. Think about it, every exterior light to be mounted on a wall, exhaust vent, dryer vent, all the Concentric Vents for the Direct Vent HVAC Equipment, HRV Fresh Air and Exhaust, exterior plugs, Water Frost Free Bibs, etc, etc, etc. My wife and I created a spread sheet to keep that list straight, and then add in the complication of navigating the open web floor trusses to bring the Concentric Vent thru and where the mechanical equipment must be installed to support that location, it was primal scream time at some points....... TECHNICAL TID-BITS As mentioned in a previous post, the most critical stage is setting the first 2 courses of block. If you don't have the footings level you'll start off thinking you know what you're doing (yea-right), skies blue and birds singing and all of a sudden you can't get the blocks to set side-by-side (gap getting greater as you go up in height) then you have to stop & unstack the wall, remove rebar and cut the block to re-establish the horizontal plane (been there done that). Besides the level issue you have to ensure the first two blocks will be anchored on the footings. To do that, Build Block strongly suggested that we cable tie the first two courses up-down & side-by-side. We found some heavy duty Boston Industrial 175 Tensile Strength 36 Inch Cable Ties on-line and went to work. The ties were placed on adjoining webs internal to the blocks and cinched tight. Also another very smart suggestion; add the same ties to all corner and adjoining blocks as you go up in height, side X side and Up/Down and lastly, do the top course just like the fist course. During the Contractor Certification Training by Build Block they emphasized; "Glue is a Friend" so I purchased several cases of WIND LOCK'S Professional Foam Adhesive. Wherever there was a slight gap in the adjoining blocks "GLUE", the first course to the concrete footing "GLUE", around all penetration sleeves "GLUE", around all bucking to adjoining blocks "GLUE", you get the drill. SOIL SURVEY: Be sure before you start down the path on one of these structures that you no-kidding understand the soil composition because we're talking an insane amount of weight. The more clay'ish the soil (in my case) the wider the footings + vertical and horizontal rebar considerations. You must understand your state's building codes, the International Building Code, International Residential Code and most important use of the ACI 318 or the PCA100 specs that give you a detailed road map in using concrete and its physical properties. To know if you're ready, you'll understand what "STIRRUPS" and "LENTILS" are and how they ensure all openings are properly supported. OVERALL FEEL OF THE HOUSE The house is ultra quiet, we are using Pella's Architectural Series windows and we can't hear a thing, open that window though and 200 feet away is a pond and those Spring Peeper Frogs are deafening, my wife and I just about have to dawn our ear plugs that I wear on the JD Tractor. It can be pouring out and wind blowing hard and you can hear a pin drop, no noise transfer thru the 13" depth walls. HVAC - When I spec'd out the HVAC system I paid a contractor to perform a "Manual J" and "Manual D" that identifies what we needed to heat/cool the rooms and the ducting sizing to get the air around. Since we installed PEX in basement slab + Slant-Fin Baseboard on the 1st floor the heat remains constant. Based on the Method D results, I stuffed typical 26 gauge ducting in the open web floor trusses to support the Forced air 95% efficient Furnace and matching A/C Coil and Condensing Unit. Nothing worse than building a home then finding out a back room doesn't get enough cooling in the heat of the summer. ENERGY WISE From Nov 1st thru Feb 22nd our total "propane" usage billing is $1,000, our total sq. ft. is 1,376 X 2. WOULD I DO IT AGAIN Right now where I'm sitting I'd say YES, however if I was in the middle of stacking the blocks and dealing with the rebar I'd say NO with a couple of explanatives thrown-in. Kind of like going to the dentist, right before you go I'd always like to opt out but after the fact I say it was well worth it. In summary unless you're a full time Builder involved in the day-to-day technical aspects of working with concrete, you'll have to dig in deep on the design details to the point you can converse with the subs, even talking on-site slump testing of the concrete.
 
   / Semi-New Member Returns after Building an ICF House #10  
Great information. I'm a big fan of other people trying out new building techniques and what their experiences are. I'm not sold on ICF's for the whole house yet, but they do seem pretty nice for a basement or a walk out basement.

Thanks,
Eddie
 

Tractor & Equipment Auctions

NEW 2025 Load Trail 83IN X 14IN Single Axle Utility Trailer (A55218)
NEW 2025 Load...
2015 Ford F-350 Utility Flatbed Truck (A51692)
2015 Ford F-350...
48" WIDE WOODEN STAIRCASE W/ METAL RAILING (A54757)
48" WIDE WOODEN...
2008 OSHKOSH FRONT DISCHARGE CONCRETE TRUCK (A54313)
2008 OSHKOSH FRONT...
2022 Adams CLC-1013 Conveyor - New (A55302)
2022 Adams...
2012 Dodge Ram 5500 Chipper Truck (A52377)
2012 Dodge Ram...
 
Top