Thanks for all the replys and comments guys. i'll try to answer Everyones questions but if i miss someone just shout.
1st off John, The roller I made out of 8" sch80 pipe. Actually two peices I had laying around that I had to weld together but it came out amazinglly straight.
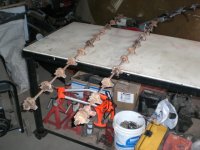
Bill, the Beam is 12"x 12" with a 3/4" flange. the way I see it there is no such thing as overkill, espically with employes using it. buy the way my first name is Barret.
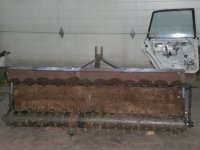
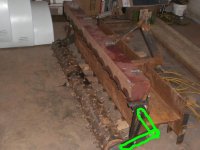
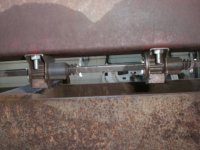
Bjr, the seed box is actually off of a old international grain drill that my buddy was sending to the scrap yard. It was 12' long but I cut it down to 6'. The seed cups were in really bad shape when I got it so I took all of them off the square drive shaft and cleaned or replaced as needed. pics attached.
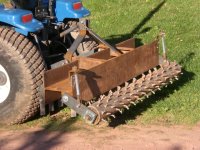
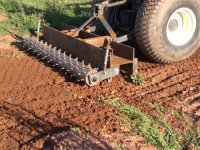
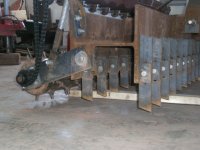
Flusher yes that is the pulverizer that I made last spring. The vertical bars are mostly for trearing up and leveling the ground prior to seeding. They are 6" apart but there are two rows of them and they are staggered making for a 3" spacing. pics attached.
Bx24, yes I made the roller but i did the bar through it a little differently. I cut out 2 round 3/8" plates that fit into the roller. Drilled a 1" hole for the bar to go through, then cut a 1 foot long bar and welded it to the plates leaving 3" on the out side for the bearings. king of like this( --l-----l ). done this for both sides, (that sounds confusing to even to me so I will try to explain it better if you don't understand).
As for the pins on the roller they are 1/2" round bar cut 1 1/2" long and all welded on. 196 pins made for alot of cutting and welding.
Your spike Idea would work great and I have seen many pulverizers made in a simalier fashion. I did it the way I did Because it will see alot of use And i figured the 3/8" by 2" flat might hold up better. Also Each spike on mine has 3 holes drilled in it so while it wears down I can adjust it 6 times Befor needing to make new ones.
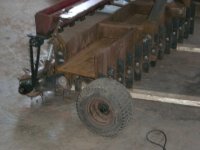
Tedder, this will be used for seeding new lawns and I am also going to try to addapt it as an overseeder for existing lawns. But you are 100% correct about putting the seed to deep in the ground. Kentucky bluegrass and fescue are the only seed around here and they like to be just barelly covered so to solve this I am going to attach a pair of adjustable wheels on it to keep the front teeth just hitting the ground. Then When I just need the pulverizer the wheels will easily come off with a lynch pin or something simillar so the are not in the way. Pic attached.
thanks for all the responses guys and keep them coming. Barret C.
")