Rotary Cutter Rotary Mower Shear Pin Help

   / Rotary Mower Shear Pin Help #1  

alexsbuddy

Gold Member
Joined
Mar 10, 2016
Messages
331
Location
Diamond, MO
Tractor
LS XG3037 w/ LS LL3109 FEL Kodiak SD5 Mower, Speeco Model 65 PHD, Bush Hog BX-600 Box Blade, Titan 42" Skid Steer Pallet Fork/Hay Spear Combo
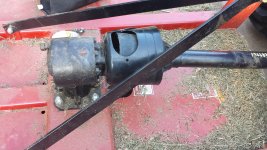
I have a new Kodiak STD 60" 3-pt rotary mower and need to replace the shear bolt. Problem is.....I have never done this before, the manual does not cover this, and I can't for the life of me figure out how to get around all of the shields to get at it. Below is a picture of the gearbox and shields. Any recommendations, suggestions, and/or guidance would be greatly appreciated. Thanks.
 

Attachments

  • 20160716_184949.jpg
    20160716_184949.jpg
    4.7 MB · Views: 2,707
   / Rotary Mower Shear Pin Help #2  
Are you sure it has shear pin? Looks like someone put the shaft on backwards.
 
   / Rotary Mower Shear Pin Help
  • Thread Starter
#3  
Yes, it definitely has a shear pin...found the pieces of it when I opened the little flap access doors on the large outer shield that this attached to the gearbox.
 
   / Rotary Mower Shear Pin Help #4  
You need to turn the shaft so the hole will line up to put a new bolt in. The shaft should turn & the yoke on the gear box should pretty much stay in place, it may need to be turned to find a easy workable position. The shield should have plastic pins/clips to remove to slide it down the shaft, if not, your going to gave fun getting the bolt & nut back in & tightening it.
Can you post a pic at the PTO with it hooked up on the tractor?

Ronnie
 
   / Rotary Mower Shear Pin Help
  • Thread Starter
#5  
Success! After doing some more research and sleeping on it, I finally figured it out. Here is what I did:
* The long cone shield on the shaft at the gearbox end is held on by a plastic retaining ring with clips. I had to depress the clips and then I was able to slide the long cone shield and shaft shield (as one piece) down the pto shaft. This allowed me better access to inside the gearbox shield.
* I removed the snap ring on the gearbox input shaft and then slid the pto shaft yoke off the gearbox input shaft.
* At this point I removed the gearbox shied by removing two bolts holding it on to the gearbox. I know this is an extra safety feature, but I decided to leave this shield off permanently. I believe the long cone shield on the pto shaft will provide adequate protection.
* I removed the remaining piece of the shear bolt from the gearbox input shaft.
* I then slipped the pto shaft yoke back on to the gearbox input shaft and reinstalled the snap ring at the end of the gearbox input shaft.
* I rotated the gearbox input shaft by turning the spindle through the deck access hole which allowed me to line up the shear bolt holes in the pto shaft yoke and the gearbox input shaft.
* I then inserted a new shear bolt (1/2"x3" grade 2) and lock nut. Used a 3/4" wrench on both ends of the bolt.
* I slid the long cone shield and the shaft shield (as one piece) back up the shaft and reattached to the retaining ring.
I tested the unit and it works just like it is supposed to. Thanks to MF283 for getting me started.

Couple things I learned from this.....don't turn on PTO at high rpms (will turn on at low rpms and then increase rpms to cutter operating level after it is engaged), keep extra shear bolts on hand, get a tool box for the tractor and keep the tools I will need in it (for this repair I used a screwdriver, needle nose pliers, hammer, and two 3/4" wrenches).
 
   / Rotary Mower Shear Pin Help #6  
I got rid of all all the guarding around the gearboxes on every cutter I have owned. Dont need it....NO ONE goes back there with cutter running anyway.

I do leave the PTO shields on, but simply because without a shield, the shaft wraps up with grass and becomes a nightmare to extend/retract. And constantly throws stuff up on the operator
 
   / Rotary Mower Shear Pin Help #7  
Most people use a standard grade 2 bolt, found at the local hardware store, home depot, ace, or whatever you have there. I get mine at tractor supply. Shear pins are grade 2. Warning, Do not use grade 5 or 8.
 
   / Rotary Mower Shear Pin Help #8  
Couple things I learned from this.....don't turn on PTO at high rpms (will turn on at low rpms and then increase rpms to cutter operating level after it is engaged), keep extra shear bolts on hand, get a tool box for the tractor and keep the tools I will need in it (for this repair I used a screwdriver, needle nose pliers, hammer, and two 3/4" wrenches).
There you go. You'll find that by being prepared and more aware of why you shear bolts, you won't shear them very often. Unfortunately, you'll also find that if you shear them all the time you can change them in seconds (well almost) but when you rarely shear them, it will take you much longer to get them swapped out. ;)
 
   / Rotary Mower Shear Pin Help #9  
There you go. You'll find that by being prepared and more aware of why you shear bolts, you won't shear them very often. Unfortunately, you'll also find that if you shear them all the time you can change them in seconds (well almost) but when you rarely shear them, it will take you much longer to get them swapped out. ;)

Yep, worked on a farm part time a few years back with a Bush hog Squealer, if it even saw a rock or something out of the ordinary, it would brake the pin. A lot of times, if you didn't spin the shaft by hand after replacing, it would snap as soon as you engaged the PTO.
Thank goodness it had a metal flip up cover which allowed for easy access.
I'll take a slip clutch anyday or an older straight shaft cutter, they rarely broke a pin when i used them.

Ronnie
 
   / Rotary Mower Shear Pin Help #10  
There you go. You'll find that by being prepared and more aware of why you shear bolts, you won't shear them very often. Unfortunately, you'll also find that if you shear them all the time you can change them in seconds (well almost) but when you rarely shear them, it will take you much longer to get them swapped out. ;)

That's why I'm so good at changing pins. :confused3:


Top