markie61
Veteran Member
- Joined
- Mar 31, 2001
- Messages
- 1,370
- Location
- Northern Virginia
- Tractor
- 2019 Rural King RK55HC with Loader & Backhoe; 2001 New Holland TC40D with Loader
I removed the subframe backhoe RK BH85 from my RK55HC shortly after I received it. Played with it, dug a couple holes, removed a couple stumps first, but it was mowing season and the finish mower took priority. I have never had a backhoe before (let alone removed/remounted one), so watched a couple YouTube videos on removal and reinstall from various brands (could find none for RK tractors except the RK24, which is very different); found this one from a Kioti dealer that is the most similar to the BH85 for removal and remounting How to take off a Kioti Tractor Backhoe - CK2610 HST w/ KB2475L Backhoe - YouTube . The major difference is that the BH85 uses the 3PH top-link, which must be removed in addition to the two pins on the "draw bar"/rear mount.
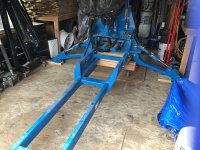
Here is the subframe diagram from the owner's manual; for orientation, the front is where the "cross bar" is:

The "cross bar" on mine is different than pictured - it's much bigger and *perfectly* blocks the engine oil drain plug despite having two big holes (see my 50-hour maintenance post https://www.tractorbynet.com/forums.../419134-rk55-hydrostatic-50-hour-service.html).
A couple of tips:
*DEFINITELY put cribbing under the subframe upon removal approximately where the blue stars are. Due to hydraulic bleed-down in all the cylinders (especially the stabilizers), the front end of the subframe ended nose-up to a point where I couldn't back over it far enough to reattach the hydraulic hoses. Had to use the FEL and cribbing to get it into position to reattach the hydraulic lines.
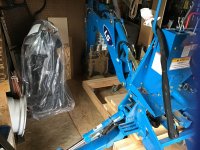
*Make sure the front of the frame is absolutely level or oven slightly nose-down before backing over it. The front corner (near the red arrow) nicked the HST filter, nearly shearing it off (see picture - this could have been catastrophic). The tolerances are tight with *maybe* 2 inches of clearance once the frame is in place.

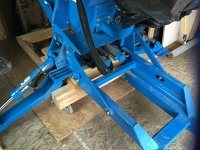
*You can "snag"/catch the "subframe crosser") with the rear "draw bar" mount before finalizing the front mount on the "cross bar". I found it best to angle the subframe's nose slightly downward while the rear "subframe crosser" was even with the lower portion of the "draw bar" plate. After backing just enough to support the "subframe crosser", I pivoted/"see-sawed" the subframe's nose level and even with the "cross bar" notches. Then after driving completely back to "set" the subframe into the mounts, I reinstalled the pins and top link.
The entire mounting process took be about 45 minute, what with the bleed down, learning, and all. I imagine next time it should take less than 10-15 minutes.
Editorially, the backhoe seems really solid - even more solid than the loader. The mounting appears heavy-duty as well. Mounted, the stabilizer cylinders definitely bleed down under their own weight - about an inch in 24 hours; it would be nice to have the locks like the Kioti video showed.
Here is the subframe diagram from the owner's manual; for orientation, the front is where the "cross bar" is:
The "cross bar" on mine is different than pictured - it's much bigger and *perfectly* blocks the engine oil drain plug despite having two big holes (see my 50-hour maintenance post https://www.tractorbynet.com/forums.../419134-rk55-hydrostatic-50-hour-service.html).
A couple of tips:
*DEFINITELY put cribbing under the subframe upon removal approximately where the blue stars are. Due to hydraulic bleed-down in all the cylinders (especially the stabilizers), the front end of the subframe ended nose-up to a point where I couldn't back over it far enough to reattach the hydraulic hoses. Had to use the FEL and cribbing to get it into position to reattach the hydraulic lines.
*Make sure the front of the frame is absolutely level or oven slightly nose-down before backing over it. The front corner (near the red arrow) nicked the HST filter, nearly shearing it off (see picture - this could have been catastrophic). The tolerances are tight with *maybe* 2 inches of clearance once the frame is in place.
*You can "snag"/catch the "subframe crosser") with the rear "draw bar" mount before finalizing the front mount on the "cross bar". I found it best to angle the subframe's nose slightly downward while the rear "subframe crosser" was even with the lower portion of the "draw bar" plate. After backing just enough to support the "subframe crosser", I pivoted/"see-sawed" the subframe's nose level and even with the "cross bar" notches. Then after driving completely back to "set" the subframe into the mounts, I reinstalled the pins and top link.
The entire mounting process took be about 45 minute, what with the bleed down, learning, and all. I imagine next time it should take less than 10-15 minutes.
Editorially, the backhoe seems really solid - even more solid than the loader. The mounting appears heavy-duty as well. Mounted, the stabilizer cylinders definitely bleed down under their own weight - about an inch in 24 hours; it would be nice to have the locks like the Kioti video showed.