Need help with installing bushings on attachment plate

   / Need help with installing bushings on attachment plate #1  

dieselfuelonly

Gold Member
Joined
Aug 13, 2007
Messages
332
Location
Chapel Hill, North Carolina
Tractor
Yanmar YM1401D
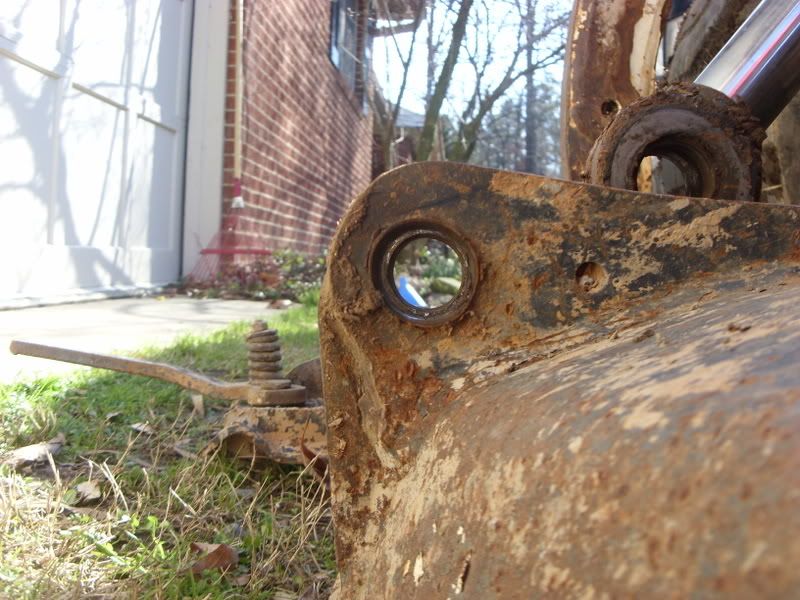
Hi everyone, hopefully someone here can guide me in the right direction. My attachment plate and pin are badly worn, the previous owner greased everything, but apparently forgot about this area. The hole in the attachment plate almost became a little "egg shaped' from being beat on by the pin.

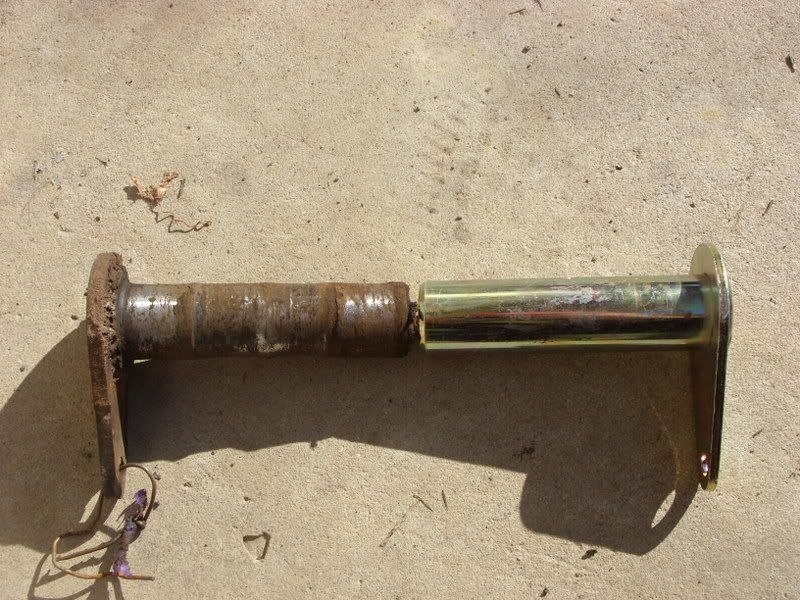
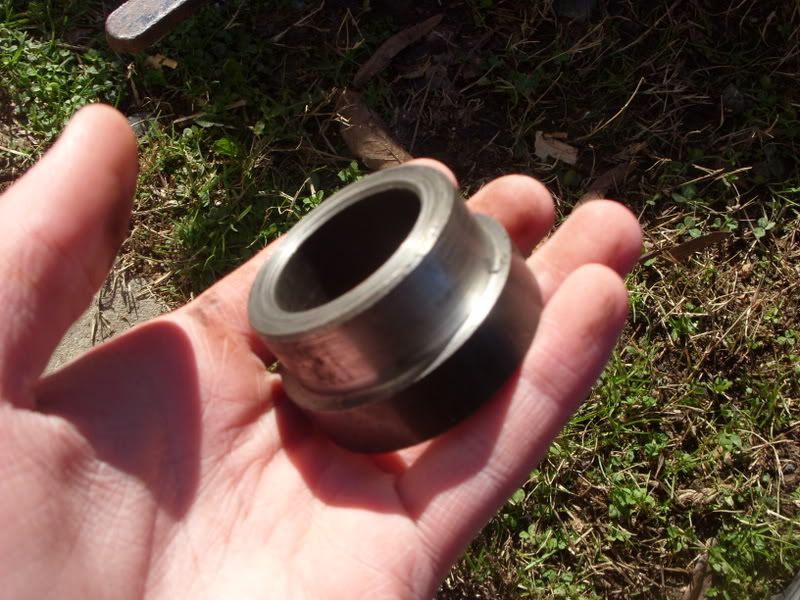
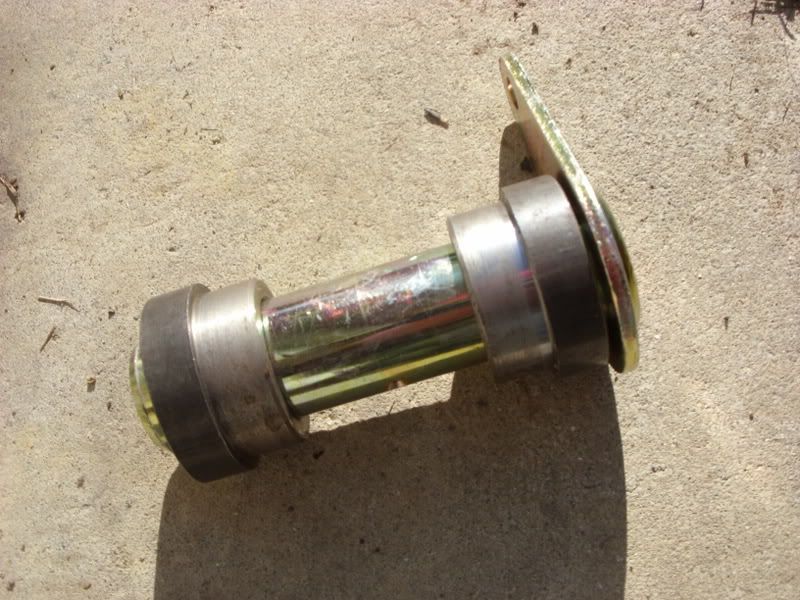
Anyway, I've got a new pin and two bushings from my Bobcat dealer. The bushings are supposed to be welded on.

And thats as much as I know. I don't know if its the kind of thing I can install myself, or if I'm gonna have to take it somewhere. If someone knows how this is done and can guide me, then from there I can figure out if its a project I can tackle or if I need to find someone else to do the work.

Hopefully everything makes sense in the pictures.

SN850445.jpg


SN850446.jpg


SN850447.jpg


SN850448.jpg
 
   / Need help with installing bushings on attachment plate #2  
From the pics it looks like the collars (one on each side of the attachment plate bracket) that hold the pin will need to be cut out and welded back in. It's hard to tell from the photos if the original collars were pressed in or welded. (And I never have really studied that on the Bobcat's I've used).

Nonetheless, from the oval wear, it looks like you couldn't bang 'em outta there with a 16lb sledge even if they were pressed in.

The tricky part of that will be to keep both collars perfectly in line with one another as well as both sides (rams).

I think you'll be best served to get a good shop onto that job.

Best of luck.

AKfish
 
   / Need help with installing bushings on attachment plate #3  
My bad... just reread your OP. Welded bushings (collars). Duh.

Straight alignment of the bushings is critical. On both sides of the attachment plate. (I'm guessing the other side has been worn.) Even if it's not ovaled out - it won't have the same ID as the new one.

AKfish
 
   / Need help with installing bushings on attachment plate
  • Thread Starter
#4  
Thanks for the help. Has anyone else installed these bushings before themselves?
 
   / Need help with installing bushings on attachment plate #5  
Never replaced bushings on a Bobcat, but have on other equipment.

Carefull use with a good die grinder and carbide bit can remove old welds to allow you to remove old bushings. If you cut the welds off, and still cant get the bushings out.

If you have it sometimes heat from a torch will help loosen things up, if you are good and carefull, sometimes you can slice the bushing as I will describe below.

I have used a sawsall, or worst case a hacksaw to cut the bushing, sometimes you have to cut one side, sometimes two.

Then you take a cold chisel and a hammer and try to drive it betwen the bushing and the hole. Either the bushing will drive out, or start folding in on itself, since your hacksaw slice will give it someplace to go..
 
   / Need help with installing bushings on attachment plate #6  
I was thinking a shop with a laser cutter. Just about any way you remove the old bushings will result in having to eventually remove the ALL the old welds, too (and get enough clearance to fit the new bushings).

And those will have to be built up (refilled) with the new bushings. That's when you can get out of alignment with uneven fill and/or heat warpage. Probably cost you ~$100-150 shop time. (Sometimes, you can cause yourself ALOT more grief by trying to save a $100 bucks!!!)

Sorry, my initial posts were not clear... I finally cleared up the brain f@rt and remembered climbing in the cab... single large hyd ram..!

AKfish
 
   / Need help with installing bushings on attachment plate #7  
I think an 80 to 100 amp plasma cutter or oxy/acetylene torch would slice through those bushings, then knock out the pieces and weld in the new parts, with pin in inserted to keep the alignment. I made the mistake of welding each bushing one time without the pin in place, and had to do some serious reaming. You may still have to ream the bushings if they warp. What I suggest is, do most of the work your self, and have a professional welder come out to your place and weld things up, with everything assembled if possible .

The picture with the pin inserted in the bushings, are they in the correct position, are they welded from the inside of the bucket ears? Do you have a picture of the inside of the bucket ears?
 
   / Need help with installing bushings on attachment plate #8  
If your not 100% confident in your abilities plus having a torch or big plasma cutter and a good higher amp welder dont attempt it.

The old weldments need to be cut out with some precision or you will be filling up big gaps with welding rods or wire.

Then as mentioned in other posts about the new weldments being true and square, it's not enough to install the pin thru and start welding.

Also there is a bronze bushing that goes in the rod end of the cylinder your going to want to replace for it to be like new.

It's not a hard job to do it just requires some skill.
 
   / Need help with installing bushings on attachment plate #9  
If your not 100% confident in your abilities plus having a torch or big plasma cutter and a good higher amp welder dont attempt it.

The old weldments need to be cut out with some precision or you will be filling up big gaps with welding rods or wire.

Then as mentioned in other posts about the new weldments being true and square, it's not enough to install the pin thru and start welding.

Also there is a bronze bushing that goes in the rod end of the cylinder your going to want to replace for it to be like new.

It's not a hard job to do it just requires some skill.
 
   / Need help with installing bushings on attachment plate #10  
I had to replace 8 of those little suckers. A real PITA. Were I to do it again, I would get DOM tube of the correct size that was of a length to span from one side to the other and stick out of both sides. Then I would SLOWLY weld each side allowing LOTS AND LOTS of time for the metal to cool between beads. Then I would cut the tube off at the inside edge with a metal cutting wheel in a grinder. The material cost will be more, but the time spent would be less. Otherwise you will be like me and JJ, reaming it out to fit when it is twisted just a tweak.

You use a cutting wheel in a 4 1/4" or 7" angle grinder to cut the bushings flush. They should pound out pretty easy then.
 
 
Top