My YM2010d 3-point hitch is stuck up!

   / My YM2010d 3-point hitch is stuck up! #1  

smithboy

New member
Joined
Aug 3, 2014
Messages
14
Location
Carrollton, GA
Tractor
Yanmar 2010d, John Deere 2640, Deutz Allis 6250
In another thread, I am detailing the process of doing a clutch repair. However, in that process, I have realized that my 3 point hitch is stuck in the up position. I have read many of the threads related to this and have already removed un-screwed the valve under the seat...In fact, I have removed it completely...nothing moved and no hydraulic fluid came gushing out. I proceeded to remove the head on the cylinder (which contains the aforementioned valve screw), and I think the piston is stuck. There was a little oil in the cylinder, but it wasn't full. There also appears to be a thin coating of corrosion on the upper cylinder wall, probably because of it leaking down and not being full of oil. I have a few questions...

1) what is a good method for un-sticking a stuck piston?
2) can the piston be removed from the rear?
3) can a piece of wood or brass bar be positioned behind the piston to knock it forward?
3) do I need to completely remove the hydraulic assembly to do the piston removal from the front (if that's possible)?

Any helpful suggestions will be welcomed.
 
   / My YM2010d 3-point hitch is stuck up! #2  
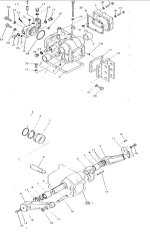
If you remove the top link bracket and slide the rockshaft out one side (fender might be in the way though) you can remove the arm #5 & rod #4 (pinned together). Then you can use a block of wood to drive the piston forward or rearward. You can do that while still on the tractor. In fact it might be easier on the tractor since it will stay put while you are beating out the stuck cylinder. If the piston is stuck in the up position it might be easier to drive the piston out the back.

1.jpg
 
   / My YM2010d 3-point hitch is stuck up!
  • Thread Starter
#3  
Ok, so here is part of the disassembly. I already had one fender off of the tractor in the process of working on the brakes, so that was a fortunate coincidence. I put a bunch of alignment marks on my lift arms and housing to help with re-assembly, but then noticed there are already some case markings and stuff to help with that...no harm in more. I disconnected the lift lever link on the right side. I removed the left lift arm with no problem...just take off the bolt and washer and tap it off the splines. I then removed the right bolt and washer. There is an alignment pin that you will have to contend with...mine was a little rusty and I had to work it around a bit to remove the washer. I removed the back toplink cover to expose the rock shaft, arm, and piston rod. The cover has two alignment pins that are really tight. It took a lot of smacks with a dead-blow hammer to loosen it. Once all that was off, I pulled the rock shaft out (I think that's the term for the spline shaft that is doing the lifting). Make sure to catch the multiple o-rings that are there along with the two splined sleeves. I had to push the rock shaft to the left, then to the right to remove all 4 o-rings and 2 sleeves. I found a pasty splined residue where I think my rock-shaft seals used to be a solid...So, I guess I need to get a couple of those. I thought this was old grease or maybe some dirt that had gotten caked into the splines of the shaft, but when looking at he parts diagram above, I realized THOSE USED TO BE PARTS! Now they are moist paste. Something very important to note...Because my piston is all the way to the back of the cylinder, I wasn't able to remove the piston rod #4 and arm #5 together. I used a piece of wire and a block of wood to hold still (for lack of a better word) the "elbow" of the two out of the back opening. Then I used a hammer and properly sized metal drift to knock the pin inward on one side. I am right-handed, so I knocked in the right side of the pin until it stuck further out on the left of the piston rod #4. I didn't have to remove the pin to disconnect the rod from the arm. Once it was about a quarter of an inch further left, the two slipped apart, and I could remove the two individually. Here are some pictures.

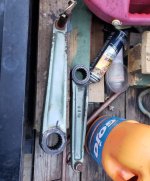
My lift arms removed...forced perspective makes one look bigger than the other, but that's just an optical illusion. They are the same size. In fact, they are identical and can be interchanged, I think.
lift arms.JPG

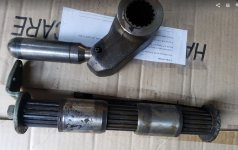
(Above) the piston rod #4 and arm #5 together again after removal. (Below) the rock shaft #6, splined sleeves #7 and end bolt and washers. O-rings are not pictured. I left them around the gear shift lever on the tractor. Also note, no seals #8 as mine were powdered!
internals.JPG

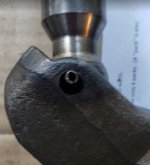
Here is the elbow I talk about above...I think there is supposed to be some play in this, but it does seem a bit excessive. Seems like a bushing or something should be filling some of this gap between the pin and the arm #4.
elbow.JPG

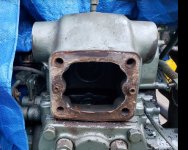
Here is the housing with stuff removed.
empty.JPG

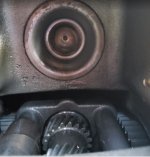
Here is a picture of the rear of the piston with everything above removed. I'll remove the 3-point cylinder head from the front of the assembly when I get a chance and attempt to remove the piston from the rear and evaluate the condition of the cylinder walls, o-ring and piston.
rearcylinder.JPG
 
   / My YM2010d 3-point hitch is stuck up!
  • Thread Starter
#4  
Oh, I almost forgot...Thank you, Aaron. You saved me from pulling the whole thing off and easily a few hours of work in the process. Everything I had read up until that point has said REMOVE IT ALL!!! Your method was much easier. I'll be contacting you about parts today.
 
   / My YM2010d 3-point hitch is stuck up!
  • Thread Starter
#5  
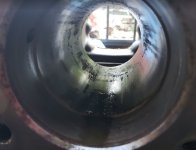
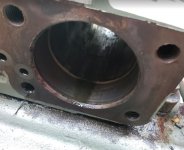
Ok, here is an update on this repair. I was able to get the piston unstuck from the 3 point lift cylinder. It wasn't easy, but I think it could have been worse if it had metal rings rather than plastic and rubber. The problem came from the fact that the piston was out the back just a smidge and got stuck there. I couldn't knock it out the back because I was unable to get a good swing on the hammer from the front of the cylinder. I tried, but failed. My best option was to hammer from the back. I soaked the cylinder from front and back with PB Blaster a couple of days before starting the removal. Then I used a hone to smooth out the cylinder walls toward the front...just enough to get rid of the rough spots. Then, when I started hammering, I started with my trusty dead blow hammer...no movement after about 30 minutes of hammering on the broad end of an oak pick axe handle. I graduated up to a 10lb sledge, where upon I split the oak pick axe handle...still with no movement. I finally combined a large round steel bar (about 1" in diameter with flat ends) with the 10lb sledge. The round bar was a tad smaller than the divot in the back of the piston, which made it a pretty solid fit, without too much movement. It took several hard licks to get the first TINY movement, but once it did move, I was able to keep spraying lubricant and it got easier. Here is a view of the cylinder once the piston was out. It looks worse than it was...the bottom looks scored, but it's partially just scrapes into the crud sitting on the bottom and not the actual cylinder wall.
cylinder3.JPG
cylinder2.JPG
cylinder1.JPG
After honing the cylinder, I was able to re-assemble everything, change the tractor transmission oil and it worked great! No leak-down, no sticking, everything appears to work as intended. My main question to anyone who knows...can these be re-bored and fit with an oversized piston, if the walls are too far gone?
 
   / My YM2010d 3-point hitch is stuck up! #6  
I would say yes...if you can find one slightly larger and can work the cylinder out to that size and if the rock shaft fits into the back the same. I don't believe this one was meant to do that, but if you have the know how you can machine about anything and make it work. You could also have a custom one machined at a shop to your specs and I would imagine it would work if done right and you can then find an appropriate o ring.
 
   / My YM2010d 3-point hitch is stuck up! #7  
If it's all working as intended , especially with your heaviest implement on it I wouldn't worry about it.
 
   / My YM2010d 3-point hitch is stuck up!
  • Thread Starter
#8  
If it's all working as intended , especially with your heaviest implement on it I wouldn't worry about it.


I agree. My question is more about what might be next if my repair isn't sufficient over time. I was just curious if anyone had faced a worn out cylinder and what they did to bring one back to serviceable condition.
 
   / My YM2010d 3-point hitch is stuck up! #9  
My question is what might be next if my repair isn't sufficient over time.
So long as the engine is running the linkage will sense the implement has drifted lower than intended, and will bring the implement back up. That might be a nuisance but the tractor is still usable for a long time until you get around to fixing it.
 

Tractor & Equipment Auctions

2010 Ford Taurus Sedan (A50324)
2010 Ford Taurus...
2013 Dodge Journey SUV (A50324)
2013 Dodge Journey...
Quick Attach EZ Axe Skid Steer Tree Shear (A52128)
Quick Attach EZ...
KUBOTA SVL97-2 SKID STEER (A51242)
KUBOTA SVL97-2...
2022 LEGUAN 190 SPIDER LIFT (A51242)
2022 LEGUAN 190...
2020 KUBOTA RTV X1100C UTV (A51406)
2020 KUBOTA RTV...
 
Top