Mounting a rear work light on the MT225E (XG3025), with questions

   / Mounting a rear work light on the MT225E (XG3025), with questions #1  

rbstern

Platinum Member
Joined
May 23, 2011
Messages
749
Location
GA
Tractor
LS MT225E, Yanmar 2210
Just like its immediate predecessor, the XG3025, the MT225E comes without a bunch of upgrades found on the XR series of tractors. The dash has available spaces for accessory switches for features that aren't there.

Can't just leave them blank like that, can we?

My first two adds are a rear work light and a horn. I had very good service from pod-style LEDs on a golf cart, decided I would use something similar for the rear work light. Ended up ordering a 36W "Auxbeam" brand LED pod from Amazon.

The MT225E has a threaded bracket welded to the ROPS on the left hand side. It looks like it's for a light. Figured I would start with that as a potential mounting spot. As it turns out, the Auxbeam fits like it was made for that bracket. The supplied bolts even matched the bracket's thread. Here's what it looks like:

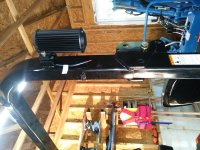
20190521_191235.jpg20190521_191250.jpg

After deciding on that mounting position, I started looking at the fuse box. One of the fuses is labeled "Work Lamp." Huh? This tractor doesn't have a work lamp. Fuse box lid must be a shared component with a tractor that does, or maybe the work lamp is an option on this tractor. But there was a fuse in that position. Checked under the dash...there's a wire there, too. So the tractor is wired for a work lamp. Started looking at the area behind the fuel tank and there are two wires with bullet style connectors, but not connected to anything. Gotta be the wires for the work light. Well, this project just got easier!

Anyway, wanted to confirm from anyone here who might know: Are those unused wires for the work light? And if so, how are they switched? Does the work light have a switch on it?
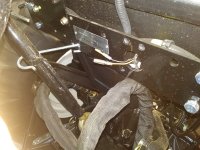
20190521_193255.jpg
 
Last edited:
   / Mounting a rear work light on the MT225E (XG3025), with questions #2  
The manufacturer uses one harness per model that accommodates all the options available. (Car makers do the same) There are probably connectors behind the dash were the switch would be placed.
 
   / Mounting a rear work light on the MT225E (XG3025), with questions
  • Thread Starter
#3  
The manufacturer uses one harness per model that accommodates all the options available. (Car makers do the same) There are probably connectors behind the dash were the switch would be placed.

No connector found for the work light, but strangely, there is a connector for a horn, which I don't believe is present. At least I have't seen it, if it's there. Maybe I need to short the terminals on that connector and see if the tractor honks?

The unused rear lead shown in my pic above gets power with the key. I wired the new light switch inline, after the fuse box, where a connector would have been. Have just a tad bit of fitting to snug up the switch in the dash cutout, and that rear work light is done. Works great, throws a ton of light. Will take some night pics and post them when I have a chance.
 
   / Mounting a rear work light on the MT225E (XG3025), with questions #4  
No connector found for the work light, but strangely, there is a connector for a horn, which I don't believe is present. At least I have't seen it, if it's there. Maybe I need to short the terminals on that connector and see if the tractor honks?

The unused rear lead shown in my pic above gets power with the key. I wired the new light switch inline, after the fuse box, where a connector would have been. Have just a tad bit of fitting to snug up the switch in the dash cutout, and that rear work light is done. Works great, throws a ton of light. Will take some night pics and post them when I have a chance.

Any way you could take a picture of the "horn" connector? Did you find the other end where a horn would tie in? I also have those same two wires behind the tank, also "always powered". The factory LS worklights have a switch mounted on the side of the light. Where did you tie the switch in? Are the wires the same color coming out of the fuse panel? I haven't had a chance to really dig into all the wiring and such...any help would be appreciated.
 
   / Mounting a rear work light on the MT225E (XG3025), with questions #5  
I ended up getting 5 cheapie blue led rocker switches, supposed to be "full size". They fit perfected side to side, but the length is too short, the "clamp fingers" will grab one end, but there's about an 1/8" gap at the other end. Are you having the same issue when you say "need to snug up the switches"? How are you going to do it?
 
   / Mounting a rear work light on the MT225E (XG3025), with questions #6  
I know the LED Lighting takes less current to give a good light which means you can run a higher wattage light and get more lights... but there is still a currect consideration to keep in mind.

Factory wiring always leave something to be desired... always wired for the low side of the current draw, I'm thinking the Factory for any Tractor, thinks one light is enough. Engineers..., they never use what they are redesigning, just want to cut the cost.

Just my opinion, and I know the response..., it is an easy thing to add a new homemade harness, no matter what the overall current is; use a fused power line from the battery to a relay and keep the relay and fuse as close to the battery as possible. Size the wire two sizes larger than required for the total current being drawn by the lights and all other components rated accordingly !

Wham-Ban... you have lights at the rear, at the front, and out the side of your Tractor and they will run efficiently and long lived !

p.s. Adding a homemade harness allows you to know for sure where the wiring is coming from and that is it up to the task.
I have wired numerous harnesses in Truck and Car, racing vehicles, trailers and Tractor Trailers, and have never had a complaint... did I use the Factory Wiring... NO, I never leave anything up to someone else where there is a safety factor... unless I can't do it !
 
   / Mounting a rear work light on the MT225E (XG3025), with questions
  • Thread Starter
#7  
Any way you could take a picture of the "horn" connector? Did you find the other end where a horn would tie in? I also have those same two wires behind the tank, also "always powered". The factory LS worklights have a switch mounted on the side of the light. Where did you tie the switch in? Are the wires the same color coming out of the fuse panel? I haven't had a chance to really dig into all the wiring and such...any help would be appreciated.

Will do the next time I have the dash apart. My horn is literally on a slow boat from China. Should be here in a week or two.

I did find one bracket on the opposite side of the firewall, near where the main ground wire comes thru the firewall. The bracket has two threaded holes, looks like it would be a perfect spot for a horn. Guessing that's where it normally goes;I was gonna put my horn out front near the battery, but the bracket may just be too easy. I didn't try to track down where the horn connector goes. Will investigate further, but I suspect the other end is capped and bundled in one of big wire sheathed looms under the dash. It's so neatly done, I don't have the heart to undo it.

The work light positive wire from the fuse box is yellow with a red stripe. It's the same wire as the rear positive wire we're talking about. Not sure where the negative wire is grounded, but it doesn't really matter, for switch purposes. The fuse box leads have a big, automotive style connector; you can disconnect that and one other connector so the lower dash with the ignition switch can be removed entirely while you work. You can also unbolt the fuse box and the entire assembly, including the connector, comes out easily. I cut the yellow/red wire between the connector and the fuse box and wired my light switch leads there. Would have like to have done it further downstream of the connector, but those big, neat looms didn't have enough slack.

FYI, I didn't have any of the bullet/bayonet style connectors that matched the rear work light leads, so I cut those off and used traditional spade connectors, with heat shrink sheathing over it for short and moisture protection.
 
   / Mounting a rear work light on the MT225E (XG3025), with questions
  • Thread Starter
#8  
I ended up getting 5 cheapie blue led rocker switches, supposed to be "full size". They fit perfected side to side, but the length is too short, the "clamp fingers" will grab one end, but there's about an 1/8" gap at the other end. Are you having the same issue when you say "need to snug up the switches"? How are you going to do it?

Yep. Same issue. I tried electrical tape, but it's too tight on the sides and doesn't add enough height. I will probably add a piece of cut-to-fit plastic to the top or bottom of the switch with some glue, as a shim. And then use a tie wrap, around the switch body's circumference, to keep it from backing out of the hole, after the switch is in position. Removing the switch in the future would just mean cutting the tie wrap.
 
   / Mounting a rear work light on the MT225E (XG3025), with questions
  • Thread Starter
#9  
I know the LED Lighting takes less current to give a good light which means you can run a higher wattage light and get more lights... but there is still a currect consideration to keep in mind.

Factory wiring always leave something to be desired... always wired for the low side of the current draw, I'm thinking the Factory for any Tractor, thinks one light is enough. Engineers..., they never use what they are redesigning, just want to cut the cost.

Just my opinion, and I know the response..., it is an easy thing to add a new homemade harness, no matter what the overall current is; use a fused power line from the battery to a relay and keep the relay and fuse as close to the battery as possible. Size the wire two sizes larger than required for the total current being drawn by the lights and all other components rated accordingly !

Wham-Ban... you have lights at the rear, at the front, and out the side of your Tractor and they will run efficiently and long lived !

p.s. Adding a homemade harness allows you to know for sure where the wiring is coming from and that is it up to the task.
I have wired numerous harnesses in Truck and Car, racing vehicles, trailers and Tractor Trailers, and have never had a complaint... did I use the Factory Wiring... NO, I never leave anything up to someone else where there is a safety factor... unless I can't do it !

My experience with Korean (and Taiwanese) electrical stuff is they don't cheat the way the Chinese do. The wire I found appears to be high quality, nice quality copper stranded, certainly appropriate size to the modest loads allowed by the fuse in question. For the 3 amps of LED lights I just added, it would be a waste to run more wire. The tractor is already neatly wired. Looks like it was done by designers and workers who care about the quality of the product. No concerns at all based on what I saw.
 

Tractor & Equipment Auctions

2011 Toyota Sienna Van (A50324)
2011 Toyota Sienna...
John Deere 1560 No Till Drill (A52349)
John Deere 1560 No...
2024 IR IRD25 HYD TRACK DUMPER (A51243)
2024 IR IRD25 HYD...
1968 International Harvester 856D 2WD Tractor (A50657)
1968 International...
Texas Post Driver Series 500 Heavy-duty Hydraulic Post Driver (A52128)
Texas Post Driver...
2018 GENIE GTH-636 TELESCOPIC FORKLIFT (A51242)
2018 GENIE GTH-636...
 
Top