You are using an out of date browser. It may not display this or other websites correctly.
You should upgrade or use an alternative browser.
You should upgrade or use an alternative browser.
Lets see your Woodworking Skills
- Thread starter hunterridgefarm
- Start date
- Views: 42713
/ Lets see your Woodworking Skills
#201
jerrybob
Elite Member
I only have a couple of other photos at the moment. First one is 60" wide and I made for outdoors above our fireplace mantel. The second photo is 42" wide that I made for a friend. His is going inside. Both were finished with a clear semi-gloss helmsman outdoor spar urethane. I put a couple of extra coats on mine since it was going outdoors. It's hard to tell in the pictures but one thing I also did was alternate the thickness of the stripes from 3/4" to 1". In person it adds a lot of dimension to the flag. And thanks for the complements. I've been envious of the work on this thread for some time. This is the first thing I've made worthy of contribution.
Flag5
Flag4
Very cool......beautiful work.:thumbsup:
dfkrug
Super Member
- Joined
- Feb 3, 2004
- Messages
- 7,604
- Location
- Santa Cruz Mtns, CA
- Tractor
- 05 Kioti CK30HST w/ Prairie Dog backhoe, XN08 mini-X
I recently made a couple of handcrafted flags from some reclaimed oak from an old
post and beam barn.
Another very creative project! Those stars do look very accurately chiseled. I think I would be out
of patience after the first 5 or 10. Nice work. Hand carving takes a lot of patience, as I am sure
Eddie and others can attest to as well.
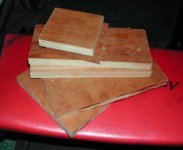
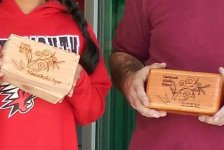
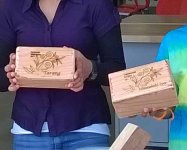
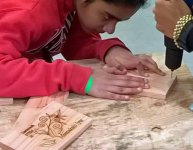
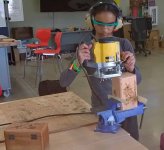
I have been volunteering at a local STEM-oriented middle school, showing kids how to use
hand tools and power tools. This year, I decided to have them build wood boxes that incorporated
a customized design cut with a CNC laser-cutter, as well as use a bandsaw, router, beltsander,
and electric drill. Not to mention nailing, screwing, sanding, and varnishing.
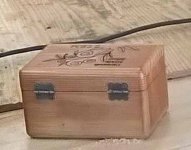
I donated some pre-cut fir planks, and made a prototype as a model.
The laser is an Epilog II, 75W unit, and I first created a design by tracing a bitmap using
CorelDraw. The text and final images are vector images that burn the wood
fairly deep.
Attachments

sixdogs
Super Star Member
- Joined
- Dec 8, 2007
- Messages
- 13,811
- Location
- Ohio
- Tractor
- Kubota M7040, Kubota MX5100, Deere 790 TLB, Farmall Super C
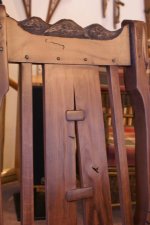
Here is a large cherry pantry with inset doors and two cherry cabinets. Wife wanted them wider than normal so I had to waste some wood but hey, she's worth it.
Pantry


Cabinet

Second cabinet


Pantry
Cabinet
Second cabinet
Last edited:
dragoneggs
Super Star Member
- Joined
- Jun 9, 2013
- Messages
- 13,627
- Location
- Seabeck, Washington
- Tractor
- Kubota BX-25D, Kubota Z122RKW-42
Hey Six, I can't open the attachments.Here is a large cherry pantry with inset doors and two cherry cabinets. Wife wanted them wider than normal so I had to waste some wood but hey, she's worth it.
Pantry
View attachment 503598 View attachment 503599
Cabinet
View attachment 503600
Second cabinet
View attachment 503602 View attachment 503603
dragoneggs
Super Star Member
- Joined
- Jun 9, 2013
- Messages
- 13,627
- Location
- Seabeck, Washington
- Tractor
- Kubota BX-25D, Kubota Z122RKW-42
Yep... very nice!Can you see them now?
ironman1952
Silver Member
- Joined
- Dec 7, 2023
- Messages
- 102
- Tractor
- 2023 Kioti RX7320pccb
Pics of two bass guitars I made.
The 5 string is a Walnut top on Maple, with a neck through of Walnut, Maple, and Purple Heart. The neck is Ebony, with Walnut headstock overlay.
The 4 string is a fretless (frets are maple inlay), Flame Maple on Mahogany.
The most difficult part of both was fretting the 5 string.
I will probably never build another - it took quite a while.
View attachment 501468View attachment 501469View attachment 501470
View attachment 501471
Great work, You know they firgure there are 90,000 different kinds of trees so its gonna take awhile to build something out of each one
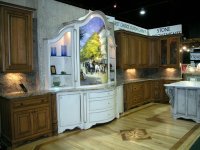
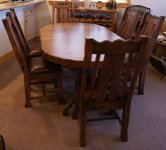
") I built this kitchen display in Atlanta at the 2005 Home show, and the table of alder and walnut for a doctor in Silverthorne Co.
I built this kitchen display in Atlanta at the 2005 Home show, and the table of alder and walnut for a doctor in Silverthorne Co.Attachments
2LaneCruzer
Super Member
Made a few of these just for fun; now...close to Christmas, I could sell all I can make!


EddieWalker
Epic Contributor
I forgot about this thread. It's nice to go back and see the pictures again!!!
I like your cutting boards. Why did you change the pattern on the bottom half of the cutting board?
I like your cutting boards. Why did you change the pattern on the bottom half of the cutting board?
