Tires Kama DIY Tire Repair

   / Kama DIY Tire Repair #1  

3RRL

Super Member
Joined
Oct 20, 2005
Messages
6,825
Location
Foothills of the Giant Sequoia's, California
Tractor
55HP 4WD KAMA 554 and 4 x 4 Jinma 284
Hi guys,
Thought I'd share this little detail with you guys.
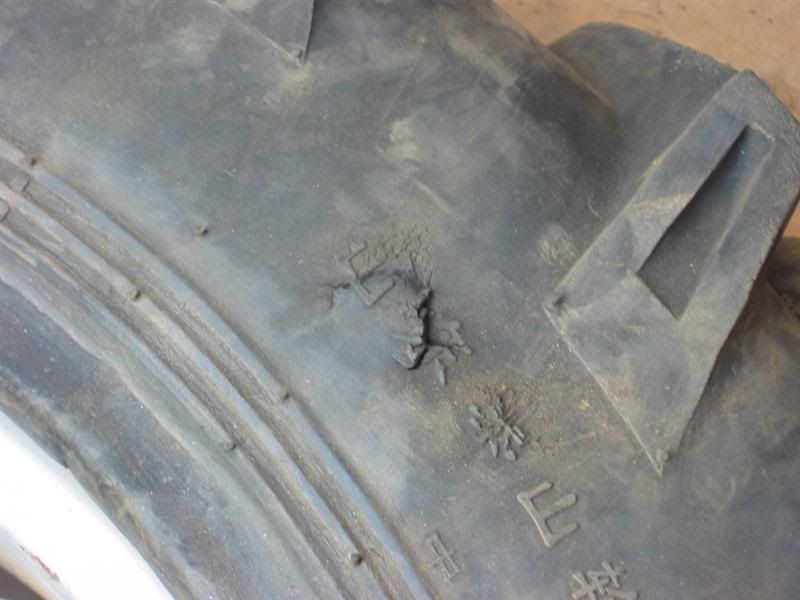
Somewhere in the mix of all the grading, pad building, rock moving and brush removal I managed to put a good sized gouge in the sidewall of my front tire. Probably when working in the rocks, the tire got pinched by the rocks.


It doesn't look that bad here, but the tear was sticking out completely (it's pushed back in here) and my inner tube was starting to bubble out. I figure I'd better do something about it before the tube blew out. The stock Ag-1 tires are still real good with little wear and I just could not see replacing the tire. And if I couldn't find the exact right size, I'd have to replace both, so my fronts would at least pull the same, even if they were a shade off the recommended front/rear ratio. I'm in the dirt all the time out here in the boonies....great....and no Kama dealer in sight.

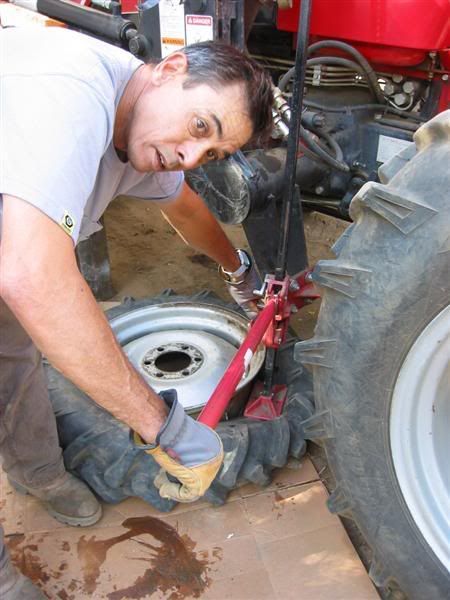
I blocked up my front end and took the tire off. I got loads of huge lumber now, like 12 x 12's and so forth. Also put blocks behind and in front of the rears. Anyway, I drained the liquid into a pan (my tires are loaded with anti-freeze and water) which took about 15 minutes. Then I had to figure a way to break the bead to get to the side wall for a repair. Anybody have to break the bead on those Kama 554 tires yet? My fronts are pretty big and they were on there tight. Plus those tread lugs are thick man.

So here's what I did. I got the farm jack and wedged the carriage under the tractor and the foot on top of my tire. Smashed the bead down, it was easy that way. Then I used pry bars to carefully get one side wall off the rim so I could remove the inner tube. Loretta was taking pictures as usual and telling me what to do.

 
   / Kama DIY Tire Repair
  • Thread Starter
#2  
My plan was to put something on the inside of the sidewall so the tube would not protrude.
Normally, I'd use a patch made from old tire or something like that but I had none. I even thought about cutting up an old pair of rubber boots for the patch until I saw a radiator hose. So I cut off a 2" long section and cut that so I could fold it open. It was pretty thick so I decided to grind some grooves in it to make a crease. That way it would not want to fold back to the round shape as much.

 
   / Kama DIY Tire Repair
  • Thread Starter
#3  
After shaping the patch, I got some rubber cement to glue it onto the inside of the tire wall. The patch would keep the inner tube from trying to "peek" out of the tear. The trick to using rubber cement is to coat the patch and inner wall with a thin layer of cement. Then let the stuff dry for at least 15 minutes but not more than 2 hours...at least that's what the instructions said.

After waiting a half hour, the instructions said put the patch into position making sure it's placed it exactly where it should go. If not, it is impossible to move the patch once it makes contact. Boy, they weren't kidding! As soon as the patch hit the sidewall, it was rock solid. Then I took my trusty K-Clamps and clamped the crap out of the patch. I used two pieces of wood to clamp, one inside over the patch and one outside over the sidewall... so the entire surface of the patch was being pushed to the side wall.


I left the patch clamped up for about an hour, then re-assembled the tire and seated the bead using soapy water and air only. Then deflated the inner tube again and poured in as much of the fluid as I could. I topped it off with a little more anti-freeze and water. That fixed the problem and my inner tube is safely hidden behind that patch. It's been about a month since I did this repair and so far so good.
Just something to remember if you're in a pinch. :)
 
   / Kama DIY Tire Repair #4  
Rob,

Great story and repair job using that rad hose. Looks like the jack took care of breaking the bead quite nicely. I wonder if putting the tire under the FEL and using down pressure would have worked?


Larry
 
   / Kama DIY Tire Repair #5  
Hi Rob

You done a good job with that tire.

There are special cold cure kits for repairing gouges and tears in large conveyor belts. They are ideal for the sort f repair you did - especially using the patch on the inside of the tire. I cannot for the life of me remember the name, but any conveyor belt manufacturer would be able to supply what you need. I have used these kits on large conveyor belts (96" wide by 1 1/2" approx size) thick belts to repair torn and damaged surface material - usually small tears.

Don't know if that helped or confused ya.

Jim (mariner)
 
   / Kama DIY Tire Repair #6  
Rob

You have a bead breaker "your backhoe"

Gemplers dose have a bolt on bead braker but i'm frugal some times and use my "hoe"

I lay tire on ground pit a short 2x4 on tire and push down with one tooth some times I have to rotate tire and hit the other side to completly knock it loose.

Then I breake out the tire irons and remove tire.
Rember to look at rim to see what way tire comes off (on my 4wheeler drop is tward rear of rim and will only come off that side)

I put patches in inside of tire when I had cut like your's
a medimum one then a bigger one over it.

My issue is reseating the bead (tubeless) some times it just wont make the right spot on rim even with a ratchert strap around tire.

tom
 
   / Kama DIY Tire Repair #7  
Nice read. next time you can simply use the large farm patches / boots sold at tube/tire stores / TSC..e tc.

My fronts on my NH 7610s are quite large, and i poked a hole in one of them 'bigger' than my thumb. I had a 6" patch put ont he inside as a boot to keep the tube from pushing thru. i have a season and a half on it right now with no issues.. except that the fronts are 95% bald.. and I'm to cheap to replace them.. yet!

your farm jack idea is good. Many of us do stuff like that.. AKA.. drive over the bead with another tractor or use a loader blade to pop it off.. etc. ingenuity is the mother of invention.

good job on your fix and saving the tire... it looked way too new to discard.

Perhaps you can really scrub the outside and then put a chemical patch on it to keep dirt/debri from getting into the flap.

soundguy
 
   / Kama DIY Tire Repair #8  
   / Kama DIY Tire Repair
  • Thread Starter
#9  
Wow, you guys are great and thanks for all the feedback guys.
I will keep the links and suggestions in mind for next time. I guess I had all kinds of tools to break the bead after all? Just didn't think of them. But the farm jack worked great too, so add that to your list.:)

It's kinda like the story about when I first got my new 3pt backhoe and it had collapsed down. I used a come-a-long and chain from my ROPS to hoist the backhoe up to mount it. Someone wrote why didn't I just plug the PTO pump in and use the backhoe hydraulics to erect it?:confused: LOL live and learn.

I'll be sure to buy a patch kit of some sort also. It's just I didn't really think of having a tire repair kit/tire irons around for an emergency like this. But I will from now on. It's fun to read how each of us overcome the little problems we have with different solutions.
Thanks,
 
   / Kama DIY Tire Repair #10  
3RRL said:
......the farm jack worked great too, so add that to your list.:)

I really liked the 'multi-tasking' use of the farm jack. I always think about lifting things 'UP' with a jack. Never thought of using the jack in reverse.

I'll file that idea for future reference.:)

Don
 
 
Top