Here's the text of what I found and a diagram attached:
If you want to make your own limiter chains, the following text and pictures (courtesy of Marshel Rossow) should be of help:
Limiter chains for three-point hitch
These chains are simple to make. The materials you will need are:
- Two 40-inch lengths of 1/4-inch chain. You probably could get by with two 36-inch chains. The chains could also be heavier, but there's no reason unless you have some chain lying around and want to use it.
-Four pieces of flat 1/4-inch steel, each piece measuring 2 inches wide by 3-1/4 inches long. Length and width could vary slightly.
Tools you will need:
-Drill press with 7/8-inch bit.
-Welder.
-Hacksaw.
-Rat-tail file.
(If lacking the oversize bit and a welder, you could get by with a half-inch drill with 1/2-inch bit and the rat-tail file. It's a bit of work, but you could file the holes open to the necessary size.)
To make the chains:
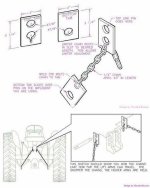
(1) Drill 7/8-inch holes in the four metal tabs as shown on the accompanying sketch -- two holes in each top tab, one hole in each bottom tab. Make sure your top-link pin will go through the holes. If not, use the rat-tail file to enlarge the holes slightly.
(2) In the bottom hole of the top tab, cut a 1/4-inch-wide slot about 5/8-inch deep as shown on the sketch. You can cut the slot by taking the blade out of your hacksaw, sliding it through the hole and reattaching it to the saw. When finished, you should be able to slide the 1/4-inch chain through the hole and drop any link into the slot; that's how you adjust the length of the chain. If the chain won't slide through the hole or drop into the slot, do some filing to enlarge the hole and/or slot.
(3) Weld the bottom tab onto one end of each piece of chain, as shown. If you don't want to weld, drill a half-inch hole toward the top of the two bottom tabs and bolt them to the chains.
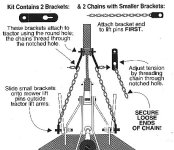
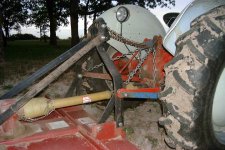
That's all there is to it. Attach the chains to the tractor and implement as shown in the sketches. To adjust the length of the chains (which in turn will determine how far down the lift arms can go), lift the implement with the hydraulic system, then pull the chains through the top tabs and slide a link into the slot. Make sure each chain is adjusted the same length or you'll have all the weight of the implement riding on only one of them. It will take some trial and error to determine the best working length for the chains. Once I found the proper length, I painted the links that go into the slots so I didn't have to go through the experiment each time I used them.
Once the chains are in place and the implement mounted, you can lift as high as you want, but if you must go lower than the chains will allow, you'll have to readjust their length. You may find that you have to get a longer top-link pin to fit through the top tabs. You can find longer pins at farm-supply stores, or you can make your own out of 3/4-inch or 7/8-inch round stock from a hardware store.
If anything I've explained here isn't clear, be in touch and I'll try to clarify. Good luck with this project.
Marshel Rossow
LIMITER-CHAIN ADDENDUM:
If you're using these chains in conjunction with drawbar stabilizers, you're likely to run out of room on the implement lift pins for the chain tabs. (This will be true whether you make your own or buy the chains.) What I did was bolt the tabs directly to my mower deck, using the same big bolts that hold the top-link arm to the deck. (I'm not sure about the technical name for this arm -- on my mower it's like a big, upside-down Y that bolts to two tabs on the deck, and the top link between tractor and mower attaches with a pin at the top end of the upside-down Y.) Regardless of your mower, you can probably find a logical place to attach the chain tabs somewhere at the front of the mower framework. At worst, you might have to drill a couple of half-inch holes. The only inconvenience is that if you want to use the chains on some other implement, you have to unbolt them. But it's the mower decks that really need the chains. Besides, once you've made one pair, you can make others for additional implements as needed.