Ridgeline Farmer
New member
I installed a detent floating valve on my tractor. The 1st thing I did was get the shifter cable and handle installed. There were a total of 6 bolts to remove to get the right side "console" loose.

Lower left of pic shows slot for bolt.

Can see location for top 2 bolts. Had to pop off plastic covers first.

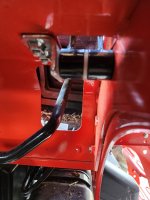
Location in middle of pic.

This bolt located below pto lever.

This bolt located at back bottom. I think bolts were 10mm.
Once I removed these bolts I had to detach the cover for the 3 pt lever and draft lever and slip it under the console to lift it up far enough to install the parts. I did not unplug anything and left pto lever alone. My very 1st pic shows the cover recessed down below the console.
I then routed the cable through the back and bolted the sheath to the bracket.
I removed the plug.

The cable came with its own flex plug.

I had to use a 17mm flare nut wrench to tighten the nuts. There isn't much room. You can see this towards top of pic. Once this was done I removed the bracket holding the shift lever. I used a 12mm socket. I discarded the metal spacer and installed a bushing and the the shifter and reinstalled and tightened bolts. It took a little patience to wiggle the 2 handles up into place.
.
This shows the 2 bolts holding bracket.

This shows metal spacer i removed and the bushing and handle that replaced it. After this I put a pin through the cable and handle to connect them, then put a cotter pin through end to secure it.
Once this was done I put the cover for the 3pt and draft back in place and then put all the bolts back on, making sure everything was OK. I then put both handles for the valve levers back on making sure I got colors correct.
.
This shows top of valve cover. It has 3 bolts to remove.

You can see in this image the thin plate that is sandwiched between the 2 valves. There is also a bracket bolted to this plate that locates the other end of the cable sheath.

I then assembled the connectors and plugs to the valve before placing it on top of the plate. I then reinstalled the valve cover with 3 new longer bolts included in kit. I then tightened the cable sheath to the bracket and attached the cable to the valve same as on the lever end. Done.
A few notes, it was tight working to install the cable and handle. There were no torque values. I just used my best judgement. The spacer plate and new valve have to be installed in specific direction due to o-rings. The cable was directional specific, so be aware of that.I found out there are 2 types of valves, at least for the RX anyway. Mine has a 3 bolt configuration. Some can have a 2 bolt configuration. So check yours if you plan on doing the work yourself. This is my 1st long instructional post. So I hope someone enjoys it. Also, this is to the best of my ability and don't take this as gospel!
Finally, sorry if I forgot anything.
PS: We lost power locally and I'm having problems posting a few last pics. Not sure if these 2 issues are related. But I will update when I can. Thanks for reading.
Lower left of pic shows slot for bolt.
Can see location for top 2 bolts. Had to pop off plastic covers first.
Location in middle of pic.
This bolt located below pto lever.
This bolt located at back bottom. I think bolts were 10mm.
Once I removed these bolts I had to detach the cover for the 3 pt lever and draft lever and slip it under the console to lift it up far enough to install the parts. I did not unplug anything and left pto lever alone. My very 1st pic shows the cover recessed down below the console.
I then routed the cable through the back and bolted the sheath to the bracket.
I removed the plug.
The cable came with its own flex plug.
I had to use a 17mm flare nut wrench to tighten the nuts. There isn't much room. You can see this towards top of pic. Once this was done I removed the bracket holding the shift lever. I used a 12mm socket. I discarded the metal spacer and installed a bushing and the the shifter and reinstalled and tightened bolts. It took a little patience to wiggle the 2 handles up into place.
.
This shows the 2 bolts holding bracket.
This shows metal spacer i removed and the bushing and handle that replaced it. After this I put a pin through the cable and handle to connect them, then put a cotter pin through end to secure it.
Once this was done I put the cover for the 3pt and draft back in place and then put all the bolts back on, making sure everything was OK. I then put both handles for the valve levers back on making sure I got colors correct.
.
This shows top of valve cover. It has 3 bolts to remove.
You can see in this image the thin plate that is sandwiched between the 2 valves. There is also a bracket bolted to this plate that locates the other end of the cable sheath.
I then assembled the connectors and plugs to the valve before placing it on top of the plate. I then reinstalled the valve cover with 3 new longer bolts included in kit. I then tightened the cable sheath to the bracket and attached the cable to the valve same as on the lever end. Done.
A few notes, it was tight working to install the cable and handle. There were no torque values. I just used my best judgement. The spacer plate and new valve have to be installed in specific direction due to o-rings. The cable was directional specific, so be aware of that.I found out there are 2 types of valves, at least for the RX anyway. Mine has a 3 bolt configuration. Some can have a 2 bolt configuration. So check yours if you plan on doing the work yourself. This is my 1st long instructional post. So I hope someone enjoys it. Also, this is to the best of my ability and don't take this as gospel!
Finally, sorry if I forgot anything.
PS: We lost power locally and I'm having problems posting a few last pics. Not sure if these 2 issues are related. But I will update when I can. Thanks for reading.