blksn8k
New member
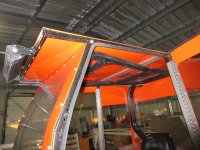
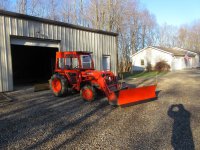
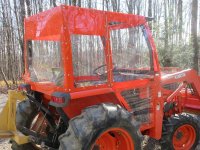
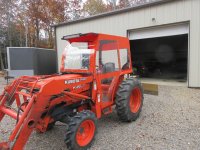
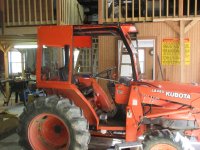
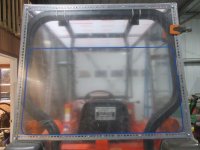
I finally decided to add a cab on my 1996 L2900 [AFFILIATE=1, nofollow=true, newwindow=true, title="Kubota"]Kubota[/AFFILIATE] tractor. Getting tired of dealing with nasty winter weather when plowing my 1/4 mile long lane. I did look at pre-fab'd canopies and soft cab enclosures that drape over a canopy but decided to build my own. Not only were those pre-fab'd parts expensive but they also would not fit over the rollcage I added several years ago.
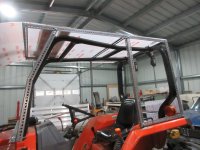
Instead I bought three 4x8 sheets of clear .118" thick shatterproof polycarbonate, several 1-1/2" x 1-1/2" x 6 ft long perforated steel angles and a crap load of 1/4-20 nuts, washers and bolts.
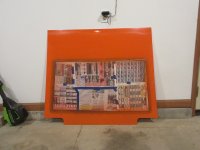
I decided because the plastic sheets are clear that it might make more sense to paint the inside surface rather than the outside. This is a work vehicle and I have been known to drive under low hanging tree limbs while brush hogging around the edges of fields and I didn't want those tree limbs to scrape all that pretty orange paint off. BTW, the paint is there mostly to provide shade in the summertime which also explains why I extended it down so far on the side and rear panels.
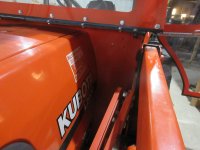
I'll probably add a 12V heater and I have an LED light bar that I added above the windshield.
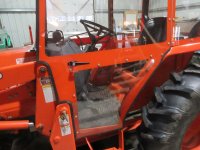
I was a little concerned about putting a bend in the middle of the windshield but it is surprisingly distortion free. The front section of the rollcage was made from discarded 2" tubing that was originally part of a cage I bought for my '75 Bronco. It already had bends where it fit behind the Bronco windshield and I decided to make the cab for the tractor fit the same contour. The tractor came from the factory with the rear hoop (ROPS bar), I just added to it.
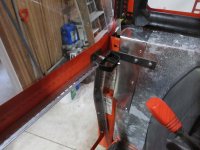
The doors hinge at the rear. I used stainless steel piano hinges and latches/handles made for shed doors. The latches also have keyed locks.
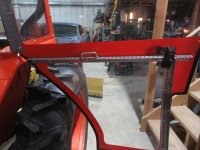
I also included an extension of the roof panel over the windshield to try and keep at least some of the crap from the weather off and also to provide a little extra shade. The frame for that also serves as a mounting surface for the light bar. I don't plan on taking it to Bonneville so I'm perry sure the aerodynamics will be fine.
Instead I bought three 4x8 sheets of clear .118" thick shatterproof polycarbonate, several 1-1/2" x 1-1/2" x 6 ft long perforated steel angles and a crap load of 1/4-20 nuts, washers and bolts.
I decided because the plastic sheets are clear that it might make more sense to paint the inside surface rather than the outside. This is a work vehicle and I have been known to drive under low hanging tree limbs while brush hogging around the edges of fields and I didn't want those tree limbs to scrape all that pretty orange paint off. BTW, the paint is there mostly to provide shade in the summertime which also explains why I extended it down so far on the side and rear panels.
I'll probably add a 12V heater and I have an LED light bar that I added above the windshield.
I was a little concerned about putting a bend in the middle of the windshield but it is surprisingly distortion free. The front section of the rollcage was made from discarded 2" tubing that was originally part of a cage I bought for my '75 Bronco. It already had bends where it fit behind the Bronco windshield and I decided to make the cab for the tractor fit the same contour. The tractor came from the factory with the rear hoop (ROPS bar), I just added to it.
The doors hinge at the rear. I used stainless steel piano hinges and latches/handles made for shed doors. The latches also have keyed locks.
I also included an extension of the roof panel over the windshield to try and keep at least some of the crap from the weather off and also to provide a little extra shade. The frame for that also serves as a mounting surface for the light bar. I don't plan on taking it to Bonneville so I'm perry sure the aerodynamics will be fine.

")