Going down the Top N Tilt path

/ Going down the Top N Tilt path
  • Thread Starter
#22  
Picks of first cylinder

Here's a pic of the top link cylinder with the new ends welded on. I ended up getting a $16 top link assembly and cutting off the ends. This allowed be to make them the desired length without having to weld in spacers of any kind. Welding was with a 120V MIG welder usign flux core wire (no gas). It was quite easy, even though this was the first time I've done electric welding (I have some minor experience with gas welding)

I've also got the control valve assemble put together and decided on a mounting position. I'm going for next to the operator's seat rather than below the loader control based on feedback in this thread. It will be mounted to the rops frame. Pics on that later.

Peter
 

Attachments

  • 37-49068-DSCN0806w.jpg
    37-49068-DSCN0806w.jpg
    28.8 KB · Views: 277
/ Going down the Top N Tilt path
  • Thread Starter
#23  
Re: Picks of first cylinder

Here's the other end of the top link cylinder. This cyinder has cost be about $140 as compared to $270 for the exact same thing from Gearmore. (P.S. We don't talk about the $450 welder I bought to do the job. Remember, I'm having fun!)

Peter
 

Attachments

  • 37-49069-DSCN0807w.jpg
    37-49069-DSCN0807w.jpg
    20.3 KB · Views: 250
/ Going down the Top N Tilt path #24  
Re: Picks of first cylinder

Nice looking work Peter! I didn't think the 110V welders would weld that much metal. What welder do you have? I'll have to bump that up on my want list /w3tcompact/icons/smile.gif

15-43440-790signaturegif.gif
 
/ Going down the Top N Tilt path #25  
Re: Picks of first cylinder

hayden, what did you do so the heat of welding won't compromise the seals ?

RCH
 
/ Going down the Top N Tilt path
  • Thread Starter
#26  
Re: Picks of first cylinder

It's a Hobart Handler 135 and was recommended by folks on this board.
 
/ Going down the Top N Tilt path
  • Thread Starter
#27  
Re: Picks of first cylinder

Bird described taking his top link cylinder to a hydraulic shop to have it shortened, fearing doing it himself for exactly the reason you mentioned (heat damage to the seals). He then watched then fully extend the rod, cut the end to shortend it, then reweld with no other handling other than extending the rod. His conclusion what "I coudl have done that myself". (Did I get it right, Bird?)

I just jumped straight to that conslusion. It's the benefit of others going before you. When you think about it, when fully extended both seals are in the center of the rod/cyl assembly and the welding is at either extreem end. After welding I could hand hold the cylinder in the middle where the seals are. Don't try this with gas welding where you really heat up the whole part, just Arc welding where the heating is more concentrated and localized.
 
/ Going down the Top N Tilt path #28  
Re: Picks of first cylinder

When we did my cylinders, we extended them fully. when we welded the rod end, we wrapped the rod with damp toweling, about 4" down from the weld. The metal directly around the weld heated nicely for proper penetration, while the rest of the rod, and seal, stayed cool. We did the same with the Cylinder end.

RobertN in Shingle Springs Calif
 
/ Going down the Top N Tilt path #29  
Re: Picks of first cylinder

<font color=blue>(Did I get it right, Bird?)</font color=blue>

Yep, that's about all there was to it. And like you said, I don't think I'd try it with a gas welder though.

Bird
 
/ Going down the Top N Tilt path #30  
Re: Picks of first cylinder

Great job!!

Where did you buy your cylinder?

What are the compresed and extened lenghts?

Thanks


Derek
18-29716-2120.gif
 
/ Going down the Top N Tilt path
  • Thread Starter
#31  
Re: Picks of first cylinder

Check out the main post. Details are all in there including spec sheets for many of the parts.

Peter
 
/ Going down the Top N Tilt path
  • Thread Starter
#32  
Re: Picks of first cylinder

That's a good idea. I'll try that on the next cylinder. The fixed lift-link that I ordered came in today so now I just need to cut off the ends and weld them to the second cylinder.

I also ordered the hydraulic outlet block for the 2910 and it's backordered, probably because we are all off doing TnT projects and have cleaned out Kubota's stock.
 
/ Going down the Top N Tilt path
  • Thread Starter
#33  
Next installment:

I finally settled on a placement for my TnT controls. After investigating the electric operated controls, I
decided to stay with the manual valves and placed them between the ROPS bar and seat. They are on an
angle to improve the position of the control handles (it actually came out quite well from what I can tell so far
despite no real experience using them yet). The hoses going to the cylinders all have quick disconnects and
the couplers are attached directly to the valve body. This eliminates 4 hoses and a mounting block of some
sort that would otherwise be required if the couplers were mounted separately from the valve body. The valve
positioning results in the couplers pointing out the back of the tractor and down at an angle to shed water.
The whole assembly is on the inside of the ROPS bar so hopefully it will be reasonably protected from attacking
branches while bushwacking. The valve control handles are still susceptable, but I can't see any way to
improve it sort of using electric valves or having pre-configured slots like on the grand L's.

The actual attachment to the ROPS is using straight bars that I got at the local HW store. I cut them to
length and welded them to the ROPS bar. This position for the valve required moving my flasher light from the
fender mount holes on the inboard side of the ROPS bar to the outboard side using mounting brackets. The
2710/2910 can be built up either way and my dealer happened to go the fender mount route. I visited the guy
who assembles the machines and as suspected he had a box of the brackets and gladly gave me two along
with the plastic plugs to fill the fender holes. The flashers will be more vulnerable to branch attacks, but what
else is a tractor nut to do?

So far so good, but I still have to connect the hoses and figure out how to tap into the return line to the tank.

Photos attached in collage format inspired by Harv,

Peter

<P ID="edit"><FONT SIZE=-1>Edited by hayden on 08/16/01 05:22 AM (server time).</FONT></P>
 
/ Going down the Top N Tilt path #34  
<font color=blue>Photos attached in collage format inspired by Harv</font color=blue>

Guess I wasn't inspirational enough. Where's the attachment? /w3tcompact/icons/crazy.gif

HarvSig.gif
 
/ Going down the Top N Tilt path
  • Thread Starter
#36  
Silly me. I meant to post in both places. Here's the attachment this time.
 

Attachments

  • 37-63815-tntcontrol.jpg
    37-63815-tntcontrol.jpg
    62.4 KB · Views: 301
/ Going down the Top N Tilt path
  • Thread Starter
#37  
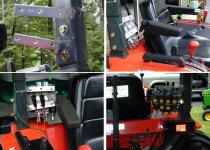
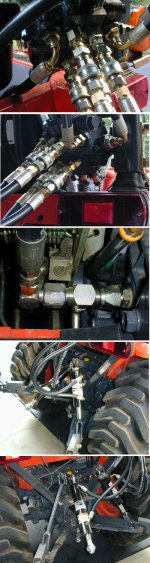
Here's what I think is the final installment of my TnT project. The other day I posted the final placement of the control valve. Since then I painted the valve and mounting bracket to match the ROPS bar, plumbed up all the lines, including full power beyond for the hydraulics, and welded together the tilt cylinder and ends.

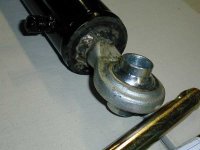
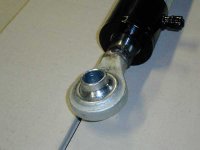
On the 2910 there are some funky angles between the tilt cylinder and the brackets that attach the cylinder to the lift arms and draw bars. I made these by first purchasing from Kubota another fixed side link for about $30. I then cut off the ends leaving just enough stub so the ends could be easily welded to the cylinder while preserving the desired angles. I also ensured that I got the correct end brackets and hole sizes etc. This worked out pretty well and it's visible in the attached picture series. The only draw back is that the cylinder and brackets, when completely retracted, is only a tad shorter than the fixed link so I don't have much tilt in one direction. I intend to rectify this by using the old adjustable link on the "fixed" side and adjusting it so it's the same length as the tilt cyinder when half extended. That way I'll get equal tilt in either direction. The only drawback is that I'll be giving up some lift height, but I think that will be OK.

The only other hassle in all this was hooking up the return lines to the trans case (not the PB line, the low pressure return/drain). I had a real challenge finding fittings that lined up leaving room for the hoses and providing clearance for all the other stuff that's in the way. The cruse control guts on the 2910 is very much in the way. I ended up with a series of JIC 39 connectors, and everytime I'd tighten one the assembly would turn a bit and cause another one in the chain to come loose. It's a good thing it's a low pressure line or I'd be leaking all over the place.

Another tip for others: Consider flow restrictors. I'm going to check them out. Even at idle, the cylinders can move very abruptly and make for challenging fine adjustments even with the feather control on manual valves. For anyone considering using electric on/off control valves the flow restrictors will be an absolute must. I can't imagine controlling the TnT with just full-on and full-off controls without major flow restriction.

What's the bottom line? I spent about $800 on parts to make this inclusive of all valves, hoses, connectors, fittings, cylinders, and links. The results work well and the links are the correct length/size and the end fittings, especially on the side link, are all correct. The total cost was about what a Gearmore kit costs BEFORE you buy all the hoses and fittings, so it's clearly less expensive. My hoses and fittings were over $300 so it's a big adder to the gearmore kit. But, I also spent a bunch of time and bought a welder that was almost $500. I consider that part fun - others may view it otherwise.

If I were doing it all over again and I could get a properly fitted, fully installed TnT for under $1000, I'd buy it. Otherwise I'd probably go do it all again. After all, I learned to weld with a mig welder.
 

Attachments

  • 37-64866-tnt2.jpg
    37-64866-tnt2.jpg
    185.7 KB · Views: 317
/ Going down the Top N Tilt path #38  
Peter,

That's some of the best digital pictures I've seen yet. Wow!

What is the make and model of the camera? Talk about attention to detail... those were super sharp and vivid! /w3tcompact/icons/blush.gif

18-35197-JD5205JFMsignaturelogo.JPG
 
/ Going down the Top N Tilt path
  • Thread Starter
#39  
Thanks - and that's after reducing the resolution by 4x.

It's a Nikon Coolpix 800. The base pictures were 1600x1200 and I reduced to 400x300 to fit the screen.
 
/ Going down the Top N Tilt path #40  
Hayden,

I figured you would end up with a great looking job and I was right. One of these days I am going to leave the wood for a while and learn how to play with metal. Keep us updated as you get a few hours with the T&T.

MarkV
 

Marketplace Items

2023 Stearling Trailer (A60352)
2023 Stearling...
POLARIS RANGER 1000 RTV (A62130)
POLARIS RANGER...
2017 Freightliner M2 106 AWD Terex Hi-Ranger 5TC55 55ft. Insulated Material Handling Bucket Truck (A60460)
2017 Freightliner...
New/Unused Landhonor 50 Ton Capacity Hydraulic Shop Press (A61166)
New/Unused...
UNUSED KJ 20' BI PARTING GALVANIZED GATE (A62131)
UNUSED KJ 20' BI...
2022 Peterbilt 579 T/A Day Cab Truck Tractor (A61568)
2022 Peterbilt 579...
 
Top