GC 2300 getting ready to grind stumps

   / GC 2300 getting ready to grind stumps #1  

massey driver

Gold Member
Joined
Aug 15, 2009
Messages
453
Location
north of winnipeg canada
Tractor
massey 175,1655 BX 2370-1
I had made a stump grinder for the 3pth on my MF 1655 now that I've gotten older decided to make it fit onto the front on my GC2300.It's to hard on my neck and back to have to keep looking behind.So first step is to take the 3pth stuff off and make a sleeve to fit onto the quick hitch.I'am thinking about making it have a :thumbsup:side shift so using a square shaft into a tube with hopes of it sliding back and forth that way.Larry;)
 

Attachments

  • Digital camera pictures 254 (Small).jpg
    Digital camera pictures 254 (Small).jpg
    42.9 KB · Views: 351
  • Digital camera pictures 253 (Small).jpg
    Digital camera pictures 253 (Small).jpg
    47.2 KB · Views: 241
  • Digital camera pictures 252 (Small).jpg
    Digital camera pictures 252 (Small).jpg
    43.9 KB · Views: 162
   / GC 2300 getting ready to grind stumps
  • Thread Starter
#2  
The next step,day two.Put the stump grinder up to the quick hitch to try and figure out what to do.:confused:This is what I came up with,I didn't want to weld the frame to the stump grinder just in case It won't work out like what Ia'm hoping it will.This way I can always rebolt the 3pth stuff back on and use it on the MF 1655.Anyway this is what I came up with and hoping it'll work to my satifaction:thumbsup:.I'll have to do more tomorro:confused:Larry
 

Attachments

  • Digital camera pictures 250 (Small).jpg
    Digital camera pictures 250 (Small).jpg
    50.2 KB · Views: 316
  • Digital camera pictures 251 (Small).jpg
    Digital camera pictures 251 (Small).jpg
    46.7 KB · Views: 263
  • Digital camera pictures 255 (Small).jpg
    Digital camera pictures 255 (Small).jpg
    46.7 KB · Views: 203
   / GC 2300 getting ready to grind stumps #3  
Larry- I'm always amazed by your inventiveness! Had you considered the RPM difference? It looks like you'll be working off the mid-PTO instead of the rear; aren't they quite different in RPMs... or is that not the case here? WBB in NH
 
   / GC 2300 getting ready to grind stumps
  • Thread Starter
#4  
Larry- I'm always amazed by your inventiveness! Had you considered the RPM difference? It looks like you'll be working off the mid-PTO instead of the rear; aren't they quite different in RPMs... or is that not the case here? WBB in NH

The pto rpm on will work out just about perfect.The MF1655 rear pto rpm is a 1800 while the mid and front on the 1655 is 2200 so with the GC2300 the mid is 2000 rpm I'am hoping its going to work way better then what it did on the rear.At least I won't need to look backwards and end up with a sore neck.Once I get going this morning I'll get it mounted onto the tractor and try it out.Let you know what it like tonight.Larry:D
 
   / GC 2300 getting ready to grind stumps
  • Thread Starter
#5  
Mounted the stump grinder onto the tractor this morning and went out and gave it a try.Just used a couple of c-clamps to keep it from walking side to side.:thumbsup:It worked so good that I went and ground out over a dozen stumps today.I also found out that it's way different using it on the front,compared to the rear.It works so good that I won't have to make it side shift after all.:laughing:All I need to do is move back and forth with the hydro pedal and turn the steering wheel,either way and it works like having a side shift.I'll just drill a hole right through one spot and put a bolt through to keep it from sliding side to side,and not bother with the side shift at this time.At least the option is there if I ever want to make the side shift work.The way it works not has me amazed at how well it works on the front.Had to take it off and put the snowblower back on as the weather here is supposed to turn cold and nasty.Even getting some snow right now,so may have to blow snow in the morning.Larry:D
 

Attachments

  • Digital camera pictures 258 (Small).jpg
    Digital camera pictures 258 (Small).jpg
    70.1 KB · Views: 278
  • Digital camera pictures 257 (Small).jpg
    Digital camera pictures 257 (Small).jpg
    60.4 KB · Views: 295
  • Digital camera pictures 256 (Small).jpg
    Digital camera pictures 256 (Small).jpg
    59.8 KB · Views: 817
   / GC 2300 getting ready to grind stumps #6  
Really neat! I've heard of them, but have never used --or seen-- a "stump grinder." What's the business end look like? Kinda like a shaper head?

I've removed & then put away my blower... doesn't LOOK like we're in for any more snow this year... course, I've been fooled before!

Larry- I also acidentally discovered a 2-minute --or less!-- install for the FEL the other day. (It has taken me in the neighborhood of 10-12 minutes in the past, with some foul language.) Let me know if you're interested in hearing about it- maybe you've discovered it, too. Can't believe how simple & quick it is, and that I hadn't figured it out before.:ashamed:
 
   / GC 2300 getting ready to grind stumps
  • Thread Starter
#7  
Really neat! I've heard of them, but have never used --or seen-- a "stump grinder." What's the business end look like? Kinda like a shaper head?

Larry- I also acidentally discovered a 2-minute --or less!-- install for the FEL the other day. (It has taken me in the neighborhood of 10-12 minutes in the past, with some foul language.) Let me know if you're interested in hearing about it- maybe you've discovered it, too. Can't believe how simple & quick it is, and that I hadn't figured it out before.:ashamed:

Sure I'am always interested in making things work out easier.What I do is get close enough to hook up the hydralic quick connects and then extend the lift arm cylinders untill they touch the tractor mounts.I then slowly drive ahead at the same time as I bring in the cylinder's.It seems to walk onto the mounts pretty good that way.Of course thats what I do but if you have a simpler and better way I'am always ready and willing to learn simpler and easier ways.
The stump grinder head has 4 teeth 2 left and 2 right.There made from the straight cutting tool bar of a metal lathe.I leave one straight and bend one either to the right or left.There spaced out evenly along the 10" round wheel.I put two of them together and drill a 1/2" hole between then causing each one to have a halve of a hole this is what keeps them from flying out.Of course there sandwiched between two plates that have guides on each side of them holding them from turning between the plates.It works really good.There carbide teeth so they take a lot of abuse.I've encountered some stones in or around the stumps .They have stood up really well over the years.I'am on my second set since building it and it's removed upwards of 200 stumps to date.I have 40 acres of bush and 15acres is open so lots of bush trails equals lots of stumps.When we moved here it was pretty much all trees so over the years opened up more and more which equals stumps.So thats why the stump grinder and thats why so many stumps.:thumbsup:

Lets hear about the easier way of mounting the loader[others maybe interested also] Larry;)
 
   / GC 2300 getting ready to grind stumps #8  
It occurred to me after my previous post that others might also be interested... I checked again this afternoon to make sure I wasn't dreaming; I wasn't. Two minutes or less. (Took it off and put it back on, just to be sure.)

In the past I had always tried to follow the directions in the book, but I suppose I'm just not familiar enough with the controls to operate two motions (the RIGHT two:ashamed:) at the same time, or in the proper sequence. I've --albeit briefly-- flown a chopper, but the FEL was a bit beyond me, I guess-- I'm still working on walking and chewing gum at the same time!

Anyway, it works, on and off, using only one control-- that I can handle!:D

I'll take some pics and post back soon.

I'm in the process, soon, I hope, of clearing some land... I'd planned to dig up stumps. Most are smallish, but there's a few big ones. So what happens after you grind the stumps-- just leave them to decompose?
 
   / GC 2300 getting ready to grind stumps
  • Thread Starter
#9  
irvingj; I'm in the process said:
What happens in the yard on the lawn area is I grind them below the surface 4" fill the void with soil,put down grass seed and the its grass to cut.:thumbsup:Out in the bush trails I just take them down to the ground surface or just a bit below and leave them be.No more stump to hit with the mower when cutting the trails and no more stump to have to drive around and over.:laughing:Nature does the rest. Will be nice to see the pictures of the loader install etc" Larry
 
   / GC 2300 getting ready to grind stumps #10  
OK, here it is. Perhaps not earth-shattering, but it certainly made it easier for me!

1. Raise FEL, tilt bucket downward, not quite 90 degrees
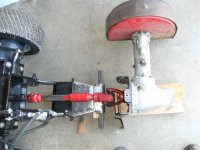
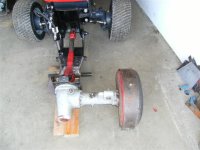
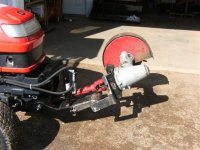
2. Lower edge of bucket onto dolly/roller/flat 4-wheel dolly, etc., with edge toward front of dolly (I'm using one of a set of 4 car wheel dollies.)
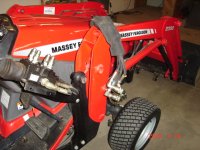
3. Apply slight down-pressure with joystick; removable locking pins will both go slack
4. Shut off engine- not needed anymore
5. Remove side pins
6. Push joystick tilt control to right, to allow FEL to lower itself flat onto the dolly. As it does so, dolly will roll forward and FEL rear arms will rotate forward away from side pins. (This will also bleed off hydraulic pressure.)

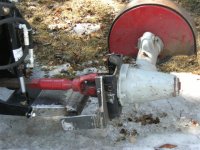
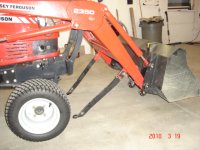
At this point, hydraulic lines can be disconnected fairly easily, as the bucket is still close enough that the lines aren't stretched tight, as I've found they are when following the book, a real help when putting FEL back on!

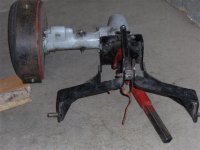
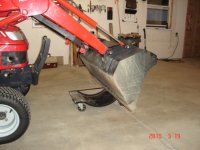
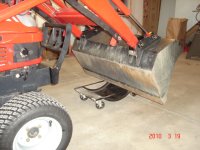
7. Lower the FEL "feet" and place on floor. My dolly sits about 4" high, so there's enough height to do this, even with FEL flat on the dolly.
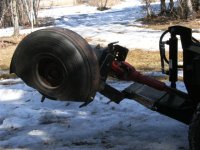
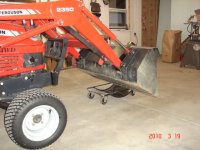
8. Manually lift the FEL arms up and out of the lower pin sockets. This is easier than it sounds- there's only about 35 lbs (or less-I'm guessing here) of weight to lift on each side. (If you're real thin like I am, you can get in the middle between the grille guard an the FEL and lift both arms at the same time, but they can also be lifted one at a time from the sides.)
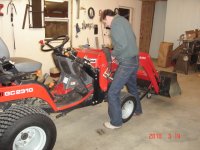
That's it- start tractor and back away. In my garage, I can easily move the FEL around by lifting slightly on both arms and rolling it around.

Putting FEL back on is pretty much the reverse- roll FEL out, drive tractor up close so lower pins are next to their sockets --they'll be just below the sockets-- lift arms up and drop lower pins in sockets, hook up hydraulics, start tractor, tilt bucket downward, and put side locking pins in when the holes line up. Raise bucket, stow "feet" and drive away. Again, because FEL is close, the hydraulic lines are MUCH easier to attach.

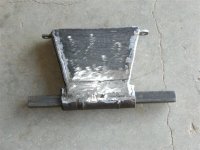
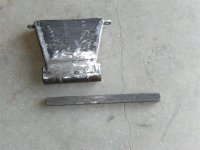
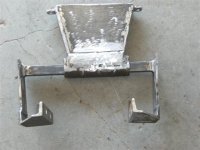
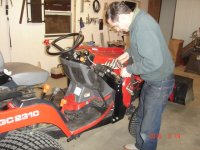
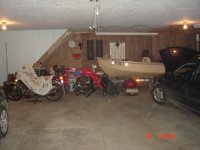
In the one pic of inside the garage, you can see the FEL "in storage," sitting on its feet and the dolly. quite easy to move around.

Hope you can follow this!
 

Attachments

  • DSC02705.JPG
    DSC02705.JPG
    144.7 KB · Views: 201
  • DSC02706.JPG
    DSC02706.JPG
    139.8 KB · Views: 198
  • DSC02707.JPG
    DSC02707.JPG
    155.4 KB · Views: 145
  • DSC02709.JPG
    DSC02709.JPG
    153.1 KB · Views: 205
  • DSC02710.JPG
    DSC02710.JPG
    156.7 KB · Views: 158
  • DSC02714.JPG
    DSC02714.JPG
    143.4 KB · Views: 223
  • DSC02715.JPG
    DSC02715.JPG
    149.2 KB · Views: 183
  • garage 3:09-1.JPG
    garage 3:09-1.JPG
    160.8 KB · Views: 192
 
Top