3RRL
Super Member
- Joined
- Oct 20, 2005
- Messages
- 6,931
- Tractor
- 55HP 4WD KAMA 554 and 4 x 4 Jinma 284
This last week we had to do the usual road repairs at the ravine switchback. We decided to widen it and build it up another foot and also add more boulders around the sides of the land bridge. I had to dig into DG and get a bunch of boulders. I was driving up some steep embankments to get them. In doing so, I got my left front drive casting smashed against a boulder as I was driving over a bunch of them and developed a leak where the oil seal is.
As a side note, I have 575 hours on the Kama clock now. I noticed that over 2 days of work ... about 16 hours or running the tractor doing this repair, building a garden shed pad and then grading the road, I had clocked only 6.4 hours on the meter! I run the tractor (usually) between 1500 and 1800rpm. I wonder how many hours I truly have on this tractor now?
My finger (gloved) is pointing to the leak and seal which is sandwiched between the upper and lower drive castings.
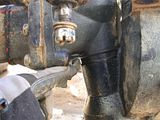
I was hoping it was just an oil seal or "O" ring or something easy to fix.
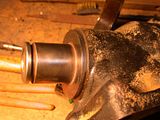
So I took the tire off and started to dis-assemble the front drive. I took the top bracket off which captures the upper and lower castings together. Then I slid the big lower drive casting down and off. The top casting which bolts to the end of the axle housing has a one-piece machined sleeve on it that fits into the bottom casting.
It looks like this normally (one-piece) casting.
To my disappointment, I found that the machined sleeve had broken off clean and was stuck in the bearing and mating sleeve in the lower half. These pictures show it when I took it apart. Then I pried out the broken off piece and put it next to where it should go in the last photo.
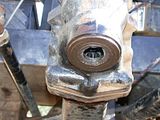


Holy crap, how am I ever gonna fix that and make it strong enough?
I've been considering calling Chip to order a new casting, but I have a plan to repair it myself first. It will force me to set up one of the milling machines (finally). So I had a lot of prep work to do such as run some 3 phase electrical, level and tram the mill and lube it all up. Then I will have to open all the boxes that contain my cutters, end mills, drills, clamps, indicators etc before I get started.
I've been running around like a chicken with his head cut off ... shees.
Rob-
As a side note, I have 575 hours on the Kama clock now. I noticed that over 2 days of work ... about 16 hours or running the tractor doing this repair, building a garden shed pad and then grading the road, I had clocked only 6.4 hours on the meter!
I run the tractor (usually) between 1500 and 1800rpm. I wonder how many hours I truly have on this tractor now?My finger (gloved) is pointing to the leak and seal which is sandwiched between the upper and lower drive castings.

I was hoping it was just an oil seal or "O" ring or something easy to fix.
So I took the tire off and started to dis-assemble the front drive. I took the top bracket off which captures the upper and lower castings together. Then I slid the big lower drive casting down and off. The top casting which bolts to the end of the axle housing has a one-piece machined sleeve on it that fits into the bottom casting.
It looks like this normally (one-piece) casting.

To my disappointment, I found that the machined sleeve had broken off clean and was stuck in the bearing and mating sleeve in the lower half.
These pictures show it when I took it apart. Then I pried out the broken off piece and put it next to where it should go in the last photo.


Holy crap, how am I ever gonna fix that and make it strong enough?
I've been considering calling Chip to order a new casting, but I have a plan to repair it myself first. It will force me to set up one of the milling machines (finally
). So I had a lot of prep work to do such as run some 3 phase electrical, level and tram the mill and lube it all up. Then I will have to open all the boxes that contain my cutters, end mills, drills, clamps, indicators etc before I get started.I've been running around like a chicken with his head cut off ... shees.
Rob-


