I thought I would share details on my first tractor project. In January 2008, I took delivery of a great little Kubota BX1850 with the 54" plow. With all the snow we had here in Minnesota this year - it has performed wonderfully. The 54" plow has the hydraulic lift, but manual angle. Kubota offers a 60" plow that comes with standard hydraulic angle, but is considerably more expensive. So, I decided to add angling capabilities to my manual blade myself. After testing different mock-ups, I decided (with consultation with my wife) to keep it simple. Originally, I designed a mounting bracket similar to what Kubota uses, but it involved more steel fabrication. After mentioning this to my wife, she simply stated "mount a bracket on the subframe and attach the cylinder to it." Hmmmm... not a bad idea keep it simple but functional.
All of my parts were obtained from various internet sources, except for the steel and paint, which were obtained locally.
Cylinder 2 bore 4 stroke eBay $56 includes shipping
Hoses and miscellaneous fittings Surplus Center $47 including shipping
Snap-Tite couplers Snap-Tite $30 includes shipping
Steel Local - $35
Paint Local farm store $3
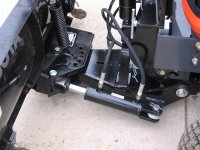
After acquiring all the parts I needed, my first step was to position the cylinder. To provide the most movement and maintain adequate clearance for the cylinder, I cut away a portion of the plow's quick hitch assembly. To reinforce what I cut away, I had two steel plates with stiffeners fabricated. I used 3/16 stock as it matched what Kubota used. I welded the fabricated plates to the original plow hitch. Once welded in place, I drilled the hole for the cylinder pin. From there, I was able to position the bracket on the subframe. This bracket was fabricated out of 1/2" stock. To provide it a little more stability, I flared the ends, so there would be more to weld to the frame.
Next, I connected the hoses and fittings, and connected it to the tractor's hydraulics. After a few test runs, I am happy to say, it works well. I brought it back into the shop and primed and painted the assembly. Not only did the project save me money, it also provided quite a bit of enjoyment. The only problem I have experienced is that the hydraulic cylinder leaks a little fluid. I think one of the seals is bad. Oh well..... On to the next tractor project.
All of my parts were obtained from various internet sources, except for the steel and paint, which were obtained locally.
Cylinder 2 bore 4 stroke eBay $56 includes shipping
Hoses and miscellaneous fittings Surplus Center $47 including shipping
Snap-Tite couplers Snap-Tite $30 includes shipping
Steel Local - $35
Paint Local farm store $3
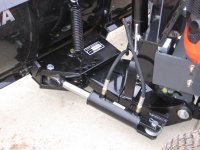
After acquiring all the parts I needed, my first step was to position the cylinder. To provide the most movement and maintain adequate clearance for the cylinder, I cut away a portion of the plow's quick hitch assembly. To reinforce what I cut away, I had two steel plates with stiffeners fabricated. I used 3/16 stock as it matched what Kubota used. I welded the fabricated plates to the original plow hitch. Once welded in place, I drilled the hole for the cylinder pin. From there, I was able to position the bracket on the subframe. This bracket was fabricated out of 1/2" stock. To provide it a little more stability, I flared the ends, so there would be more to weld to the frame.
Next, I connected the hoses and fittings, and connected it to the tractor's hydraulics. After a few test runs, I am happy to say, it works well. I brought it back into the shop and primed and painted the assembly. Not only did the project save me money, it also provided quite a bit of enjoyment. The only problem I have experienced is that the hydraulic cylinder leaks a little fluid. I think one of the seals is bad. Oh well..... On to the next tractor project.
Attachments
Last edited:
